Victory Day is a wonderful holiday! The population of our country celebrates this day with special pride. in schools and other educational institutions, as a rule, creative lessons are held, where children get acquainted with the history of this holiday and make crafts. Such products may be great gift for a veteran or they can be put up for competition. In general, for you in this article we will list various crafts by May 9 that you can bring to school. Our ideas should please you.
Crafts for Victory Day
Order.
To make the first craft, you will need a minimum of materials and a little effort. So, from the materials it is worth preparing:

- Cardboard white color,
- yellow colored paper,
- Blue and white crepe paper
- George ribbon,
- Scissors and glue.
Progress:
- First of all, cut out a circle from white cardboard.
- Into this circle with a simple pencil fill in the outline of the dove.
- Cut out squares from blue crepe paper. Roll them between your palms into small but dense balls. Do the same with white corrugated paper.
- First, fill the figure of a dove around the office with white balls.
- When the dove is filled with balloons blue color the remaining space must be filled.
- A star is cut out of yellow colored paper. Bend it and iron along the edges.
- Now start collecting crafts. Glue the circle with the dove to the star. Now it remains to glue the St. George ribbon.


Craft in the technique of facing.

- Cardboard or paper
- corrugated paper.
- ruler and pencil,
- PVA glue and scissors.
Progress:

Spring star.
The symbol of May 9 is the spring star. Indeed, this symbol is used to decorate all postcards and leaflets that are dedicated to this holiday. Now we will tell you how to make a beautiful star quickly from step by step materials. To create a craft you need to use: 
- Cardboard or paper
- Pencil, scissors, ruler and PVA glue.
Progress:


Paper composition.
If you don’t know how to make crafts for May 9, then use the ideas of this publication. We suggest you make the next craft out of paper. This material is considered the most accessible. Therefore, it is used quite often to create various kinds of products. To create a product you need to prepare:
- colored cardboard,
- Colored paper: red, white and yellow,
- Scissors, pencil and PVA glue.
Progress:
- Crumple the red paper, tear off pieces from it and roll them into balls.
- Fold a sheet of cardboard in half. Outside, you need to draw a star, and inside the number 9. Draw the word "May" inside.
- Glue the red balls along the outline of the picture.
- To make apple flowers, use white paper. Circles are cut out of it, which have a diameter of 3.5 cm.
- Fold the mugs in half, bend the bottom corner, glue it and open the petal.
- Cut out 20 more white circles, which will have a diameter of 2.5 cm. Fold in half and glue 4 more overlapping petals.
- For the core of the flower, we use yellow paper balls.
- Spread the petals and glue the flowers themselves to the composition.

Tank in quilling technique.
Quilling technique - allows you to create compositions from twisted elements of cardboard or paper. Making a tank model will not be difficult even for a schoolboy. For work, you may need the following items:
- green corrugated cardboard
- colored paper,
- Pencil, ruler, scissors, glue,
- Quilling tool.
Progress:
- Cut strips from cardboard. One should be 2 cm wide, and 10 pieces should be 1 cm wide.
- Roll the strips. The edges must be treated with glue. As a result, you get wheels.
- Then proceed to the formation of caterpillars. One row will consist of 5 wheels. Glue them and wrap them in paper.
- In order to get a barrel, twist the paper into a tube.
- A wheel from a wide strip will be the hatch of the tank.
- All parts are glued to a cardboard square.
- Now it remains only to add a star and a flag. These elements need to be cut out of colored paper.

Craft - carnation.
The carnation is considered a traditional symbol of the Victory Day holiday. Pupils given flower they can easily make it on their own. To make a festive carnation, you need to prepare:
- Napkins or crepe paper
- Chenille wire.
Progress:
- The paper must be cut into pieces of 15x30 cm. A flower will need 6 pieces of such squares.
- These squares are folded into a pile and into an accordion.
- Fasten them in the middle with wire.
- Cut the ends of the paper into a triangular shape.
- Unfold the paper and separate the petals.
- Using a felt-tip pen, tint the edges of the petals.

Craft "Eternal Flame".
In this article, we continue to list crafts for Victory Day that you can make with your own hands. Craft "Eternal Flame" looks very interesting. Moreover, it corresponds to the theme of the holiday. To create a craft, it is worth preparing:
- colored cardboard,
- PVA glue,
- Carnation, which was made from napkins, wire and colored paper,
- Cocktail tubes.

Progress:
- First make a carnation. To make it, just pay attention to the master class, which is located above.
- To work, you will need a silver or gray cardboard, from which you must make a star with five ends.
- In order to make a flame, the tubes are cut into segments, the length of which is 2 cm. It is also worth leaving one piece of the tube 4 cm long.
- The edges of each tube are cut. In this case, the base must remain intact. As a result, your workpiece will not fall apart.
- An incision is made along the long tube, approximately to the middle. Now blanks can be put on the tube. The "rays" of the blanks should be located at the top.
- A small hole is cut in the center of the star. A flame is inserted into this hole.
- Now an eternal flame is glued onto the base sheet. Glue 3 stems a little lower.
Finally
Create with pleasure a variety of themed crafts for May 9th. Get a good mood and a positive mood from this lesson!
Creating crafts for May 9 for a competition or a solemn exhibition has become a good tradition in kindergartens and schools. Children different ages they are happy to be creative and show imagination, making layouts from paper, sticks, matches, beads, napkins, beads and other improvised materials military equipment, volumetric five-pointed stars, flowers, obelisks and other attributes that are considered traditional symbols of Victory Day.
Crafts for May 9 for a competition in kindergarten step by step: Bouquet with a star
For the competition, which is held on the occasion of Victory Day in kindergarten, it is better to choose simple compositions that are not burdened with a large number of small details. At such a young age, kids are not yet capable of too meticulous work and may simply not be able to cope with the manufacture of a complex object.
Necessary materials to make crafts for Victory Day in kindergarten
- colored paper
- CD or DVD disc
- scissors
- St. George Ribbon
- five-pointed cardboard star
Step-by-step instructions for making DIY crafts for the competition by May 9

We do crafts for May 9 for a competition at school: Dove of Peace (master class with photo)
Victory Day in Russia is celebrated very widely and solemnly. Holiday parades, concerts and performances are held everywhere, and schools hold matinees and all kinds of patriotic competitions, where students demonstrate handicrafts for May 9, made by their own hands. Most often, compositions are exhibited as works for such events. military theme. However, recently the jury much more often awards high places to participants who have done not militaristic, but peaceful work.
Craft at school for Victory Day: Materials needed
- pigeon silhouette made of medium weight paper
- white napkin with a beautiful openwork edge
- plain napkins (pack)
- scissors
- stapler
- colored paper
Craft for the Victory Day contest:Step-by-step instruction

Crafts for May 9 for a do-it-yourself contest from various materials

DIY crafts for May 9 for the competition: video instruction
The video shows in detail how to make simple, but beautiful crafts for May 9 for a competition from colored paper with your own hands. The author invites everyone to learn how to make a miniature copy of the obelisk eternal flame decorated with a bright red carnation. The finished product looks very solemn and patriotic, immediately attracts attention and makes a good impression. To create this little miracle, you need cardboard, a set of colored paper, glue, double-sided tape, sharp scissors, a ruler, a pencil and a stationery knife. The whole process takes from 10 minutes to half an hour and is a pleasure for both children and adults.


 We make bumpers on a crib with our own hands
 How to make a Rubik's snake ball?
Great Patriotic War will never lose its great historical significance for all countries of the former Soviet Union. This is confirmed by annual events educational institutions that help us convey to children the events of the war years. One of the most effective ways to explain to the younger generation the essence of Victory Day is the manufacture of crafts on May 9th.
All schools and kindergartens are preparatory work to the celebration of Victory Day. Teachers and educators offer children do crafts on may 9 which are sent to thematic exhibitions or given as gifts to war veterans and children.
If you are already thinking about what to make with your child crafts by May 9 on Victory Day, Let's take a look at some creative ideas.
Festive craft for a preschooler
Each handmade, which is occupied by a child under the age of 6, should be not only entertaining, but also developing. When making crafts, the child needs to learn to think abstractly and extraordinary, develop imagination and learn to be accurate.
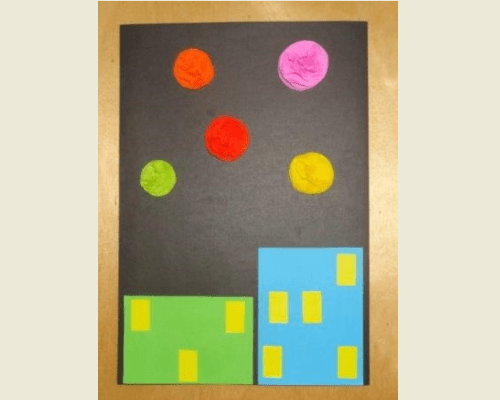
We suggest you try to do it with your baby craft-card for May 9"Salute of Victory":
To make such a simple postcard, you will need some materials and tools:
- Decorative paper of different density (corrugated, colored)
- Simple pencil and ruler
- Glue (we recommend using dry quick-drying glue so that the child does not get dirty)
- stapler
- Stationery scissors and some kind of round object that the baby can trace around to make card elements
What sequence of actions must be followed to make a postcard:
- Take colored corrugated paper, fold it like an accordion.

- Circle round objects on the front side of the accordion to make circles (5-6 pieces of the same color) - they will depict salute shots in the picture.
- Cut out the circles with utility scissors.
- Do the same procedure with paper of other colors (to create a salute, use bright paper - yellow, red, blue).
- Fasten the same circles with a stapler. The upper layers will need to be lifted and flattened so that they look like flowers.

- Cut out 2 rectangles from plain colored paper. One of them should be slightly higher than the other.
- From yellow or orange colored paper, cut out several small squares.
- Glue on black cardboard (A4 format) rectangles that will depict apartments, and on them squares - windows.

- Glue the prepared salute shots to the top of the craft.
Festive craft for a student
A primary school student can already make a more complex voluminous crafts by May 9. For example, here is such a “Victory Monument”:

To create it, you do not need to purchase any special material. You definitely have everything you need at home and in your child's briefcase:
- Colored cardboard and paper
- A simple pencil, ruler and glue
- Rectangular box of chocolates and pasta from ballpoint pen
- Cover the candy box with colored paper (color doesn't matter). We recommend sealing the bottom of the box with paper of either black, or gray, or brown.
- Cut out small squares from white paper - 2 by 2 cm. They will depict tiles.

- From colored paper, make small flower beds using trimming - wrap strips of colored paper on a ballpoint pen. Glue the resulting scrolls alternately with each other, forming flower beds.

- Glue the monument out of cardboard - form parallelograms of different sizes and cut out a shape that appearance will imitate a pedestal (you can stick a star made of red colored paper on the pedestal).

Paper crafts by May 9
Making paper crafts is the easiest way to congratulate a veteran on the holiday Great Victory. There are many interesting techniques, using which you can make a beautiful greeting card with your child. For example:
Crafts for May 9 using quilling technique
We propose to make such a beautiful white dove against the background blue sky, because this symbol of peace is very relevant for Victory Day:

To make this postcard, you will need:
- blue cardboard
- White quilling paper
- Red double-sided colored paper
- Scissors or utility knife
- Toothpick and tweezers
- simple pencil
The process of creating a dove is simple:
- First, draw the outline of a dove on a cardboard base.
- Twist quilling patterns on a toothpick (in the form of an eye from white paper, and in the form of droplets from red paper)
- Glue white blanks along the contour to make a dove (prepare the beak from red paper)
- Glue the red blanks to the place where the flower should be located
Crafts for May 9 using origami technique

- Cut red double-sided colored paper into 5 identical squares;
- Make 4 folds on each square (they should fold towards the center);
- Each triangular must be bent diagonally;
- All blanks now need to be connected to each other using corners.
Beautiful crafts for May 9 from fabric
As a rule, craftsmen make toys and sew clothes from fabric. However, this material can also be used to create such crafts for May 9, like a tank:

In order to make such a craft, you do not need to possess special skills. All you need to do is follow a few simple steps:
- From cotton wool and wire or foam, prepare a model of the future tank;
- Take measurements of the workpiece in order to prepare a pattern from felt or any other dense fabric;
- Sheathe the layout with the resulting pattern;
- Use buttons for tank wheels (if you have ideas for other tank decorations, you can add them to the craft).
Crafts on the theme of May 9 from beads
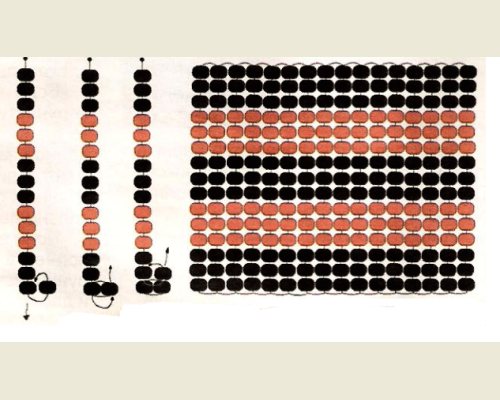
Working with beads is very easy if you have a diagram of the product you are going to create in front of your eyes. As original crafts by May 9 you can weave a beautiful St. George ribbon from beads:

To make it, you need to purchase orange and black beads, a fishing line, a needle, and also be patient, since beading is painstaking work. You can find a diagram for making a St. George ribbon on the Internet. We suggest you use this simple scheme:
Craft options for May 9: photo
In addition to all the above crafts, you can try to make others, more complex ones. We presented them in this article as samples and examples. creative ideas that might inspire you to be creative.


