What can you tell about the lynx? Yes, in general, this is an ordinary cat that lives in our homes. It differs only in that it can swim well, does not eat whiskas, but live and weighs more than 50 kilograms. They say that a lynx never attacks people, but it's better not to keep such a cutie at home. Firstly, she will eat twice as many of all family members combined, and secondly, her purring resembles the hum of a powerful electric motor. She will not want to sit at home and will scare away all the neighbors. Better let her live in your drawing.
How to draw a lynx with a pencil step by step
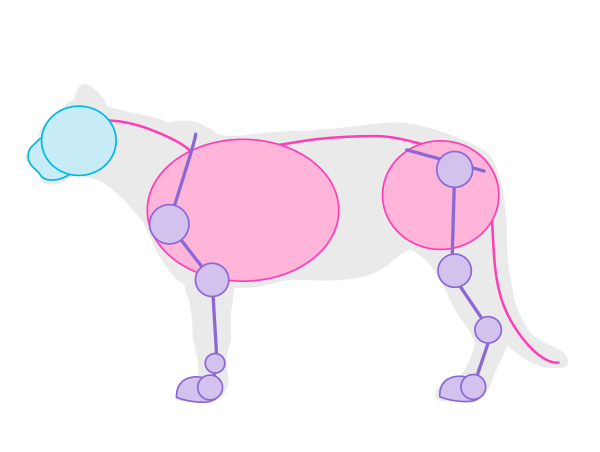
Step one. In the center of the sheet, draw three circles: for the head, upper and lower torso. Let's sketch the legs.  Step two. Add two more legs and outline the contours of the body. The tail of the lynx is small. On the head we draw ears and a round nose.
  Step three. Now we have an almost finished sketch of a lynx. Let's circle the contours of the body with a thicker dashed line, thereby showing the fur of the beast.
  Step four. We detail the head of the lynx: it is relatively small, but very expressive. hallmark are the tassels at the ends of the ears.
  Step five. Let's add strokes all over the body, creating a shadow effect, and also draw a speck. The result should look like this:
  I also recommend to see step by step lessons drawing other animals.
Want to learn How to draw a lynx, Lynx with a pencil step by step, take a few simple steps.
STEP 1. Let's start with a side shot to the head.
First, draw a circle that will be the base of the head shape, then draw a "window" for the muzzle, a triangle for the ear, a guide line for the ruff of the extended hair under the ear, and two lines for the neck.
After you have made the guide lines, you can draw the outline of the head: face, muzzle and chin.

STEP 2. Finish the nose and add a pretty big eye.
Draw the ears and long fur on the cheek.

STEP 3 Now add detail to the ears and neck.
Remember to draw and tufts of hair on the tips of the ears.
Then add the last details like fur and mustache and you're done!

STEP 4. Now, the whole body is a trot.
Before we start I think it's good to point out the main differences between lynx and lynx.
Lynxes look like large domestic cats with rather large paws, trimmed tails, long hair on the cheekbones, and tufts of black hair on the ears.
Lynxes have large paws, long legs, longer tassels on their ears and longer fur on their cheeks.
Okay, now draw the guide lines like in the picture.

STEP 5. You might find it helpful to add four ovals to the guide lines from the previous step: two for the shoulders and two for the hips.

STEP 6. Now, let's work on the lynx head.
Draw the ears and long fur on the cheeks.

STEP 7. Add eyes and muzzle. Start drawing the nose.

STEP 8. Finishing the nose (remember the nostrils), add the fur on the ears and neck.

Step 9. Draw thick front limbs with rather large paws. Don't forget to draw the cracks from which he releases his claws.
Lynxes have five-toed front paws and retractible claws.

STEP 10. Finish the lynx body and add to it the hind legs which are slightly longer than the front ones. The hind feet have four toes.
Then add stubby and fluffy tail.

STEP 11 Add tufts of hair on the tips of the ears, fur, whitskers and other details and your bobcat is finished.
What can you tell about the lynx? Yes, in general, this is an ordinary cat that lives in our homes. It differs only in that it can swim well, does not eat whiskas, but live hares and weighs more than 50 kilograms. They say that a lynx never attacks people, but it's better not to keep such a cutie at home. Firstly, she will eat twice as many of all family members combined, and secondly, her purring resembles the hum of a powerful electric motor. She will not want to sit at home and will scare away all the neighbors. Better let her live in your drawing.
How to draw a lynx with a pencil step by step
Step one.
In the center of the sheet, draw three circles: for the head, upper and lower torso. Let's sketch the legs.
Step two.
Add two more legs and outline the contours of the body. The tail of the lynx is small. On the head we draw ears and a round nose.
Step three.
Now we have an almost finished sketch of a lynx. Let's circle the contours of the body with a thicker dashed line, thereby showing the fur of the beast.
Step four.
We detail the head of the lynx: it is relatively small, but very expressive. A distinctive feature are the tassels at the ends of the ears.
Step five.
Let's add strokes all over the body, creating a shadow effect, and also draw a speck. The result should look like this:
- How to draw a dog with a pencil;
- Leo
- Jaguar;
- Cheetah;
- rabbit or hare;
- deer;
- horse;
I hope with this guide you will know how to draw a lynx with a pencil step by step. If you liked the lesson, subscribe to our Vkontakte group and get fresh drawing lessons every day right on your page. And also you can suggest your topic for writing, you can do it here: Submit an idea for a lesson.
In our first lesson, we looked at how . Today we will take care of other wild cats such as leopards, jaguars, mountain lions and lynxes. Once again, I will show you what makes cats so different and what patterns exist for them.
1. Draw a leopard
When the word "leopard" comes to mind, a large, spotted cat immediately comes to mind. Unfortunately, if we only follow these rules, then we can end up drawing a jaguar or, even worse, a cheetah. So how to draw a leopard?
Step 1
When it comes to silhouette, there are a few rules you need to remember:
- The torso is long and thin, but not as thin as that of a cheetah;
- The legs are not longer than those of a lion, but they are thin and proportionate;
- The neck is strong and muscular.
Step 2
To draw the silhouette of leopards, start with this simplified pose:

Step 3
- The main color for a leopard is yellow, its shade depends on the habitat. You can use golden, reddish or even brownish shades of yellow;
- The underside of the body may be slightly lighter than the base color;
- Rosettes are brown, cracked, with a little more dark color than the base.

Step 4
The pattern is fairly regular, following invisible lines all over the body. The legs, neck and lower body are covered with dense spots - the lower down the body, the smaller the spots. The upper body, thighs and tail are covered with dense rosettes.

Step 5
To draw the leopard's head from the front:
- Draw the mouth;
- You now have enough guide lines to add character traits leopard faces;

Step 6

Step 7
Now that your proportions are ready, you can add the details:
- Leopard ears are thin and rounded at the tip. Their back is black, with a light spot in the middle;
- The eyes are yellow, rather narrow, with short tears;
- The nose is red, compact, with a slight spot (not white!) a little higher;
- Mustaches are long and sloping. The holes are dark and dense, almost merged with each other. The dark mark of the mouth starts at upper lip.


Step 8
The melanistic version of the leopard is called the black panther. It is not completely black - the rosettes are visible in the sun.

2. Draw a jaguar
Jaguars are commonly confused with leopards (and vice versa). They are both yellow and spotted and lack a mane or distinctive stripes, so it's easy to make that mistake. I'll show you what a jaguar looks like and how to tell it apart from a leopard.
Step 1
Here's what you need to remember about the body of a jaguar:
- Jaguars are slightly larger than leopards, they also have a rather stocky body with a characteristic sloping back;
- The tail is the shortest of all large cats;
- The legs are short and muscular (compare them to a leopard);
- The belly is rounded, separating the slenderness of the leopard;
- The head may appear large due to the powerful jaw that can crush the skulls and shells of a tortoise;

Step 2
To draw a jaguar, start with this pose:

Step 3
- The main color for the jaguar is yellowish. Like leopards, it can be brownish or reddish;
- The lower part of the body is white;
- The rosettes are black, thick, heavily cracked, with a medium slightly darker than the base color and with small black spots inside.

Step 4
The entire upper body is densely covered with large rosettes. The lower part of the body is covered with dark spots. On the tail, the rosettes merge into stripes.

Step 5
To draw the jaguar's head from the front:
- Draw a circle - divide it into quarters;
- Add a long ellipse starting from the center of the circle. Add guide lines to place the nose;
- Draw the mouth;
- Cross the entire head with guide lines to define the eye area. Remember - the eye always starts a little near the line of the nose, not on it;
- You now have enough guide lines to add the characteristic features of the jaguar's face;

Step 6
To draw a leopard's head in profile:
- Start with the same circle as before;
- This time add another circle instead of an ellipse. Divide it into sixteen pieces to create guide lines. Now you can add the mouth;
- Add a nose at the top of the circle and chin;
- Draw guide lines for the eyes;
- Tighten the shapes of the head with additional lines.

Step 7
Now you can add details to the face of the jaguar:
- The ears are round, black at the back, with a slight spot in the middle;
- The eyes can be golden to orange, more round than those of a leopard. The tear sign is longer than that of leopards;
- The nose is large and brown;
- The mustache curls down. The mouth mark in the corner of the lips covers the upper and lower lips.


Step 8
The black jaguar is also called the black panther. As with the black leopard, rosettes may be visible, but since the melanism here is from the dominant allele, the two black jaguar cubs may be darker.

3. Learn about the mountain lion
Although mountain lions (also called cougars) may seem rather boring compared to all those exotic, spotted and tabby cats, they are still cool! And because they don't have a repeating pattern, they draw quickly, which is a big advantage, isn't it?
Step 1
To draw a mountain lion, you need to remember a few things about its body:
- The torso is very lion-like, broad with a rounded belly;
- The hind legs are very long, sloping down the back;
- The head appears disproportionately small;
- The hair is short and coarse, so the muscles must be clearly defined.

Step 2
Here is how you can start drawing a mountain lion:
Step 3
- The base color may be red-brown or grey;
- The lower part of the body may be lighter;
- The tip of the tail is black.

Step 4
To draw the cougar's head from the front:
- Draw a circle - divide it into quarters;
- Add a long ellipse starting from the center of the circle. Add guide lines to place the nose;
- Draw the mouth;
- Cross the entire head with guide lines to define the eye area. Remember - the eye always starts a little near the line of the nose, not on it;
- You now have enough guide lines to add the characteristic features of the mountain lion's face;

Step 5
To draw a cougar's head in profile:
- Start with the same circle as before;
- This time add another circle instead of an ellipse. Divide it into sixteen pieces to create guide lines. Now you can add the mouth;
- Add a nose at the top of the circle and chin;
- Draw guide lines for the eyes;
- Tighten the shapes of the head with additional lines. Don't forget to cut off some for the forehead.

Step 6
When the proportions are done, you can refine the details:
- The ears are small and round, black or dark brown at the back, with a large light spot in the middle;
- The eyes are yellow or hazel;
- The nose is small and pink;
- The whiskers are rather short, the holes are almost invisible. The black mark of the mouth starts on the upper lip and goes straight to the corner of the nose, gradually weakening.


Step 7
Puma cubs are spotted and their mouths may be darker.

4. Draw a lynx
In fact, there are no species called lynxes. It is a genus name, as is panther (lions, tigers, leopards, and jaguars are all panthers). There are four types of lynx. We will learn how to draw a Eurasian lynx ( lynx lynx), the largest of them, and then I'll show you the differences between all the species.
Also, the lynx is not actually a big cat, although even the smallest of them can be three times the size of domestic cats.
Step 1
There are several features that allow you to recognize each trot:
- The hind legs are so long that the back becomes noticeably slanted;
- The tail is very short, as if it were carved at the base;
- The head appears small in comparison to the short, stocky body;
- The head is adorned with a long cheekbone mane and tassels on the ears.

Step 2
When drawing a lynx, you can use this simplified pose:

Step 3
- The Eurasian lynx can be grey, brown, or greyish-orange;
- The spots are dark brown, black, or so faint that they are almost invisible. They may look a bit like half a socket;
- The underside of the body is slightly lighter.

Step 4
Spots of the Eurasian lynx are placed regularly. On the tail, they merge into stripes, and the tip becomes black.

Step 5
To draw the lynx's head from the front:
- Draw a circle - divide it into quarters;
- Add a long ellipse starting from the center of the circle. Add guide lines to place the nose;
- Draw the mouth;
- Cross the entire head with guide lines to define the eye area. Remember - the eye always starts a little near the line of the nose, not on it;
- You now have enough guide lines to add the characteristic features of the lynx's face, including the mane on the cheekbones and tassled ears;

Step 6
To draw a lynx head in profile:
- Start with the same circle as before;
- This time add another circle instead of an ellipse. Divide it into sixteen pieces to create guide lines. Now you can add the mouth;
- Add a nose at the top of the circle and chin;
- Draw guide lines for the eyes;
- Tighten the shapes of the head with additional lines.

Step 7
Now you can add more details:
- Lynx ears have characteristic black tufts. The back of the ears is black, with a white spot in the middle;
- The eyes are golden or brown;
- The nose is small (like that of domestic cats) and red;
- The mustache is long and sloping.


Step 8
There can be many variants of the Eurasian lynx, all of which are the same species. So, how to distinguish other species?

Step 9
The Canadian lynx is smaller than its Eurasian cousin. What else can we say about this?
- Her paws are very big, they work like snow shoes (remember snow leopard?);
- The fur is gray and long;
- The cheek mane is the most pronounced of all lynxes;
- The eyes are deeply furred, so they may appear small and narrow.

Step 10
The red lynx is also a lynx! This is the smallest species of all, but there are other differences:
- The tail is slightly longer than other lynxes, also the tip is not quite black;
- The ear tuft is rather short;
I "m a Polish artist with a long experience in doing useless, but creative things. Since I realized how bad I was after all these years, I decided to take fate into my own hands and actually study things in order to draw them properly. My tutorials are the result of thorough studies - I hope they help you as they helped me!
The animal world is very rich and diverse, if you learn how to depict at least a few animals, then it will be easier for you. Photo and video materials can be used to help. And you can depict animals with different materials.
In this lesson we will learn how to draw a lynx, let's see how it's done....
Step one.
In the center of the sheet, draw three circles: for the head, upper and lower torso. We make a sketch of the legs.

Step two.
Let's add two more legs and circle the contours of the body. The tail of the lynx is small. On the head we draw ears and a round nose.

Step three.
Now we have an almost finished sketch of a lynx. Let's circle the contours of the body with a thicker dashed line, thereby showing the fur of the beast.

Step four.
We detail the head of the lynx: it is relatively small, but very expressive. A distinctive feature are the tassels at the ends of the ears.
Step five.
Let's add strokes all over the body, creating a shadow effect, and also draw a speck. The result should look like this:
I hope with this guide you will know how to draw a lynx with a pencil step by step.