Tatiana Yasinskaya
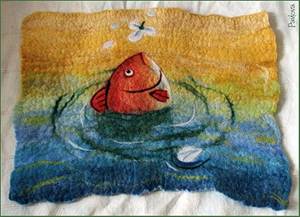
Materials and tools:wool for felting(sold in needlework stores, A-4 size felt, scissors, knitting threads for the contour. We lay out the contour of the future image with knitting threads. Separate the lumps of wool and lay out the space inside the contour with these "clouds".
The main background is superimposed. Now, with thin strands of wool, lay out the details-stripes on the abdomen, emphasize the line of the wings

The finished work must be drawn up - inserted under glass and framed

Following panel with a caterpillar - also lay out the contour with threads

We fill the space inside the contour with twisted strands of wool (we wind the lock on the finger).We use different shades of wool for expressive image. .We work slowly, carefully.

We complement the image with chopped strands of white wool, make accents, paws, etc. Done!

Related publications:
Both adults and children are waiting for the end of December, With pleasure they tear off this sheet of the calendar. There comes a holiday of masks, Tinsel and confetti, Among.
Materials 1. Styrofoam 2. Stationery knife 3. Pencil 4. Scissors 5. Brush 6. Glue "Dragon" 7. Self-adhesive 8. Artificial flowers "Sakura".
Among the many favorite flowers, I would like to note chrysanthemums. Initially, chrysanthemums were only yellow. Today it exists.
Autumn is a wonderful time of the year! A riot of colors in the autumn forest. Here the larches have changed their outfit! Now they are in yellow-orange dresses.
Pano Snowman We will need: colored cardboard in blue and black, colored paper green and white color, scissors, PVA glue, simple.
Master class on making panels "Sun".
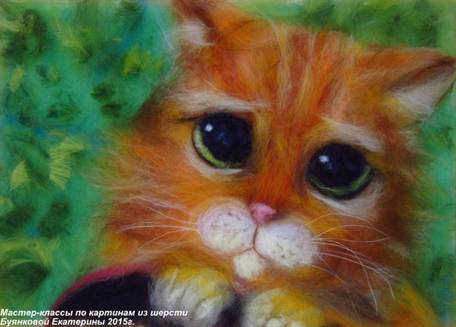
Recently in our kindergarten competition "Dolls with their own hands" was held. So I decided to make a Kitty cat. Dry way mostly.
Now a lot of women are engaged in needlework. Cross-stitching, knitting, origami - all this, of course, is very interesting and requires effort and talent, but it has already become banal and not so interesting. But felting paintings from wool is definitely an original activity, the paintings are simply amazing, they can be a wonderful accessory to decorate your interior or a gift for any occasion. In our article, we will tell you all about this unusual activity.
There are two felting techniques - dry and wet, we will try to tell you about both options for work. Our first lesson will be in the technique of dry felting, after each stage of work, the product should be held under glass for fixing, this technique is not used in wet felting.
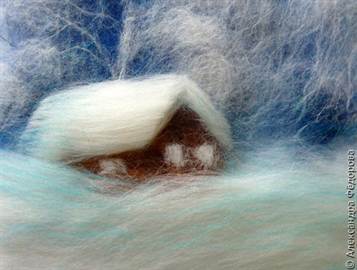
"Winter night"

We bring to your attention a master class that is perfect for beginner needlewomen, because the picture itself is simple, and the lesson will be very detailed, with step by step instructions and a photo of each stage of work.
For work you will need:
- Wool (white, blue, dark blue, light blue, turquoise, dark brown, brown, yellow, orange and red);
- Flizerin substrate measuring 18 by 24 centimeters;
- scissors;
- Tweezers;
- Photo frame with glass.
We take woolen strands and cover the surface of the base with them (non-woven backing). We lay out our pieces in different directions, the wool should protrude beyond the base by about two centimeters (maybe a little less). Now we cover the craft with glass and cut off the extra pieces.

Now we need to make the background. We lay wool of different shades (from dark to light). After that, we again impose glass and cut off the extra particles.
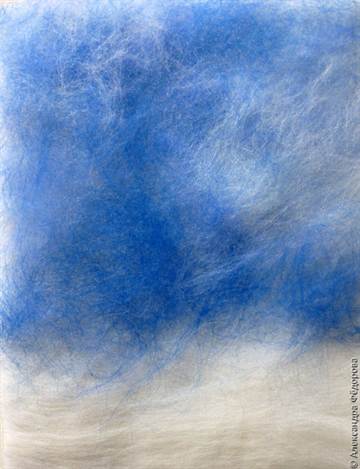
Since winter will be depicted in our picture, we need to make snowdrifts. To do this, take white wool and lay it horizontally at the bottom of the picture.

Now we take dark blue wool, twist it into small “sausages” and lay out the silhouettes of trees with them.

We have winter, our trees need to be “powdered” with snow. We take white yarn, twist it into a “sausage” and lay out snow-covered trees.

Again, we make a crown of trees from white wool, for this we need to fluff the wool a little.

Now we make a ring out of white or yellow wool and place it on the picture, so we marked the outline of the moon. We cut the wool into small pieces and fill our moon.
Now we are “building” a house from brown and dark brown wool. The wall, which is located on the side of the moon, should be lighter, this should be taken into account when working.

Now we make dense pieces of white wool and make the roof of our house out of them. The edges should be even and clear, it is best to trim them with scissors.

The lower part of the house needs to be covered with "snowdrifts", it's not worth saying what color yarn we make them from.

Now we make windows and a door from yellow or white wool.
Now we will give our picture even more realism by adding light pouring from the windows. We make overflows from orange wool, yellow color. With tweezers, you can throw white and yellow wool on the house.

Bright colors are best muted with thin strands of white wool, and small turquoise hairs can give expressiveness to the picture.

Our painting " Winter night» completed. Now place it in a beautiful frame under glass and you can safely hang it on the wall or give it to family or friends.

We invite you to look at some other paintings, perhaps you will get new ideas or you will be inspired to create a new masterpiece.


Wet felting
As noted above, there is another technique for creating paintings from wool - wet felting. It is a little more complicated in its execution, but the pictures as a result are no worse, unusual and beautiful.
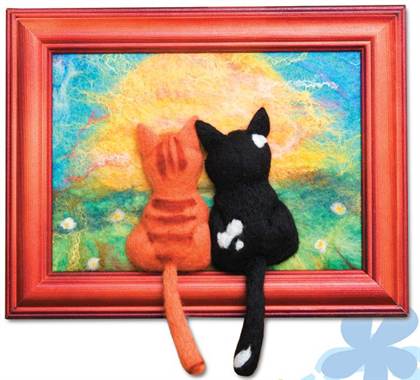

We suggest you watch a very interesting video tutorial from which you will learn how to make a three-dimensional picture with cats.
The master class is very detailed, each action is explained in an accessible language, the instructions will be clear to both beginner needlewomen and experienced girls who have long been familiar with the wet felting technique. Such work will be a little more difficult, but no less interesting and exciting.
Video on the topic of the article
Now you can proudly call yourself an experienced fuller. As you can see, this work is painstaking, but it is addictive, and what beautiful pictures are obtained. Of course, it is very important to choose the right sketch, drawing, which you want to perpetuate in such a way. in an unusual way. We invite you to familiarize yourself with the materials of this video collection, thanks to which you can consolidate your knowledge and acquire new interesting ideas.
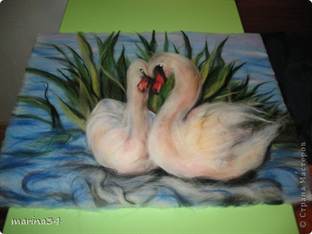
A wool panel is the simplest thing you can think of using the wet felting technique. Therefore, we dump such a cat: 
Like any work, felting should begin with a sketch:
In order to make panels with dimensions of 45 * 32, we need about 100 gr. unspun wool. And from them somewhere 40-50 gr. - so-called. Sliver, coarse wool, which is placed at the base of the panel. For “drawing” with wool, both combed tape and carded wool are suitable - they will give different effects similar to painting watercolor paints.
We will also need: a plastic “pimply” film (which is used for packaging equipment), a thin plastic film (a cut bag), a bar of soap (for children), gum, cotton cloth, a watering can or plastic bottle, in the cork of which 5-6 holes are made, as well as a stick 60 cm long and 4 cm in diameter (you can take a rolling pin or a handle for a shovel) 
It should be borne in mind that the wool during the felling process shrinks 30%, which means that the panels need to be laid out a third more on each side.
We begin the process of laying out the wool: in one hand we take a strand of sliver, and with the other we pull a small piece out of it 
We put it on a pimply film, which is laid out with a ribbed surface up. We lay out the strands, orienting the direction of the fibers in one direction. Thus, we lay out the entire area of the panel, not forgetting that it should be 30% larger than the final size. Then, in the same way, we lay out the second layer of the sliver - now with the fibers in the other direction. This is necessary so that the shrinkage goes in both directions. When the entire sliver canvas is laid out, lightly crush it with your hands
Then, in accordance with the sketch, we begin to lay out the colored wool. The layout goes in such a way that the color that is in the background is laid out first. Those. first lay out the background, and then the figure on it. We divide the wool into thin layers, which we spread on the sliver. In the layout process, we use different colors, slightly overlapping one color with another, to achieve a picturesque effect. 

When the background is laid out, we proceed to the layout of the wool on the cat figurine 

We also use different shades. After that, lay out the small details. Please note that small and thin parts may shift slightly during the felling process. 

You can also use ordinary woolen threads (yarn) in the panel to stroke the elements. The yarn sticks to the wool and will give an interesting “trembling” effect). 
This is what our panel looks like, ready for wet felting. Note that sometimes the layout of the wool takes longer than the actual felting. 
Prepare soap solution: baby soap three on a grater and 1-2 tablespoons of soap pour 1 liter of boiling water. We wait until the soap dissolves, and carefully water the panel with a watering can. Do not pour a lot of solution - the excess will pour out and create inconvenience, but the entire product must be evenly moistened. Small parts can move - correct them by putting them in place and pressing lightly. 
Then we cover the panel with a thin plastic film in one layer. Gently press the film to the wool, lightly moisten it with soapy water (so that your hands glide over the film better), then begin to rub the entire product, compressing the wool evenly over the entire area. Three minutes 5-7 - in this time runs initial wadding of wool. Excess solution may spill out - keep diapers handy. 
Then tightly wrap all layers (films and wool) on a stick. We tie the resulting "roll" with elastic bands in three places, wrap it with a diaper, which we also fix with elastic bands, and begin to roll it with our hands. We roll along the entire diameter, move our hands along the entire length - this will ensure uniform felting of the product. We ride, applying efforts, for 15 minutes. 


Then we unfold, check if the product is deformed. Uneven edges can be laid on the wrong side 
Then, in the same way, we turn it into a “roll”, but in a different direction (that is, if you previously rolled in width, now the panel should be wound on a stick in length. This will allow the product to sit in both directions proportionally) 
At the second stage of felting, the "roll" can be put on the floor (placing an oilcloth) and rolled with your feet - because the legs have more strength than the hands and the product falls off better 
In total, the product should be subjected to friction for 40-50 minutes. We periodically unfold and change direction, the panel can be slightly pulled, eliminating the deformation of the edges. 
The indicators of feltedness of the product are: shrinkage of the product by 30 percent or more, the inseparability of the fibers from each other, the overall uniformity of the felt.
When the product is felted, unfold it and wash it from soap under warm running water. Gently squeeze into a dry diaper, lay out to dry. 
The finished panel can be placed in a frame or sewn on the back of the slats and hung on the wall.
According to the size of the hardboard substrate taken out of the frame, cut out a rectangle of white flannel. Stick on the substrate (use glue stick). This is the "canvas" for the future painting. "Write" a picture should be with background. Tearing off thin, almost transparent strands from the wool tape, lay them out on the background. The strands should overlap each other - due to this, a mixture of colors and smooth transitions from color to color are obtained.
Step 2
Lay out the foreground - snowdrifts. Different thicknesses of layers in different parts of the picture also create perspective.
Step 3
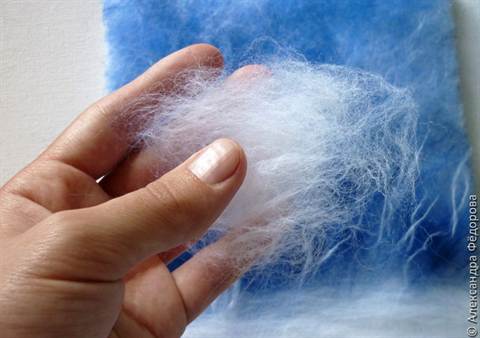
It is impossible to lay out the small details of the picture with long fibers of wool. Cut a piece of wool over a piece of paper into very short lengths.
Step 4
Picking up small pieces of chopped wool with tweezers, lay out a small house lost in snowdrifts.
Step 5
Cut a strand of white wool and lay out the pieces of the roof. To make the roof "reflect" the sunset sky, add a little color to a strand of white wool.
Step 6
When cutting colored wool, complete other small details - for example, windows of a house, a pipe. From a twisted strand of white wool, make smoke.
Step 7
Twist in your fingers a thin strand of dark wool - a tree trunk. Post it near your house. From finely chopped white wool, lay out the snow-covered crown of the tree.
Step 8
In the same way, laying out the cut pieces with tweezers, "besiege" several Christmas trees near the house. To depict Christmas trees, use wool of several colors at once - dark green, blue, blue. Put the strands together and cut them finely, mixing the colors. Put some "snow" of white wool on the spruce paws. From thin twisted strands, lay out the wattle fence near the house.
Step 9
Wrap a thin strand of yellow wool around your finger several times - this is the outline of the moon.
Step 10
Put the ring on the background. Fill it with chopped white wool. Post a picture of a snowy Christmas tree foreground. Given the perspective, the image should be large.
Picture of poppies made in the technique of felting
Felting is one of the oldest technologies for creating textiles. During excavations, archaeologists found that the approximate age of this method is 8000 years.
Felting came to Russia in the 13th century during the Mongol-Tatar invasion. Cloth and felt were made, which were used in household affairs. Felted clothes were also common. They made hats, skirts and pouches in which they kept tobacco for smoking. The peculiarity of wool was used for warming houses.
This technique is currently art form and has a specific name - felting. It is used in the creation of toys, paintings, crafts and clothing.
Types of wool felting
How and why does felting happen? It turns out the principle is the same as with our hair. Hair is made up of scales that look healthy and smooth when closed. But if the scales are open, then tangles can form and fall off. However, this property for art is an advantage.
felt paintings


dry felting
Dry felting pictures from wool is performed with a needle. It should be thin enough, have small notches and resemble an L shape. With such a tool, the fibers are easily tangled, and the process becomes similar to plasticine modeling.
 Poppies made by layering colored sheep's wool
Necessary materials:
- sheep's wool;
- special needle;
- thimble (mandatory).
Everything you need for dry felting
Felting technique:
- We separate a small lump from the wool, tangle the fibers between the palms. Roll into a tight rope.
- We stick the needle deeply into the lump and first of all we start sealing from the inside (this is important). We gradually move to the outer walls, compacting and wallowing. This will level the surface.
- To make the figure denser, use a thinner needle. If in the process of felting the figure does not change its appearance, shape and density, then felting should be stopped. To create a bulge in a certain area, this place is rolled for a small amount of time.
Picture of wool dry felting
Wet felting pattern
Wet felting wool is a classic method. With soapy water and friction in different sides, the fibers are tightly piled.
 Wool pattern looks voluminous and unusual
For this technique you will need:
- unspun wool;
- film (bubble);
- bamboo napkin;
- felting needle;
- thimble;
- soap;
- grid;
- warm water
Everything you need for felting
Technique:
- We separate thin shreds 8 cm long from the unspun wool. Lay out the shreds on the bubble wrap, layering each other a little. Thus lay out 3-4 layers.
- Lay out the drawing on the penultimate layer. It may consist of woolen threads, tufts of wool and other suitable materials.
- Spray the workpiece with soapy water and cover it with a net.
- We iron the wool in all directions to compact the material.
- We spread everything on a bamboo napkin and fold it tightly like sushi. Next, wrap it in a towel and roll it on the table about 100 times.
- We unfold the structure and turn it back, turning it 90 degrees.
- When felting, the canvas will decrease by 20-40%. When everything is ready, rinse in warm water and dry.
For wet technique, you will need a felting needle. This is a special metal needle with a wooden handle. It is needed in order to imprint the drawing on the canvas. The needle has multidirectional notches that can damage the skin if used carelessly.
The splendor of wet felting paintings
felting pictures
Felting wool paintings - one of the most unique and unusual species art. Such a picture can be performed both in dry technique and in wet. However, you should stick to your preferences. If you want a picture with voluminous, convex figures, then the dry technique of felting pictures from wool is intended for this. With the wet method, wool paintings are flatter and can be framed with glass.
 This three-dimensional painting is made in dry technique.
Advantages and features of the technique of felting pictures from wool:
- an interesting skill that can be useful on the farm;
- the process itself is quite easy, which is good for beginners;
- the opportunity to decorate the house and make gifts with their own hands.
You can choose any drawing for felting a picture from wool and the idea itself, this is a matter of your imagination. When choosing colors, you should pay attention to the level of complexity of the craft itself. For beginners, it is better not to choose a large number of colors. A large number of colors requires a lot of time, more accuracy, experience and the necessary skills.
You should also pay attention to the compatibility of colors and the range that you have chosen. When layering colors, a messy pattern can result if the colors do not match with each other or if there are too many colors in one place.
Description of the felting process
First of all, to create a picture, you need to choose a felting method. Wet technique will look more convenient and beautiful. The base image can be found online. It can be of any quality and color, the main thing is that you yourself understand what you want to see in the end.
Execution sequence:
- For the basis of the picture, we spread a bamboo napkin or papyrus paper on the table. We put pimply paper next to it and we already roll the picture itself on it. The basis of the picture is needed nearby only in order to monitor the size of the craft.
- It should be borne in mind that the size of the picture in the original version will sit down about a third. We fill the background of the picture tightly and without gaps, tearing off small pieces of wool. Wool should be laid out in three rows so that one is across the other. The thickness of the entire craft should be approximately the same, so where the drawing is intended, you should not lay out the background wool. If you want to make the picture more airy, then, accordingly, the background layer is made thin.
- The pattern is also laid tightly in accordance with the colors. The last layer can be laid out along an oblique line - this will hold on tighter. To fix the pattern, you need to press it with your hands or use a felting needle.
- If the pattern is airy and openwork, very thin patches of wool will look good against a contrasting background. We lay them out in the desired shape as if we were drawing. To make the pattern look even more interesting, you can use small pieces of yarn and lay them as needed.
- After the entire drawing is laid out, we cover the craft with a grid. While felting, you need to lift the mesh from time to time so that it does not fall off with the picture. Wet everything with a prepared soapy solution using a sponge or spray bottle. Then smooth and roll (three intensively). We continue felting until the fibers stop separating.
- Next, put everything on a bamboo napkin and roll it tightly like sushi. Next, wrap it in a towel and roll it on the table about 100 times.
- When felted to readiness, you can rinse and leave to dry.
Master class on felting a picture
Such a picture will be not only a beautiful decoration of the house, but also a great gift.