The first human journey into space lasted only some 108 minutes, but they, one might say, "turned the world upside down." Since then, since April 1962 (more precisely, the twelfth), they celebrate the year that has become World since 1969.
As always, a little history
Which of us in deep childhood did not want to become an astronaut? And from whom to take an example? Of course, with Yuri Gagarin, whose name in 1961 sounded in many languages of the planet Earth. Because the cherished dreams of all mankind for many centuries have finally come true - to find out what is out there, outside our world, in space! And then, in 1961, all people rejoiced and were proud of the achievements of Soviet scientists in this field. The pioneer hero receives high awards from the government, and in a few months the second astronaut makes a daily flight around our planet!
Today we know much more about space. Man not only conquers distant orbits, but also learns to live there. And how many robotic satellites have been launched that constantly fly over us, doing various research!
What to choose, doing creativity with a child, for Cosmonautics Day? Drawing, probably, in the first place. So let's get started!
How to draw a drawing for Cosmonautics Day?
Children's works on the space theme are always relevant. Here it is assumed to use various techniques, attracting the child to creativity. But the most basic among all, of course, is pencil! Because everything starts with her. Here step-by-step instruction, for Cosmonautics Day in pencil.

Other techniques
Having learned, first of all, by the Day of Cosmonautics with a pencil, you can try other mixed techniques, for example, "grattage" (from the French gratter - scratch, scrape). It is available even to preschool children. Begin!
- We take thick paper, better - A3 cardboard. We paint the entire plane with colored crayons (wax is better) in the freest style, but with a thick layer. All paper must be drawn. Involve your baby more actively at this stage of work.
- Mix dishwashing liquid (1 part) and black gouache (3 parts). We cover with an even layer over the crayons, paint over everything!
- Got a black sheet. Let's let the paint dry. This process can be accelerated with an ordinary hair dryer! What fun for a child!
- We take a fairly sharp object (toothpick, knitting needle, but better - a special wooden stick) and scratch our drawing on a black background. Yes, at least the same astronaut and a rocket! As a result, we get a very original work in the "scratch" technique.

More options?
And you can also celebrate this holiday with the children in the "Do it yourself" style. The theme of the craft is "Cosmonautics Day". This is from ordinary disposables, and rockets from plastic bottles, and many many others.
Mother's Day in Russia has not yet become mega-popular national holiday, but at the same time, it has long been actively celebrated in kindergartens and schools. In particular, on Mother's Day in children's educational institutions traditionally held holiday concerts, exhibitions and creative contests. Most often, for such events, children prepare pictures with their own hands, timed to coincide with this wonderful holiday. Such a drawing for Mother's Day can be done with both paints and pencils - the choice depends on the creativity of the child and his desire. But the themes of the pictures should certainly echo the main idea of the holiday. In our today's article, you will find several step-by-step master classes with photo drawings for Mother's Day, including for beginners. We hope that from them you will not only gain skills on how to draw this or that picture in stages, but also be inspired to create your own masterpieces!
Drawing for Mother's Day in kindergarten, a master class with a photo
First of all, we bring to your attention a drawing master class for Mother's Day for kindergarten students. Of course, such a drawing is hardly suitable for participation in the competition, but for a gift to mom it will fit 100%. But the main thing is a very simple drawing for mom on Mother's Day in Kindergarten which even kids can do with the help of adults.

Necessary materials for drawing in kindergarten for Mother's Day with your own hands
- landscape sheet
- finger paints and brush
- markers
- wet wipes
Instructions for drawing mom in kindergarten with your own hands in stages
- Mentally divide a sheet of paper into two equal parts horizontally. At the bottom with a felt-tip pen or with a simple pencil draw an inverted trapezoid. This will be the base for the flower pot.

- Then, on top of the trapezoid, draw a narrow rectangle with rounded corners. We also draw the volume of the pot, as in the photo below.

- Now we take green paint and brushes and draw the stem and leaf of the future flower for mom.

- Let's move on to the most interesting - the bud. We will draw it with the help of finger paints and palms. To do this, apply the paint on the palm of your hand with a thin, even layer and transfer the image to paper. With paint of a contrasting color, we repeat the same thing, but with the palm of the second hand.

- We wipe our hands, let the paint dry a little. Add a congratulatory message. Ready!
Do-it-yourself drawing for Mother's Day to school, master class
Our next step-by-step do-it-yourself drawing master class for Mother's Day is perfect for both a gift and an exhibition for school. Despite the rather simple idea, the final image is very effective and cute. Such a do-it-yourself drawing for Mother's Day to school is suitable for students in grades 4-5, and for older students.

Necessary materials for a drawing for Mother's Day to school with your own hands
- landscape sheet
- watercolor paints
- tassel
- simple pencil
Instructions for drawing to school on Mother's Day in stages
- In this master class, we will draw a Tree of Hearts - a very touching symbol of tenderness and boundless love for mom, which, like a tree, grows more and more every year. First of all, using a simple pencil, we will make a sketch of the trunk and color it with brown watercolor.

- Now let's decide on the crown palette, which will consist exclusively of hearts of different shades and sizes. The following colors are best suited: red, pink, purple, purple, blue. With the help of these shades we make small strokes imitating the branches of a tree.

- Let the sketch dry a little and move on to the hearts. You can first draw hearts with a simple pencil, and then decorate with paints. And you can immediately paint watercolor. We try to evenly distribute the hearts and make them of different colors and sizes.

- We are waiting for the picture to dry completely. Add a congratulatory inscription and a couple of hearts at the base of the tree. Ready!

Pencil drawing for Mother's Day, a master class for beginners with a photo
You can also draw a very beautiful memorial card for mom with the help of pencils. Our next master class for beginners with a photo will show you how to draw a tulip for Mother's Day with colored pencils quite simply and quickly, which mom will definitely like. Such a drawing with pencils for Mother's Day in our step by step master class for beginners with a photo will decorate any postcard, poster or wall newspaper.

Necessary materials for a drawing for Mother's Day with pencils in stages
- paper
- colour pencils
- simple pencil
- eraser
Instructions for drawing mom with colored pencils in stages
- First of all, let's make a sketch of a tulip. To do this, in the middle of the sheet with a simple pencil, draw an inverted trapezoid and a long line crossing it.
Important! We draw all lines with a simple pencil smooth and without pressure. So it will be easier to remove them with an eraser during the drawing process.
- We round the corners of the trapezoid and draw the petals of the tulip.

- Carefully remove the extra lines with an eraser. We draw the stem of the flower.

- Now we make the outline of the flower clearer, while removing unnecessary strokes with an eraser. We draw a leaf of a tulip.


- It remains to decorate the flower: we decorate the bud in red and add a little yellow shade at the base, and fill the stem and leaf with a green pencil. Ready!

Drawing with paints for Mother's Day, step by step
A very gentle and original drawing for Mother's Day with your own hands can be drawn using watercolor paints. Moreover, to make the picture even more expressive, you can use the technique of layering several shades in stages, as in our master class. Next, we suggest you master the watercolor bouquet for mom in stages, which is also suitable for a kindergarten, school, a thematic exhibition or competition. The theme of flowers is one of the most relevant for children's pictures with both pencils and paints. But it is the drawing with flowers made with paints for Mother's Day that looks more gentle and touching. Our master class is quite simple and suitable even for beginners.

Necessary materials for drawing with paints for Mother's Day in stages
- thick sheet of paper
- watercolor paints
- tassel
Instructions on how to paint a picture for Mother's Day in stages
- First of all, we note that there is no need to rush when working with watercolors, especially if you are layering shades, as in our master class. It is very important to let the paints dry before applying a new coat. So, we take red watercolor and make light drop-like strokes, forming flower petals.

- paint yellow color fill in the middle of the flower. No need to strive to completely fill the entire space inside the petals. A more beautiful effect can be obtained just by leaving small bald spots.

- By the same principle, we fill the entire sheet with flowers. We make flowers in different shades and shapes to give the picture a more original look.

- We are waiting for the complete drying of the first layer and begin to layer the shades. We change the intensity from the center to the edges, which will create a more voluminous, slightly faded effect.

- While the flowers are drying, draw a few leaves and twigs, filling the space between them.

- We give the finished bouquet more volume by layering shades and drawing details.

Summary: Children's drawings on the theme of space. How to draw a picture for Cosmonautics Day.
On the eve of Cosmonautics Day, it will be relevant to talk about children's drawings on the theme of space. In this article we want to tell you how to draw space using non-traditional drawing techniques. Here we will consider drawings on the theme of space, made in the techniques of scratching, passe-partout, "spray". You will also learn how to draw unusual drawing for Cosmonautics Day with shaving foam or bubble wrap. The techniques for drawing the cosmos described in the article are easy to perform and are available, including to children of preschool and primary school age.
1. Drawings on the theme of space in the technique of scratching
The word "grattage" comes from the French gratter - scrape, scratch, so another name for the technique is the scratching technique.
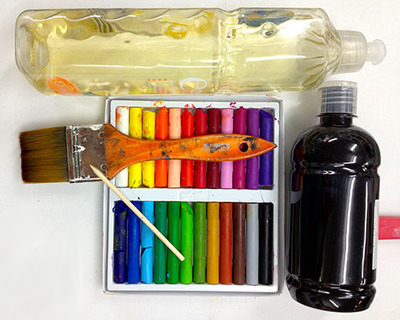
To draw a drawing on the theme of space using the scraping technique, you will need:
Heavyweight white paper (or cardboard)
- colored wax crayons
- black gouache paint or ink
- dishwashing liquid
- brush
- any sharp object (wooden skewer, toothpick, knitting needle, etc.)
Work plan:
1. Color the paper with colors wax crayons in free style. Do not spare the crayons, they should cover the paper with a thick layer. Note: even a small child can handle this part of the work.

2. Mix 3 parts black gouache paint (ink) and 1 part dishwashing liquid. Spread the mixture evenly over the paper.

3. Let the paint dry completely. You can speed up this process with a hair dryer. And now the most interesting! Take any sharp object and scratch your drawing on the theme of space with it. The result will be an original work for the Day of Cosmonautics, made in an unconventional drawing technique, scratching

2. How to draw space. Drawing in the technique of "passe-partout"
This is a very unusual and fascinating drawing technique. First, as in the previous technique, you need to color a sheet of paper with colored wax crayons. As a result, you will get a bright, colored rug. After that, draw patterns of planets, flying saucers, space rockets, stars, etc. on cardboard. Cut out templates. On the dense sheet lay out the cut out templates in the form of a composition on black paper. Circle them with a pencil, then cut out the silhouettes with nail scissors. Note: This step must be performed by an adult. Now put a black sheet of paper with cut out silhouettes on the "rug" painted with crayons. Drawing space in the technique of "passe-partout" is ready. Link to original source.

3. Children's drawings on the theme of space. Drawing with shaving foam
For children in creativity, the process itself is more important than the result. We, adults, are interested in the final product of our activity. Today we want to offer you a kind of coloring game that will satisfy the needs of both children and adults. The site games-for-kids.ru describes an interesting way to create a so-called. "marble paper" using regular shaving foam and paints (or food coloring). Taking advantage detailed instruction on the manufacture of "marble paper" described on this site, you can make beautiful drawings on the theme of space for Cosmonautics Day.

4. Drawings for the day of cosmonautics. Draw space to music
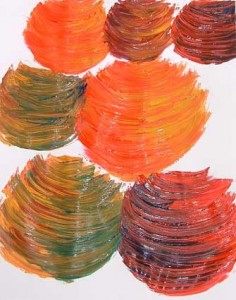
In 1914-1916 the English composer Gustav Holst composed the symphonic suite The Planets. The suite consists of 7 parts - according to the number of planets in the solar system (excluding Earth) known at the time of writing. We suggest that you do the following with your child: interesting activity dedicated to the theme of space, on the eve of the day of cosmonautics.
Give your child a large sheet of paper and paint. Ask him to divide the sheet into four equal parts with a simple pencil. Now let him listen in turn to any 4 parts of the suite (for example, Mars, Venus, Jupiter, Uranus). listening to every part piece of music, he must depict on canvas the emotions and feelings that this music evokes in him. Children usually like this kind of work very much. Here is what one of our students drew.

From the resulting abstract paintings, then it will be possible to cut out the planets and stick them on a sheet of black paper. The drawing for Cosmonautics Day is ready!


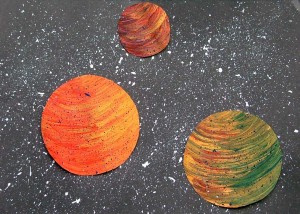
5. Drawings on the theme of space. Drawing space with a toothbrush
We suggest you make a drawing on the theme of space in the so-called. spray technique. Using a toothbrush on a sheet of black paper, spray white paint. You will have a starry sky. Planets can be drawn with a sponge, smearing paints of different colors with it. Look what beautiful drawing on the theme of space turned out with us!

6. Children's drawings on the theme of space. Non-traditional drawing techniques
If suddenly you have a piece of air bubble wrap lying around at home, now is the time to use it to children's creativity. After all, with the help of this wonderful material, you can very simply paint the planet. It is only necessary to apply paint to the film and attach it to the drawing in the right place.

The planet in the figure below is also made in this technique. non-traditional drawing. Additional prints were made using a cardboard toilet paper roll and a plastic straw. Also, when drawing this drawing on the theme of space, the so-called. spray technique.


7. Drawings space. Drawings for Cosmonautics Day
An interesting project for children on Cosmonautics Day was prepared by MrBrintables.com. On this site you can download and print a drawing of the moon. The moon is presented in three sizes: large (22 sheets), medium (6 sheets) and small size(1 sheet). Print the drawing, stick the sheets on the wall in the correct sequence.
Now invite your child to dream up who lives on the moon. Let him draw its inhabitants, their houses, transport, etc.

8. Drawings on the theme of space. Children's drawings on the theme of space
These charming aliens are drawn using this non-traditional technique drawing is like blowing paint through a straw (plastic tube). What is this technique?

We apply paint diluted with water with a brush (or pipette) on a sheet of paper so that a stain of paint is obtained on the sheet. After that, we blow on the paint through a straw, it spreads into different sides and we get a spot of a bizarre shape. When the paint dries, we finish our alien with all the necessary details.
Natalia Dobrynina
The children and I talked about the upcoming holiday. Watched the presentation dedicated to the first cosmonauts: the first animal to return from space unharmed - the dogs Belka and Strelka; first person in outer space- Yuri Alekseyevich Gagarin; the first woman astronaut in the world - Valentina Vladimirovna Tereshkova; first person to go out into the open space, - Alexey Arkhipovich Leonov.
https://ok.ru/video/282000952046
We talked about outer space, about the stars, about our star called the Sun, oh solar system. Remembered a poem that was taught in the past year: "Yuri Gagarin" by Vladimir Stepanov
AT space rocket
With title "East"
He is the first on the planet
I was able to climb to the stars.
Sing songs about it
spring drops:
Forever will be together
Gagarin and April.
Learned a poem about solar planets systems:
All the planets in order
Call any of us:
Once - Mercury,
Two - Venus,
Three - Earth,
Four is Mars.
Five - Jupiter,
Six - Saturn,
Seven - Uranus,
Behind him is Neptune.
He is eighth in a row.
And after him already, then,
And the ninth planet
called Pluto.
After that, the children were asked to fantasize about space. For children to choose drawings were offered: paints, pencils, plasticine. Everyone chose what they wanted. As a result, after a little thought and reflection, my children got such works.


Related publications:
Leisure for Cosmonautics Day FGBDOU "Child Development Center - Kindergarten No. 1" UD of the President of the Russian Federation Leisure time dedicated to Cosmonautics Day Compiled by: secondary teacher.
Collective work of children for the day of cosmonautics. The theme of space is always interesting for children. Therefore, on April 12, on the day of cosmonautics, we celebrate holidays.
April 12, 1961 for the first time in the world on spaceship Vostok was flown by the first cosmonaut of the planet - Yu. A. Gagarin. Single turn flight.
Space flight. Leisure time dedicated to Cosmonautics Day Leading: Today is not an easy day, Everyone in the world knows this. For the first time, a brave man from the earth flew into space. April 12, 1961 - the first.
The purpose of this work was to acquaint children with the holiday "Cosmonautics Day"; to promote the formation of children's ideas about space.
Entertainment for Cosmonautics Day Preparatory group. Entertainment dedicated to the day of Cosmonautics Purpose: To instill in children respect for the work of people whose work is connected.