Finally, I post the promised MK on the gnomes. The height of the finished doll is 34 cm.
Materials: 2 types of green fleece, green felt. Nylon, artificial llama fur, eyes, white and 2 types of green threads, synthetic winterizer, wire. Glue moment, hairspray. Powder and always a good mood.

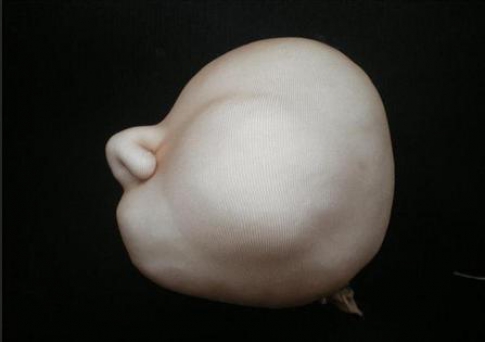
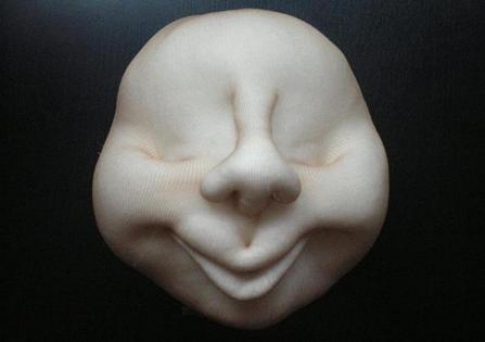
We begin to make the head: cut out a circle with a diameter of 10 cm from the nylon and lay a line along the edge, form a ball with a diameter of 12 cm from the synthetic winterizer for the face and a small ball for the nose. First we put a small ball on the nylon, then a large one and tighten the nylon, leave a hole of size 4-5 cm.
3.
You should get a blank for a face with a diameter of 10 cm.
4.
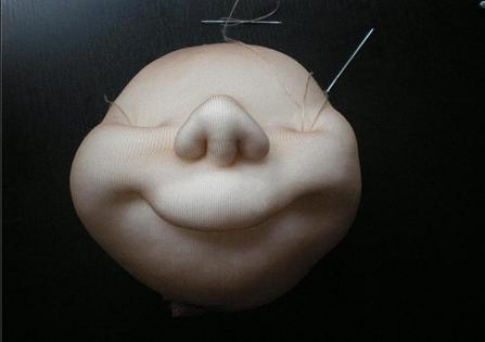
We make tightenings - we sew the nose, mouth and upper eyelid.
5.
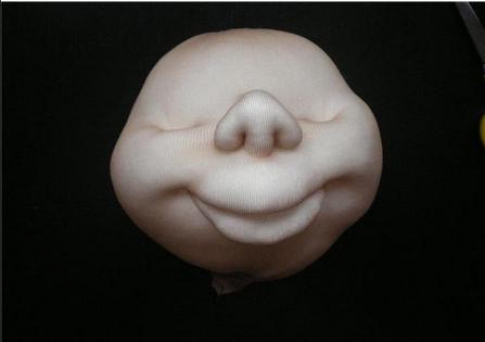
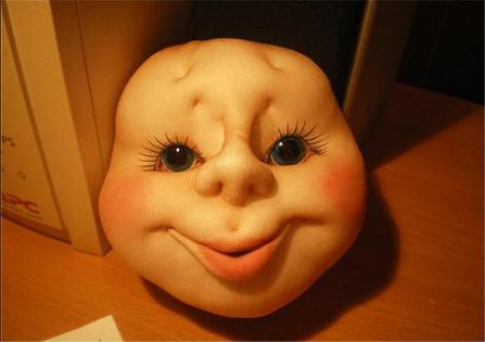
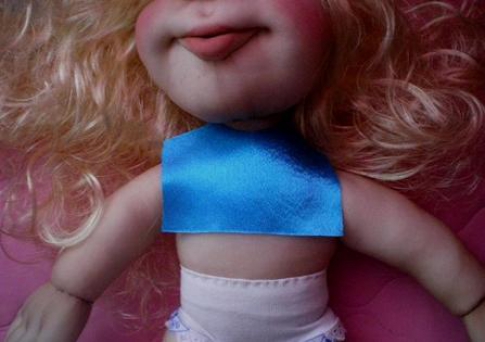
We glue the eyes and sew wrinkles.
6.
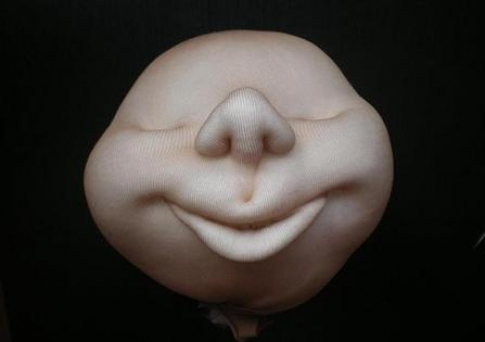
Apply makeup and spray your face with hairspray.
7.
We begin to make ears: cut out 2 ovals 5x7 cm from nylon, tear off 2 pieces 5x7 cm from the synthetic winterizer, then put a smaller piece inside each.
8.
We lay a line along the edge of the nylon - we fold the synthetic winterizer in half and put it inside the nylon - we tighten the nylon.
9.
From the received - by stretching we form an ear. With small stitches we sew the inner part. Then we sew the lobe.
10.
11.
Sew the finished ears to the face.
12.
From a nylon with a diameter of 10 cm and a synthetic winterizer ball with a diameter of 12 cm, we make the back of the head.
13.
Now sew together the face and the back of the head.
14.
We cut out a beard - a strip of fur 2x25 cm - and sew it around the perimeter of the face.
15.
We make a doll frame from a wire 60 cm long. We bend it as in the photo - the neck is 5 cm, the shoulders are 5 cm, the distance from the shoulder to the bottom is 18 cm.
16.
We fasten the finished handles to the frame - how to make handles can be found in my MK on the snow maiden http://stranamasterov.ru/node/847907. - We wrap the places of screwing the handles with adhesive tape.
17.
We wrap the frame with a strip of synthetic winterizer.
18.
We bend the wire as in the photo - the length of the foot is 5 cm.
19.
Now we wrap it with synthetic winterizer again - the thickness should be 1.5 cm.
20.
We take white and light green threads together and wrap the legs imitating stockings.
21.
From the green fleece we cut out and sew the jumpsuit - we fold the bottom and hem it.
22.

Full-size pattern on an A4 sheet.
23.

We put the finished jumpsuit on the frame - then we stuff the tummy area tightly with synthetic winterizer - we sew the shoulders.
24.

We cut out boots from felt - we sew them in front and turn them inside out - we bend the lapels and put them on the legs - we must take into account that the boots should turn out - left and right - the photo shows that the inside is narrower than the outside.
25.

We glue the sole to the foot of the doll - from behind the sole should protrude 1 cm beyond the heel - then we sew the upper part to the sole. In the area of \u200b\u200bthe heel we put a lump of padding polyester so that it is not empty. We twist the cord from the threads and sew it along the bottom of the boot.
26.

We cut out. We sew and put on a jacket - we glue the sleeves to the wrist.
27.

We sew the cap - we sew the top and the inside - then we connect them together and turn them inside out. We sew the edge of the cap with a cord.
28.

We lay a line and tighten the cap to the desired size. Lay a couple of folds and sew them.
29.

30.
We sew the finished cap to the head.
31.

Then we decorate the cap with a strap with a buckle. We sew the finished head to the body. We put a scarf on the doll and voila, our gnome is ready!
32.

33.
Back view.
34.

Want to unique collection dolls for your child or maybe you have an idea for making a homemade puppet theater? Pantyhose dolls handmade- a great idea for the implementation of any creative project. It is easy to find a couple of unnecessary tights in each apartment, and you can buy a synthetic winterizer at a fabric store or take it from old jackets. The finished doll is very plastic and realistic. We offer you several workshops for making dolls with your own hands in hosiery technique.
Sock dolls, ideas with photos
Materials:
- scissors;
- wire;
- glue;
- tights;
- a needle;
- Knitting;
- ordinary threads;
- pieces of fabric.
If you are new to making dolls, we suggest you start with the simplest - a pantyhose baby doll. This toy has enough simple form, so it is ideal for mastering the work with kapron.
1. Take a nylon sock, fill it with filler and tie a knot.
2. Mark the neck area and sew with a basting stitch. After that, pull off the neck and wrap a few more times with threads.

3. Sew stitches around the legs and pull them together.
4. Sew a small circle on the head and pull it off - this will be the spout.
5. Now, in the area of the seam of the tights themselves, insert the needle to the tummy of the baby doll and grab a few threads of nylon to make a hole-navel. Also separate the buttocks without tearing off the thread.
6. Ears can be made on the head, to do this, pull the thread in two places. Embroider eyes and brows with thread

7. From the corner of the mouth to the eye, tighten the cheeks and immediately sew on the bead-eye.
8. In the crown area, stick a needle with a red thread and make a mouth so that the baby smiles. Make a knot at the top of your head to hide it later with your hair.

9. Cut off the excess from the knot on the head and make handles for the baby doll out of this piece of nylon. Sew the arms to the body.
11. Clothes can be made from scraps of fabric or colored socks.

Dolls from nylon tights master class
Pupsik is ready! By the same principle, you can make several boys and girls. After you practice stocking technique on such babies, start making more complex puppets.

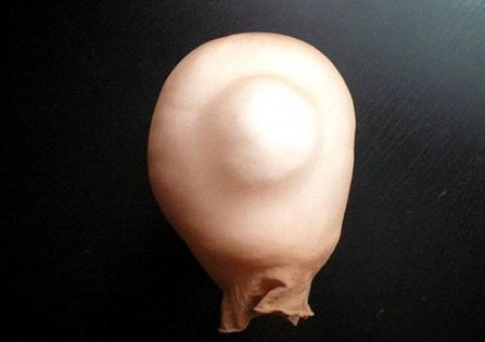
2. Now start shaping the face. To do this, roll up a ball from a synthetic winterizer, insert it into a bottle covered with nylon and form a nose with a needle and thread. After that, you can add more synthetic winterizer to form the cheeks, forehead and chin. Glue the eyes, embroider the mouth and give the doll a suitable expression. To make the neck line stand out, drag it with threads.

3. Pull the remaining lower part of the tights up and pull through the neck. Fasten the tights at the top with threads. Find hair from threads.
4. Hands are made of wire. Cut pieces for fingers, wrap them with padding polyester and gradually connect. You need to wrap the entire handle from the palm to the shoulder, and then put on it the “skin” of caprons. Highlight the fingers with threads. 
It is not necessary to sew legs for such a doll, especially if you plan to dress her in a long skirt. You can come up with an outfit for your grandmother from pantyhose yourself.
Frame from plastic bottle great for making not just a doll, but a heating pad for a teapot for tea leaves or a cap for a sugar bowl. You can make such a heating pad according to the previous master class, most importantly, correctly calculate the length of the skirt. 
Today, in the manufacture of toys, mass production is often used and all dolls are similar to each other. That is why interest in has recently increased. It is quite possible that children do not take care of store toys, because they do not see their value, so parents can make some kind of toy out of tights with their own hands together with the child. Let the product not be perfect the first time, but it will teach the child to appreciate the work of others and help to reveal his abilities for needlework.
DIY frame doll
Frame baby dolls made of nylon tights are the pinnacle of hosiery craftsmanship. These toys are pleasant to hold in hands, they are quite plastic and look like real dolls.

For their base, a wire frame 30 cm long is made. It consists of a 12 cm loop for the head, an oval body 12 cm and legs 16 cm. Separately, the handles are tied with electrical tape and loops are made at the ends of the legs for shoes.
 First you need to separately make the head and form the face of the doll. A head is made from a piece of tights, and then the individual parts are pulled together with threads. The eyes are either embroidered or glued on. Threads or an old wig can be used as hair.

For a doll about 50 cm in size, you will need 1.5 m of wire from which the frame is twisted.
The palms are made from pieces of wire wrapped with padding polyester. A piece of tights is put on top. Fingers and nails are embroidered with threads.

The palms are screwed to the frame and it is completely wrapped with padding polyester to the desired thickness. After that, the body is covered with padding polyester and the head is sewn on.
It remains only to sew a beautiful dress for the doll and dress her.
 All seams are desirable to mask. If you are sewing a child toy, then the ratio of the torso to the head is 3:1 for a baby doll, 6:1 for a schoolboy, and 8:1 for an adult.

The frame is made of aluminum or copper wire, while it is possible to combine wires of different thicknesses. Dolls on the frame can sit and stand, because the wire makes separate parts of the body movable. Keep in mind that the smaller the doll, the more difficult it will be to sew clothes for her.
Watch the video: stocking dolls
You can sew heroes of children's fairy tales from nylon tights that will decorate the interior and become good.
Creative people do not stop at mastering already known types of needlework - they constantly have new ones. creative ideas. Many needlewomen already know how to sew a do-it-yourself tilde doll, and from the moment products made from thin nylon became cheap and affordable for everyone, ideas appeared on how to create a doll from nylon tights.
Pantyhose dolls: main varieties
Since master classes describing how to make a doll from nylon tights have appeared relatively recently, there is no clear classification of toys for this type of creativity.
Nevertheless, soft dolls from kapron and synthetic winterizer can conditionally be divided into several types - depending on the appearance and manufacturing methods.
Tumbler dolls
In creating a doll, not only nylon tights are used - stockings and socks are also great for this. At the end of the working process, the master receives small soft toys of a round or oval shape with conventionally marked limbs.
Simple master classes on creating this type of dolls are great for teaching beginner needleworkers.
Do-it-yourself butts
Another easy way to create a doll from nylon tights. From the name you can understand the peculiarity of the doll - in the workflow, the face and buttocks are especially distinguished. Masters jokingly call this toy a fortune teller - which side it will turn to you in the morning, such a day awaits you.
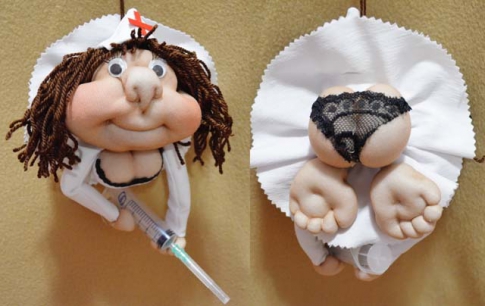
The doll needs to be made in parts: first make all parts of the body (head, hands, feet, ass), and then sew them to the clothes.
Skeleton doll
Frame toys take longer to make than previous types, they become taller and take appearance close to human.

The main material for the frame is a rigid wire wrapped with filler, but plastic bottles can also be used.
Nylon dolls - a master class for beginners
If for the first time you decide to make a nylon soft toy, take note of the method of creating a product from stockings. Such a master class will not take you much time at all - after practicing several times, you will learn how to make a cute tumbler doll in just an hour!
- Take a medium-length nylon sock and stuff it tightly with white filler, like a padding polyester. Pull the edges of the product with a thread.
- Define the neck in the following way- in the right place, sew the sock with a seam forward with a needle in a circle and tighten. Wrap the thread several times and tie to secure.
- Do the legs in a similar way - select two small circles at the bottom of the product with an overcast seam different parties and pull off.
- From below, in the area of \u200b\u200bthe seam of the sock, stick a needle, take it out on your stomach and stick it in again. Slightly tightening a small seam. You will receive a navel. Return the needle to the bottom seam and secure the thread with it.

After preparatory work with the torso is over, the doll from nylon tights needs to be endowed with emotions, giving conditional facial features.
- Form the nose in the same way as the legs, but grab a circle with a smaller radius.
- Ears can be made as follows - pinch a small area on the side of the head with your fingers and pull it with a thread once.
- In the right place, make three black stitches - eyelashes.
- Insert a needle with a threaded bead-eye under the cilia and bring it out in the place where one of the corners of the mouth should be, and pull it off slightly. Repeat the same action on the other side. So you get both eyes and cheeks at once.
With a single ply of red thread or a permanent marker, mark the smiling mouth.

- Cut off the tight tail on the head of the baby doll - the extra matter will come in handy for sewing hands. Cut it in half and sew it up so that you get two fabric “sausages”. Stuff them soft material and sew to the body.

Sew to head if desired. long hair from yarn so that the baby doll turns into a girl. To finish the doll from nylon tights, you need to make her toy clothes at your discretion.
Control the tension of the working thread and capron yourself: for example, the cheeks need to be tightened more to highlight it better, and the navel can be barely marked. But do not overdo it, otherwise you may tear the working material.
Do-it-yourself nylon frame dolls: step by step instructions
If the previous master class seemed too simple to you, try making a doll from nylon tights on a wire frame. Thanks to the rigid wire, the limbs of the toys can take different positions.
Head
As a rule, most of the time is spent on creating the head and shaping the facial features.
- Take a piece of synthetic winterizer and squeeze it into a tight ball the size of a fist. Put the soft ball into the nylon tightening bag. Form another smaller lump and stick it on the side - this is the future nose. Tie the opening of the nylon bag, but not tightly.
- Insert the needle from the side in the upper part of the nose, pull it out on the other side and pull it off a little, forming the bridge of the nose.

- From below, form the nostrils in a similar way.
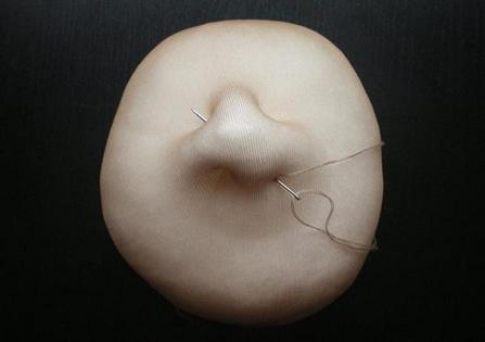
- Make thread loops around the nostrils.
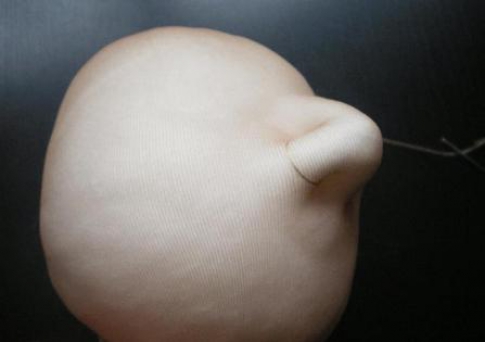
- Pull off the loops, clearly outlining the nose.

- Through the hole at the bottom of the head, add 2 more identical small soft lumps in the places where the cheeks should be, and an oblong piece in place of the future mouth.
- Insert the needle in the place where the left corner of the mouth should be, and bring it out in the place of the left eye - tighten until the cheek is formed. Repeat the same on the right side.

- Between the corners of the lips, stretch a tight thread - a smile.
- Tighten another thread under the first, forming the lower lip. During each action with the lips, bring the needle into the eye sockets to gradually form the hollows for the eyes.
- Insert the needle in the middle of the smile and bring it out in the center of the upper lip.

- Tighten the thread, forming sponges with a bow.
- Extend the bridge of your nose with a few back and forth movements of the needle.
- Glue the eyes in the right place - you can buy them in a special needlework store or borrow them from an old unwanted doll. Paint cheeks, lips and eyebrows with acrylics.
For hair, put an old toy wig on the doll or buy a new one from a specialty store.

Hair can be made from yarn, floss threads in the same way as on a waldorf doll.
torso
After working on the toy head, the doll must be provided with a wire frame. Take as a basis a ready-made scheme with approximate limb sizes.

Even a beginner needleworker can easily make a wire base, but it will take patience to calculate the length of the limbs and bend proportional sections.
- Make the frame of the palms - connect together 5 short pieces of wire proportional to human fingers. Wrap the wire tightly with filler.
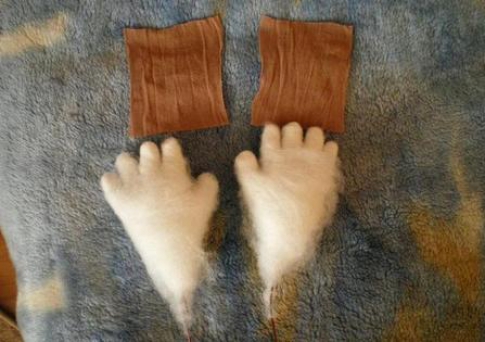
- Cut out small square pieces of nylon and wrap them around your palms.
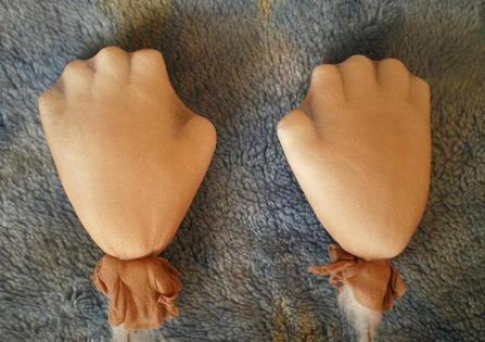
- Treat the hands in the same way as the face, giving the fingers relief.

- Wrap the torso frame tightly with stuffing. Screw the head and hands in the right place.

- Finish processing the frame by wrapping it with nylon.
Such a doll made of nylon tights can be dressed up in any doll clothes that fit her in size, or you can sew a costume yourself. Due to the fact that the toy is suitable for many different outfits, you have the opportunity to complement her image in any way - braid her hair, decorate with beaded bracelets or a hairpin with cold porcelain flowers.

In conclusion, watch a video tutorial that will tell you how to make a cute brownie doll from nylon tights.
Widget from SocialMart
Take it, tell your friends!
Read also on our website:
show more
Steps
- 1 Draw an ellipse to make the lid.
- 2 Draw a similar ellipse slightly lower than the first one to make the bottom and inner lid.
- 3 Draw a slightly larger part of the ellipse under the lid to represent the widest part of the jar.
- 4 Draw a vertical line from each edge of the larger ellipse to create the sides of the jar.
- 5 Draw another floor of the ellipse by connecting two vertical lines and thus creating the base of the jar.
- 6 Draw the smaller half of the ellipse to create the bottom of the can.
- 7 Add the rest of the details for the lid.
- 8 Add additional embellishments and outline the sketch.
- 9 Erase the sketches and color the sketch. If necessary, indicate the brand of soda.
- Don't use a cheap pencil. Cheap pencils (graphite) usually contain a lot of impurities that interfere with the creation of a good sketch.
- Don't try too hard to draw with deep, chiseled lines on paper. Light, sweeping movements of the pencil (or pen) give good results. In drawing, less is often more.
- Try different types of paper. Often it is sketch paper that gives a lot of pleasure. Heavier and more textured paper allows for more interaction between the pencil and the surface. This creates great results!
- Alternative shading methods include using straight lines to form curves. This is an advanced method and best left for later!
- Try to draw a crumpled jar when you can easily draw a simple jar. Wrinkled metal, shiny and matte contrasts will be interesting to display!
Warnings
- Once your brain understands how to do it, you will want to draw all the time. Any blank sheet of paper can be a potential victim.
What will you need
- Can of soda (optional)
- pencil
- paper
- eraser (optional if you make a lot of mistakes)
The glass jar is a versatile item. It is used to store cereals and jams, as a vase, as a decorative item in the interior. Everyone has experienced them at some point in their life. This article discusses in detail how to draw a jar, and how to supplement the work.
What to pay attention to?
Before proceeding directly to drawing, it makes sense to carefully and thoroughly study the subject. When deciding how to draw a jar, it is first of all necessary to decide which variety will be depicted. Glass jars for jam and tins with canned food differ greatly in shape. Common and unique features of jars:
- All banks are symmetrical.
- Glass varieties have a neck.
- Any jar can be opened - with a screw cap or
- The lid of a glass jar may be of a different size than the diameter of the jar itself.
Stages of work
Consider in detail how to draw a jar with a pencil:
- We outline the general proportions - height, width. In this case, it is important to monitor the distances to the edge of the sheet. The outline of the jar should be commensurate with the size of the chosen format. If the jar is too small, it will get lost on the large sheet and look ridiculous. If the jar practically rests on the edge of the sheet, it seems that it is “cramped”. Therefore, you need to monitor not only the size of the can itself, but also its position in the figure.
- The neck and lid are outlined.
- The bottom of the jar is rounded, because there is a circle at its base.
- The lid is drawn - it can be high and embossed.
- Details are added - accents on the shadows, a small shading that will emphasize the volume of the can and the lid.

Thus, the question of how to draw a jar can be considered resolved.
Tin can drawing
A tin can is just a regular cylinder. Stages of work:
- We outline the proportions and dimensions - width, height.
- The bottom and top of the can have the same diameter and are depicted as ellipses.
- The most interesting thing is to come up with and draw a label on the side. It is she who is distinctive feature tin cans. It can be a drawing, an inscription, or a combination of both. After the sketch is ready, it can be colored with pencils, felt-tip pens or paints.
Finishing and completing the drawing
When a pencil sketch is ready, there is often a desire to finish the work. As a result, you want to see a beautiful, colored drawing, and not just a sketch. That is, the question of how to draw a jar is complemented by the task of making this jar beautiful and aesthetically attractive. List of specific options and recommendations.