Recently, educational toys have appeared on the shelves of all stores. "And how without them?!" - teachers exclaim. Let's figure out what an educational toy is.
Based on the name, this is a toy that develops something in a child: fine motor skills or some knowledge. By and large, all toys are educational: a rattle teaches a child to control his hands (grab, shift from hand to hand, throw). And yet, developing toys are usually called those that allow the child to learn something in game form. You can make many of these toys with your own hands.
The main stages of child development
Before you start making a toy, determine what age it will be designed for. It is obvious that the five-year plan will not be interesting. It is also important what the child is interested in. It depends on what shape your toy will be and what plot it will be combined with.
I would like to remind you that everything is individual. Perhaps your child has already mastered some skill ahead of time, perhaps not.
0- 3 months
The child most of the time lies on his back. It is necessary to develop the ability to focus.
Types of toys: mobiles, bright rattles, garlands, beads.
Requirements for toys: different textures, lightness of toys, simple shapes. The colors are bright, but not garish. Preferably no more than 5 items.
3 - 6 months
The child moves more and pulls all objects into his mouth. Learn to roll over from back to stomach. It is necessary to develop coordination of movements, hearing and vision, grasping skill.
Types of toys: tumblers, rag beads, toys with a mirror, rattles - dumbbells, rings. Developing rugs with arches. Rag balls, bracelets with buttons.
Requirements for toys: bright, colorful toys that make different sounds.
6 - 9 months
The child learns to crawl, recognizes loved ones. For a while he is able to entertain himself. It is necessary to encourage motor and speech activity, as well as to develop the ability to grab an object not with the whole hand, but with two fingers.
Types of toys: educational rugs, sorters, pyramids, nesting dolls, musical toys with buttons.
Requirements for toys: bright, sounding toys should differ in shape, weight, method of use.
9 - 12 months
The child learns to walk and talk. It is necessary to develop motor and speech activity.
Types of toys: educational rugs and picture books, wheelchair toys, dolls with pronounced facial features, glove and finger puppets, pyramids, cubes, sorters, options for boxes, buckets, baskets (toy inserts).
Requirements for toys: toys made up of different parts that can be assembled and disassembled. Toys that reflect real world situations.
1 year - 1 year 3 months
Active development and exploration of the surrounding world begins. The child shows a desire for independence. It is necessary to develop motor and speech activity, as well as operations of thinking: comparison, generalization, analysis.
Types of toys: pyramids, cubes, insert toys, musical instruments.
Requirements for toys: toys made up of different parts that can be assembled and disassembled.
1 year 3 months - 1 year 6 months
Development of speech, encouragement of speech activity, development of fine motor skills (unfastening - fastening different ways). The development of the operation of thinking.
Types of toys: developing mats and books, cubes, toys with a surprise (secret), sorters.
Requirements for toys: toys that allow you to generalize objects on the basis of similarity, size, color. Names of animals, plants, clothes, etc.
1 year 6 months - 1 year 9 months
Active knowledge of the surrounding world. It is necessary to develop the active use of objects for other purposes, independent play, understanding of emotions.
Types of toys: toys that reflect real situations and objects of the world, animals.
Requirements for toys: subject games (plot, construction, etc.). Toys that require you to show and name colors, shapes, choose an action.
1 year 9 months - 2 years
The child is active social development. It is necessary to develop an understanding of shape, color, size.
Types of toys: sorters, pyramids, cubes, books.
Requirements for toys: toys that can be grouped by shape, color, size.
2 - 3 years
The active social development of the baby continues, he already knows how to interact with other children. It is necessary to develop fine motor skills, as well as the ability to distinguish shapes, colors, sizes.
All kinds of toys. Crafts from natural materials, paper, plasticine.
Requirements for toys: toys for subject, role-playing games.
35 years
Activity, the ability to independently build their gaming activities. These skills need to be reinforced.
Types of toys: children's lotto, puzzles. Games for learning the time of day and seasons. Learning the alphabet and numbers.
Materials for the manufacture of educational toys
There are a lot of materials for making educational toys, most of them are in every home!

Remains of fabric
Educational toys are good because you can use the leftovers that every needlewoman has for them. For example, the remains of various fabrics, felt, fleece, knitwear. Any texture is welcome!
Want to make your life easier? Use small pieces of fabric that are applied to new suits.
Those who know how to knit can use the squares that are knitted to calculate the loops.

Everything is used: laces, ribbons, buttons, beads, zippers, buttons, drawstrings, latches, adhesive tape, buckles and much, much more! And small decals may well play the role of a secret hidden behind a curtain or in a pocket.

furniture fittings
Latch latches, hooks, keys with locks and threaded screws can be used, for example, when “building” a house.

Rustling elements
The rustling of one or another element is achieved by inserting a crumpled plastic wrapper from tea or a box of chocolates inside.
Thundering elements
Thundering elements represent a huge scope for imagination. Put inside a plastic container from shoe covers or a plastic egg from Kinder Surprise, into which some kind of cereal (rice, peas, buckwheat, small pasta), salt, dry cherry pits or acorns is poured.

Ringing elements
Most often they are a small bell bought for little money in a souvenir shop or a fishing store.
Shiny and transparent elements
These include pieces of thick foil, the inside of a juice or milk package, as well as packaging from toys or bed linen.

Opening elements
Children usually like them very much, especially if someone is hiding under them) Options: window, pockets, curtains. And you can use these ordinary caps from water or juice.

Old clothes
Some craftswomen use the children's clothes of their kids, which are already small for them.

Fillers
Syntepon, foam rubber (then your cube will keep its shape) or polystyrene are usually used as soft fillers.
However, I am sure that if you think about it, you will definitely come up with something of your own!
What are educational toys
On the Internet, you can find a huge number of educational toys made by yourself: books, cubes, panels and rugs, pillows, stands, houses, animal figures, etc.

Developing mat


The plots are also varied. It can be some kind of children's fairy tale or just a plot picture.

Remember, for example, what your boy is fond of: cars or trains?

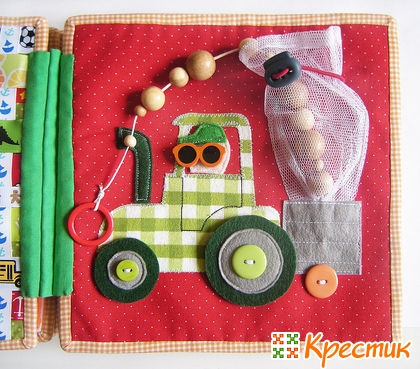
Interesting options for books "about the baby" - they not only develop motor skills, but also help the child to get to know the world around him better.

Or maybe it will be just a cube, with some elements? You choose.

All toys can be divided into 2 large groups : those with whom the child can play by himself and those for whom need help or adult presence. Usually, the former include entertaining toys for children in the first months of life, as well as toys that develop fine motor skills. After several shows, the child will be able to unfasten a zipper or a button, unscrew the cap, etc.

The presence of an adult requires toys that develop the ability to count; find more-less, right-left, top-bottom; name colors and geometric figures, parts of the body or animals, explain the rules of behavior or traffic etc.

Toy options and the skills they develop
Such a bracelet is useful for a very small baby (from 2 to 4 months). It will contribute to the development of hearing and vision of the baby, as well as coordination of movements.

Beads (slingobuses)
Slingobuses develop color perception, tactile sensations, teach the child to sort out and roll small elements. And in addition to beads, you can attach several small knitted animals or fruits.

Cushion with buttons
Despite the apparent lightness - the toy is quite interesting. develop baby's sense of touch. Take it with you on the road and ask the child (depending on his age) to find all the buttons certain color, count them (on the entire pillow, in one row or column), find the largest or smallest button of a certain color in a row or on the entire pillow, show which button is to the right of the small blue one, etc.

Book
Develops fine motor skills, teaches to name animals, allows you to study colors and geometric shapes.


Stand with locks
I'm sure the boys will love it! After all, there are so many things that can be opened, unzipped, rotated and pressed. Making a developing stand is quite simple, most of the elements can be found in the pantry of any man.

Rug - fairy tale
The rug develops the child's speech and imagination. Simple leading questions from parents will help the baby learn these skills faster (And imagine that Kolobok turned the other way? Who will he meet? Etc.)
Toys are something that attracts both adults and children, they are completely different and for different purposes.
DIY fabric or textile toys are some of the safest and most attractive types of toys for children. They can be played by children from the very early childhood, but also in adult life Stuffed Toys do not lose their relevance. For example, now it has become fashionable to give and decorate home comfort with handmade interior toys. As a rule, such toys are not cheap, so many consider them a sign of luxury and prosperity.
Even the most simple toy made with high quality and with love can become very valuable and necessary in someone's family!
For example, my daughter has become a favorite toy - the owl Angela, which I made for her a couple of years ago, now she does not part with her and takes her to sleep with her for a walk, and to the store, to the dacha, (well, at least they bathe separately)) she generally liked her. I think most children either have a favorite toy or really want to have one.
Therefore, today I propose to make a beautiful toy for a gift, and for whom it will be up to you to decide!
Below I have collected templates with a pattern of toys, as well as a step-by-step master class on making.
How easy it is to sew a soft toy. DIY soft toys for beginners with templates
For beginner craftswomen, it will be easiest to sew from a simple pattern.
For example, take a bear template and print it on a printer, increasing it to the desired size, but you can also redraw it on paper, to do this, enlarge the template you like to the appropriate size on a computer monitor, attach it to the screen White list paper and carefully trace all the contours of the pattern with a pencil.

After cutting out the paper template along the contours.
Choose a beautiful fabric for the toy.
If this is not a complex toy, for example, like a bear in the photo, then here you will need to fold the fabric in two with the front side inward, you can fix it with pins for convenience so that it does not slip, then attach a paper template to the fabric and circle the contours of the fabric with soap or chalk.
Cut out pieces of fabric leaving allowances for seams.
We sew on a typewriter with a regular straight line, leaving a small hole in order to turn the toy on the front side later.
Notches should be made at the folds so that the fabric does not pull in these places.

All now the toy is turned inside out and stuffed with padding polyester, padding polyester or other similar fillers.
Stuffing should not be too tight, but in order to avoid empty areas, the filler must be distributed evenly.
The hole through which stuffed at the end is sewn up with a blind stitch.
We glue or embroider the eyes and mouth, nose on the toy.
We add beautiful details, for example: a bow, a flower, a scarf, buttons, or you can even sew clothes. There is a huge field for creative experiments.

Realize the idea!
A simple pattern of a cat from fabric.
Another easy-to-tailor model is a kitty.
It is sewn and cut according to the same principle as the bear, only two parts are cut out here.
This is the cat itself in two parts and the tail, also in two parts.
They are sewn separately, small holes are also left for eversion and for stuffing with filler, then the tail is sewn to the base of the cat.
You can decorate however you like.

This is the cat I got.
Gave to my sister for home comfort)

How to sew a complex toy? Do-it-yourself fabric ball, an interesting idea
I think the more difficult toy to make is the one that contains many parts and which is assembled in a certain order.
One night, an idea came to my mind, why don’t I sew a ball out of fabric, it seemed so simple in my head, but when the idea got to the point, it was difficult to understand without an example what to cut, how much to cut and how then all this is right sew.
So I'm sharing the example that I did.
You will need two templates, a hexagon and a pentagon. We transfer them to paper, or even better to cardboard.

We need to cut out 20 hexagons and 12 pentagons from the fabric. I used the fabric in two colors, but this is not necessary, you can make it completely plain or vice versa colored, it's up to you.
As you cut the required number of polyhedra, it is better to decompose them in order to visually understand how you will sew.
This is what the ball layout looks like. 
Another layout option

This version of the ball is made of felt, it is easier to sew.
I chose to sew from coarse calico and on a sewing machine, so you still need to leave allowances for seams on the fabric. And iron the seams. You don't need to do this on a felt.
All parts are simply sewn into two halves, and then these two halves are connected together. You need to connect from the wrong side, and then leave a small hole not sewn up and turn it out through it.
Stuff tightly with padding polyester, and sew up the hole with a blind stitch.

Such a ball - I turned out handsome!


See also - article toys made of felt
Fabric toys step by step master classes with patterns.
I offer a few more ideas. interesting toys With step by step wizard classes.

Fabric rainbow fish


Fabric boat.


Needlework is the type of activity when creativity and the use of technology are combined in a single process.
Today I want to cover the issue of technology in detail.
What fabric to sew a toy from
In order to choose the material for the toy that we want to sew with our own hands, we need to know the pros and cons of the fabric.
Below I made a comparison of the main types of fabric used for sewing toys.
| Material name | Pros at work | Minuses | |
| Felt | A variety of colors, keeps its shape, easy to sew, does not fray, multifunctional. | expensive | For almost all types of toys: animals, birds, dolls, educational toys. |
| Fleece | A variety of colors, easy to sew, does not fray, multifunctional, washable, not expensive. | Can roll up | For almost all types of toys: animals, birds, dolls, educational toys. For example, fleece can |
| Fur | A variety of colors and textures for different types of animals. With a certain skill, sewing is easier than fabric ones. | It's crumbling. Need some skill in cutting. Do not wash. Good fur is expensive. | For soft toys-animals. |
| Knitwear | Variety of colors. Elastic, easy to sew, easy to shape the shape of the toy. Can be washed. | Good knitwear is expensive. | For dolls, educational toys. Less common for animals, birds. |
| Cotton | Easy to sew, variety of colors, washable. Not expensive. | Doesn't keep the shape. | For dolls, educational toys. |

How to fill embroidered toys
Choosing a filler for a toy is quite simple. But it is worth paying attention to the features of materials during operation. Comparison of the main types of filler with brief tips in the following table.
| Filler | Pros at work | Minuses | Which toys are best suited for | Where to get |
| Sintepon | Not expensive, soft, light, washable. | It is necessary to distribute into a soft mass, it is laborious. There may be lumps in the toy. | For all kinds of toys. | in fabric stores. Sold in meters. A medium-sized toy 30-40 cm will require 0.5 meters. |
| Holofiber, sintepuh | Lightweight, washable, lay down evenly, no lumps when stuffed. It is very convenient in work. | Expensive. Sold in large packs. | For all. | In specialized stores for creativity. For one medium-sized toy, you can buy an inexpensive pillow, for example, in the Ikea store. |
| Batting | You can stuff the toy very tightly. | Heavy, cannot be washed. Not practical. | Animals, birds. | In "Tkani" stores. Sold in meters. A medium-sized toy 30-40 cm will require 0.5 meters. |
| Grass | Eco-friendly, good for little kids. For good night, for example. | Expensive and long - to collect, dry. | Dolls - amulets, herbalists. | Forest, garden. |
| Groats | Weighting agent for stability of toys. | Do not wash. | Educational toys. | Kitchen cabinet 🙂 |
When choosing a filler, consider who the toy is intended for. For toddlers who are already running around, toys usually need to be washed, so the filling should be practical.

When you have decided on the choice of a toy - you have chosen the type of toy (animal, doll, educational), prepared a pattern, fabric, filler, threads, accessories (eyes, noses, antennae, etc.) you can get to work.
The technology of sewing a soft toy contains several main stages.
Going sequentially from one stage to another, you can easily sew any toy.
For ease of perception, I have included the stages of technology with a description in the table.
| № | Stages of technology for sewing a soft toy | Description, tips |
| 1 | Remove pattern | The pattern must be copied to paper (if it is in a magazine), or printed. All details must be signed with the name of the part, quantity, and the direction of the shared thread or fur must be indicated on each part. |
| 2 | Transfer pattern to fabric | This stage is very important, because. how you carry out the preliminary work with patterns will depend on the entire subsequent course of work. So, lay out the fabric, folded in two with the front side inward. Lay out the details of the pattern on the fabric, starting with the largest, moving to the smallest. Be sure to take into account the direction of the shared thread or fur, according to the pattern. Pin patterns with pins. Draw around the outline. Next, draw seam allowances (usually 0.5 cm.). It is necessary to outline the details, this will help to easily sew a good toy. On the fabric, sign the names of the part and indicate the share thread with arrows. |
| 3 | Cut out product details | Cut out the details of the toy along the lines of the seam allowances. Pins can not be removed until the moment of direct sewing of this part. |
| 4 | Sew the details of the muzzle, make eyes, nose, mustache. | We make a muzzle: we sew the details and make out. Make the muzzle of our toy (or the face, if it is a doll) depending on how the muzzle will be designed - it can be embroidery, appliqué, ready-made details - eyes, nose, mustache. |
| 5 | Sew the rest of the product | Sew starting with large parts (torso). Further smaller - paws, tail, ears. Basically, the parts are sewn from the wrong side, so you need to fold two parts of one part of the toy with the right sides inward, chop or sweep (so that the fabric does not move when sewing), and then sew the part along the intended line. |
| 6 | Stuff toy parts | If adding balls or grits, you need to start with them, putting this filler in the bottom of the body of the toy (or in the bottom of the toy's limbs). You need to stuff evenly, straightening the filler inside the toy with your hands. In small details, you can use a knitting needle for stuffing. Be sure to form by hand correct form toys, make sure there are no lumps and distortions. |
| 7 | Collect product details | Sew the head to the body with a seam "over the edge" with threads to match the color of the details of the product. Try to make the seam invisible, the stitches are small. Fasten well with a knot and hide the ends of the thread inside. To do this, after the knot, bring the needle a little further a centimeter to the side and cut the thread to zero, the end of the thread will be inside the product. In the same way, sew the remaining details - paws, tail. |
| 8 | Decorate a toy | Decorate the finished toy. It can be a beautiful collar for a dog or cat, a piece of fur in the form of bangs on the head of a toy, a bow or beads on the neck or head. In general, what is enough imagination and desire. |
When transferring the pattern to the fabric, be sure to take into account the pattern of the fabric, the share thread and the direction of the fur.
Drawing lines of allowances facilitates sewing and guarantees a symmetrically sewn toy as a result of work.

What seam to sew toys
For sewing toys are used different types seams. According to the illustrations and descriptions below, it is not difficult to master the techniques of basic seams.
Basting stitch
The simplest seam, but not very strong.
It is used to connect parts for ease of sewing instead of pins.
It is sewn very simply in a straight line of stitches through an equal distance.
I advise you to sew along the outlined line.
Seam "back needle"
The seam is strong, on the front side it looks like a machine line.
With this seam, you can connect the parts of toys, retreating from the edge of 0.5 cm. The connection will be strong.
You can also embroider eyelashes, eyebrows and mouths in animals with this seam.
Start as a running stitch, then go back and stitch the distance to the first stitch. Lay the seam along the line.
chain stitch
Used for decoration. Looks like a chain.
overcast seam
It is used as an overcasting of the edge of parts, both for decorative purposes and for joining toy parts.
Blind stitch
A seam is useful for joining parts on the front side.
The seam must be done with small stitches, carefully, without tightening the thread, otherwise the seam will be visible.
french knot
Used to decorate the eyes of animals big size(An example can be found in the article), as well as in the middle of small flowers when embroidering.
Pierce the fabric with a needle, wind the thread two or three times around the top of the needle.
Wrap the thread around the needle.
Without releasing, insert the needle into the fabric at the site of the initial thread removal.
Fasten the knot from the wrong side.
How to sew sequins
Sequins and beads are often used to decorate toys.

How to sew the details of a soft toy
Each craftswoman eventually develops her own secrets for working with this or that material.
Similarly, in tailoring toys, there are some nuances.
If you use these tips in practice, then the work will be argued, and the result will please not only you, but also your loved ones!
- The toy can be sewn both from the wrong side and from the front side, using different types of seams. As a rule, if the fabric frays, it will be sewn from the inside out, if not, you can decorate it beautifully from the front side.
- When working, it is better to use a palette of thread colors, choosing threads exactly in the color of the fabric. Then the product will be of high quality.
- You can sew the details of the toy on a typewriter and on your hands. On a typewriter, as a rule, large parts are sewn. And on the hands - small.
In this video you will see the process of creating a soft toy with your own hands.
A soft toy sewn by yourself will be a wonderful gift for dear and close people. After all, a person will be pleased to understand that when you made a toy, you thought about him. Below you will see various patterns and patterns of toys. Let's start, perhaps, with such a cute tiger cub:
You can sew such a wonderful bear-angel,

pattern of which is attached:

Also included is the assembly diagram:

Or, for example, you can sew Smesharik Krosh. Its pattern is quite simple and suitable even for beginners.

And here is a cute kitten Woof, which is also easy to sew.


Consider cool toys that you can sew yourself.
Hedgehog


frog


Owl


Every child loves big soft toys, and even girls are delighted with such gifts. Usually a favorite soft toy is a bear, but what if we sew a polar polar bear? Moreover, there is a pattern.
Patterns in the following photos:


According to the same pattern, such a bear was sewn:
DIY soft toys using the tilde technique
Sewing tilde toys is very simple. Try it yourself - and you will see for yourself.
Bunny


These are pretty easy toys to make.
Deer


Doll


You can sew these fabric toys, the patterns of which are not needed. Only one pattern is needed, according to which they are sewn. Since they have the same body, only the ears and tails change.


You can even sew soft toys from socks.
DIY soft toy "Bunny"
To understand how to sew soft toys with your own hands, the patterns of which are not needed, see the master class.
Let's make a bunny out of socks.

What is necessary
- Pair of socks;
- Sintepon;
- A piece of velvet (for the nose);
- Button or bead;
- Pieces of fur.

Turn the sock inside out, put the heel up and cut off the elastic (2.5 cm). Cut the sock in half, starting from the toes, without cutting to the heel 2.5 cm.

Turn the second sock inside out and place the heel up. Cut off the elastic - 6 cm. Cut off the fingers. Cut lengthwise, without cutting to the heel 4 cm. Round off the corners on the ears. Cut the elastic part in half (future 2 front legs). Cut a piece for the tail from the fingers.
Pull the tail piece with a thread over the edge, fill with padding polyester and fasten. Similarly, you can make a nose out of black fabric. Seam "over the edge into the loop" to sew the ears. Turn the head on the front side and fill with padding polyester. Pull the hole and sew in a circle.

Like sewing the body.

Sew the paws with a seam “over the edge into the loop” and turn out.
On the head, pull the heel vertically with a thread, then wrap one part of the heel, tighten. This will be 1 cheek. Make a second one. Pull the bridge of the nose with a through stitch.

Constrictions of threads make fingers on the legs. Bend the bottom of the legs and make blind stitches to form the feet.

Sew tail with secret stitches.

Fill the front paws with padding polyester, pull the hole around in a circle and sew it up. Make the toes the same way as on the legs.
Today, many people are fond of needlework - they make crafts from beads, sculpt toys from salt dough, sew from felt, do quilling, decoupage and other types of art. In this section, I would like to talk in more detail about how to make fabric toys with your own hands.
Patterns of fabric toys: cats


cute bunnies


Bear cubs

Sheep

cows

To sew such unusual toys, you just need to print the patterns on a piece of paper, pin them to the fabric and cut out fabric pieces that will make a toy in the future.

Such a funny octopus can be made without a pattern at all. Let's try to create such a wonderful toy for your child together.
DIY octopus

To prepare this toy, you will need a ball of cotton wool, fleece or jeans, eyes with moving pupils, threads, ribbons, a handkerchief. Octopus can be made from both fleece and denim.
The work steps are quite simple, no patterns are needed, you don’t even need to sew anything. Take a cotton or foam ball and wrap it with a square piece of fabric so that there is enough free fabric for the legs.


We pull the fabric wrapped around the ball with floss threads of the same color as the fabric, weave a pigtail from the cut out strips, tie it with a ribbon of a contrasting color.

The strips at the end of the braids must be cut so that they are the same length.

It remains to draw the face of an octopus. We glue the eyes with glue and embroider a smiling mouth with threads, this is the only moment when we had to sew. And at the end we will tie a scarf on the head of a toy. Octopus is ready!
Patterns of fabric toys for the New Year
Now let's look at some patterns New Year's toys from fabric.
Christmas decorations

Herringbone

Father Frost

Deer

Here is a Christmas deer:

You can download patterns for free from the Internet original toys devils, penguins, giraffes, kittens and dogs, rabbits and cubs, and even stars.
flat toys
The child can be offered to choose one of the patterns of flat toys. They are the easiest to sew, this work is already available for children 3 summer age. The main thing is to teach the child to properly hold the needle and manage it. If, nevertheless, you are afraid to entrust the baby with a needle, then you can use another method. A needle with a thread can be replaced with ordinary glue, and patterns can be printed from the Internet.

Tilda dolls
If you professionally approach the issue of creating toys with your own hands from fabric, then I bring to your attention tilde dolls. For example, a sheep

It is better to sew it from terry cloth, it will be curly.
Angel girl, made in vintage style:

A bee and a flower in love with each other.:

Original and funny goat pillows with a pattern:


And a pattern for it:

Goats as hanging toys:
