This article is about how to learn how to put a barre if you can’t clamp the strings and take a full-sounding barre chord on the guitar.
One of the most difficult tricks on the six-string guitar is the technique of setting barre chords. The index finger, when playing the barre, is pressed parallel to the fret and simultaneously clamps from two to six strings on the guitar neck. There is a small barre, in which the index finger pinches two to four chord strings, and a large barre, where five or six strings are pinched at the same time. Roman numerals, placed above the written or schematically depicted chords, indicate the fret number on which the barre technique is performed. Thanks to the reception of the barre and the fourth system of the instrument on a six-string guitar, you can take six-sounding chords almost all over the fretboard while playing in all keys. It is thanks to this six-string guitar so popular all over the world.
How to play barre chords on guitar
To start mastering the barre technique, the following conditions are necessary to achieve a positive result:
The body of the guitar should be vertical to the floor. Setting the barre with the right fit is much easier. The correct landing of the guitarist is shown in the article. The left hand when performing the barre technique should not be bent at the wrist, thereby causing unnecessary tension in the hand. The photo shows the allowable bend of the wrist of the left hand. Desirable nylon strings, during clamping of which there is no pain and a faster achievement of the result of setting the barre.
The strings should be pressed as close to the metal fret as possible. The photo shows the left hand of an outstanding Spanish guitar virtuoso. Please note that the index finger presses the chord strings almost fret. In this place, it is easiest to clamp the strings to perform the barre technique.
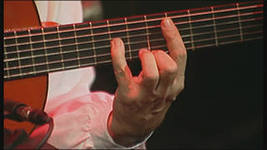
The index finger of the left hand, which pinches the strings when receiving the barre, presses them flat, while the remaining three fingers remain definitely free to be able to set the chord. If you take the barre with the edge of your finger, then the other three fingers simply will not be able to gain that certain freedom that is so necessary.
 In order to correctly take barre chords on the guitar in the photo, the red line indicates the place of the index finger with which the frets should be clamped.
At the same time, it should be noted that if you put the barre with the edge of your finger, some strings do not sound due to the configuration (shape) of the index finger. I myself, starting to learn the barre technique, really thought that it was impossible to put a barre just because my index finger was not even (crooked) and I pressed it with a frantic effort in the middle of the fret, not realizing that I had to turn my palm a little and press the finger flat almost on the metal nut itself (frets).
When clamping the barre, make sure that the tip of the index finger only slightly protrudes from the edge of the neck. He should press all the strings tightly while the thumb with reverse side the neck is located somewhere at the level of the second finger, clinging and, as it were, creating a counterbalance to the index finger.

Try placing your index finger while holding the barre and look for a position where all the strings are sounded. When putting barre chords, try not to bend the phalanges of the second, third and fourth fingers and, like hammers, clamp the strings on the guitar neck.

Don't expect everything to work out quickly. To achieve the result, you will have to practice, looking for a stable performance and a full feeling of neck contact and a comfortable finger position. Do not try too hard and do not be zealous, if the left hand begins to get tired, give it a rest - lower it down and shake it, or even just put the instrument aside for a while. Everything takes time, but if you connect your head to training, the process will speed up many times over. Play Am F E Am| Am F E Am|, when the barre is not constantly clamped, the hand does not have time to get too tired and the palm does not lose its elasticity in the process of playing chords. Good luck in mastering the barre and further success!
"E" in open position. Position your fingers in the following way: 2nd finger (middle) - G (3rd on the 1st fret);
3rd finger (ring finger) - A (5th string on the 2nd fret);
4th finger (little finger) - D (4th string) on the 2nd fret.
Without changing the position of the fingers, go down the fretboard so that the second finger is on the 4th fret, the third and fourth on the 5th fret.
On the 3rd fret, firmly press all the strings on the 3rd fret with your first (index) finger. In this case, not a single string should rattle. You get a barre "G" chord of the "E" group at the 3rd fret. Hold your hand so that you do not feel any discomfort. Repeat this exercise until you feel that you can confidently play this chord.
Now learn five variations of each of the "A" group chords. They are a little more difficult than the previous ones, since they require flexibility and significant stretching of the fingers. Frequent practice will help you master these chords. Play an "A" chord in the normal open position, but instead of the first, second, and third fingers, use the second, third, and fourth fingers: 2nd finger (middle) - D (4th string on the 5th fret);
3rd finger (ring finger) - G (3rd string on the 5th fret);
4th finger (little finger) - H (2nd string on the 5th fret). Without changing position, move your fingers to the 5th fret.
Play the barre on the 3rd fret with your first finger, pressing all the strings firmly so that none of them rattle. You get a barre "C" chord of the "A" group at the 3rd fret.
Start expanding your repertoire. From all these chords it is possible to build derivative forms. This can be done without changing the original position of the hand. You can diversify the game without memorizing fingering options.
Related videos
note
If your hand hurts, stop the game. The hand cannot be overstrained, carpal tunnel syndrome is an occupational disease of musicians.
When playing the barre, press the first finger as tightly as possible to the neck. To avoid injuring your joints, place your finger slightly sideways.
The barre technique is a must for every guitarist. It is used very often and allows you to play chords in different keys using the same fingering. The index finger of the left hand in this case plays the role of an additional nut, which moves from one fret to another. The remaining fingers clamp the strings at the desired frets.
Instruction
Start mastering the small barre. When performing this technique, not all strings are clamped, but several - usually three or four. If your left hand fingers are still not strong enough, put on nylon strings at least temporarily, even if you intend to play metal in the future. Adjust the neck so that the distance between the neck and the strings is no more than 0.5 cm. It may very well be that new guitar will have to sharpen the sills.
Clamp index finger the first three strings. The finger must lie absolutely evenly and pinch all the strings equally strongly, otherwise the sound will turn out to be rattling. Do nothing with the rest of your fingers. Don't be discouraged if you can't relax at first. left hand. Achieve this, but prepare for the fact that you have to practice for several days.
Don't forget to place your thumb correctly. It is located under the fretboard, strictly opposite the fret on which the barre is taken. The thumb can also be on the strings, clamping them from above. The neck lies in the palm of your hand. This technique is very often used in the performance of gypsy musical works. The index finger should be perfectly straight and parallel to the nut. Only in some complex chords is it permissible to put it at an angle.
When all three clamped strings sound equally even, add a fourth. This should be much faster than the previous step. Start using the rest of your fingers. Pick a suitable chord, learn how to take it on one of the lower frets. Gradually move your index finger along the fretboard and use the same fingering. Determine which chords you have learned to play.
Set up a big barre. Press all the strings with the index finger of your left hand. Try playing an arpeggio. If all the strings sound even, play the barre without using the other fingers in turn on all frets. This one technique alone has led to the fact that you have a lot of chords in your arsenal, and you no longer need to use a capo.
Pick a suitable chord, put a barre and hold other strings on the desired frets with the rest of your fingers. Get a smooth sound, then repeat the same fingering on other frets.
Start playing basic chord progressions in different . Start with the ones you already know. For example, after mastering the basic chord sequence in A minor, play it in B minor with a big barre on the first fret. Thus, go through all the keys.
Related videos
note
In sheet music, barre is usually indicated by a square bracket before the chord. The fret number is placed at the top or side, usually in Roman numerals.
In tablature, barre can be denoted in different ways. It may or may not be labeled at all. If you see that several strings nearby are pressed on the same fret, use this technique.
Sources:
- how to learn to play so that all the strings sound
Although the barre is one of the main techniques of playing the guitar, it can cause serious difficulties for novice musicians, and even dissuade some from learning the instrument. The reason for this is the difficult setting of the fingers and serious physical efforts in the early stages.

Instruction
Perfect all open chords. In everything you need to keep the system, and even more so in learning the game. If you take up the barre without carefully learning the simpler techniques of the game, you will run into a whole host of unnecessary problems. Therefore, make sure that when playing on open strings, you do not have any pain in the fingers, the sound is of high quality, and the transition to a new chord is intuitive.
Explore the fingerings of the main closed chords. It is very easy to remember them: barre is nothing more than la, mi (A, E) and their derivatives. For example, play an E major (E) chord and then move it to the right one fret. Now hold the strings on the same frets, but without the index finger (little, ring and middle fingers), and “put” the released index finger on all the strings on the first fret. In fact, you are "shortening" the neck by sticking your own finger in place of the nut (the capo works the same way). Most closed chords are set in the same way. "Shifted E" is F; A becomes B. Em is, respectively, Fm, and Am is Bm.
When staging a chord, distribute the load correctly. First of all, don't try to apply equal pressure to all strings. For example, Bm has 2, 3, and 4 already clamped to the right than barre, so your index finger should only pin 1, 5, and 6. What's more, the 6th string doesn't affect the sound too much, so you can just touch it lightly with your finger. Then the setting becomes as convenient as possible. Similarly for F: concentrate on fixing the "one", "two" and "three", and you can relax the top. At the same time, put your finger not perpendicular to the neck, but with an edge - this way you reduce the load. For convenience, create yourself a support from the thumb on the other side of the neck.
Explore options for setting closed chords in different frets. Any open chord can be played using the barre, but it will have a slightly different sound (usually higher). For example, if you put an F on the fifth fret, you'll get a more sonorous A. Or if you want a C minor (Cm) chord, you'd put Bm on the third fret. Full list you can find the provisions in any textbook or on the Internet.
Newly minted guitarists often have a problem with not being able to get a bar. In fact, learning this is not so difficult, you just need to be patient and not stop training.
barre- This is a special technique for extracting sound, in which the index finger of the left hand presses several strings or all strings on one fret.
barre is of two types:
- Small barre, when 3 or 4 strings are pressed at the same time, starting from the first;
- A large barre, when 5 or 6 strings are pressed at once at the same time.
At the time when the index finger performs the barre, the other fingers must be slightly raised above the neck so that they do not interfere with the sound.
During the reception, the index finger must be absolutely straight. It should not bend, much less bend in the opposite direction. The index finger is parallel to the metal fret nut, closer to the right nut. At the same time, the hand should be slightly moved forward in the direction from the body of the performer, and the hand in the wrist joint should be strongly bent, which contributes to the full extension of the index finger.
With a big barre, the index finger should not protrude beyond the sixth string, too far, since it must also be pressed by the very tip of the finger, and not by another part of the last phalanx.

In some cases, some chords cannot be played without a slight deflection of the index finger. Then it is not parallel to the nut, but at a slight angle to the fret. However, before learning such chords, it is necessary to ensure that the index finger is as straightened as possible, which can be quite difficult for beginners.
When performing this technique, the location of the thumb of the left hand on the back of the neck is of no small importance. At the beginning of mastering the reception, it should be located under the neck approximately opposite the middle finger. It is this position that promotes normal pressing of the strings and helps to ensure sound without rattling. In principle, the position of the thumb varies depending on the complexity and specificity of the chord being played, when, in addition to the barre, the strings are pressed with other fingers, the index finger can relax and rise above the strings.
It is necessary to ensure that the index finger clamps the strings without tension, and the other fingers are not motionless and constrained. They should always be ready to play the required strings on the next three frets.
In the event that during the execution of the reception, the index finger must be moved from one fret to another, the hand should move as quickly as possible, but at a small distance from the strings and without sudden movements.
Due to the increased complexity, the barre technique must be mastered gradually, devoting just enough time for each lesson so that the hand does not get too tired. But without systematic training, it is impossible to master this technique..
I wish you good luck in mastering Barre!!!
In this article we will talk about how to quickly and correctly learn how to take barre. There is a small and a large barre. Small is when you hold several strings with your index finger, and large (in the figure), respectively, when all the strings are clamped
The two main problems are pain and fatigue. The first problem is easy to deal with - just once a day to practice with your hand on the neck.

It is done like this - you hold all the strings with your index finger on the first fret and help it with the middle one, i.e. put your finger on your finger. Naturally, if you do this exercise, say, on the third or fourth fret, then the process of getting used to it will be much easier, but I advise you not to look for easy ways. Remember - the main thing is to "handle" the first fret! After a few days, you will notice that the index finger no longer feels pain, this is a good sign, then the skin of the finger has become rough and you are ready for a full barre!
First of all, you should pay attention to your landing, you need to sit correctly, as shown in the figure. This is, of course, ideal.

The picture on the left shows a correctly pressed “F” chord. Pay attention to the index finger, it practically lies on the fret. This is the correct barre clamp. If the finger were between the frets, the guitarist would need to make more effort.
Another very important point! Pay attention to the little finger and ring finger. The fifth string is pressed with the ring finger, the fourth with the little finger, and not vice versa. That is, no “ladders” of fingers, remember this! If you get used to clamping incorrectly, you will lose dexterity, and it will be difficult to relearn.
Important point! If, it would seem, with the correct taking of the barre, the strings sound muffled, then do not try to pinch the strings even more, it is better to pay attention to how correctly you clamped them in general.

Now let's talk about hand fatigue. This is the next problem that a beginner will have to face. The simplest solution is to sign up for a bodybuilding section :) Just kidding, it’s enough to do push-ups on your fingers once a day and your hands will become strong and enduring. Girls can be advised to train with a carpal expander (in the figure)
In conclusion, I want to give a couple of tips:
So, a few words about agility with taking the barre. There are no special techniques. You just need to try to play, you will try, there will be progress. You can train like this: Am - F - Dm - E, your task is to develop dexterity and muscle memory.
One of the first problems beginner guitarists face is closed or barre chords. The difficulty lies in the fact that the index finger must clamp on one fret from four to six strings at the same time. Naturally, it is quite difficult to immediately accustom a hand to such an element. And this is what our article today will be about.
On the Internet, there are quite a few different video tutorials, articles, theoretical aspects closed chords, in general, a lot different material. I want to approach this issue from the other side - without further ado, immediately to the advice and recommendations. And some experienced teachers, authors of video lessons on the site will help me with this.
Albert Fatkhutdinov: "How it was..."
Quite quickly I managed to understand the basics of playing the guitar, and taking closed chords became one of the first serious difficulties in my practice. The need for this appeared when, like all novice guitarists who want to touch the heart of a girl, I began to try to play the song of the Akhra group " Brown eyes". All the substitutions for the F chord, which allow me to play this chord in an open form, frankly, got me, and I also wanted to grow in terms of skill. I confess, it was painful. metal strings, serious tension and high string height made this stage of guitar life really difficult. I even wanted to quit my “musician career” when I didn’t succeed for a long time. But my friend, who taught me how to hold the guitar, said that it was normal, and I tried, tried a lot ... Played songs with closed chords again and again ... As now I hear this dull sound of a far from completely taken barre. The index finger was swollen, and the calluses on it made others surprised. Quite a long period of time was spent on comprehending this “art”. Once I picked up an electric guitar, on which the strings are much “softer”, and I did it! I was terribly glad, and eventually did it on my acoustic guitar. Barre really makes the game easier and more beautiful. These are chords at the 10th fret. This will raise the tone at any moment. This is to show that you are a guitarist. Good luck to everyone who has met this quite traditional guitar problem! Get a barre! Play guitar!
Albert's analysis can be viewed at.
Ivan Selivanov: "What needs to be done..."
 To develop the technique of playing the guitar, you need to practice a lot. You need to start slowly, extract every note, without unnecessary overtones and "dirt". To learn how to hold the bar on the guitar, you need to start with simple chords. For the development of the index finger, there is a simple, but effective exercise. Press with your index finger (only with one finger, the others do not yet participate) the first and second strings on the fifth fret (you can clamp on any from the first to the 24th). Try to play in such a way that both notes sound equally loud. If you succeed, and the notes sound even, without “dirt”, clearly and without a sharp attenuation, hold down three strings with your index finger (the first is the thinnest, the second and third). Do the same. Continue to gradually increase the number of strings, but remember that every note must be readable! Once you have managed to clamp on the fifth (or any other fret) - move further along the fretboard. Reducing the fret length can cause some inconvenience when holding a chord. Let's say, starting from the 14th fret, it becomes problematic to clamp the strings.
If everything sounds nice and clear for you, you can move on to chords. It is also better to start with simple chords (for example, B minor, aka Hm). Don't go straight for "A major" with the tonic on the 5th fret of the sixth string. Practice chords on five strings, then gradually move up to 6 strings.
Good luck!
Ivan's analysis can be viewed at.
Shamil Vyal'shin: "How did I do..."
 I, too, will not “keep in myself” the experience of comprehending barre and will share my advice. I learned the F chord. It took me about a month to get it. The problem was not to hold down all the strings on the first fret, but to get the rest of the fingers where they needed to be. Therefore, at first I took the F chord after the Dm chord, since there the middle finger remains in place, you just need to put the ring finger and forefinger, and, of course, block the fret. This helped me a lot. Gradually, I began to take barre after other chords, in different frets, in different positions. Now barre chords are no different to me than simple chords. And all because my desire to play was stronger than this "problem". Everything is in our hands, and here this phrase is used in the literal sense.