Angels are creatures invisible to humans, whose main function is to convey God's will to people. After all, we ourselves are not able to feel and see what God wants, for this we need some mediators, in the role of which it is the angels who act. These creatures protect and protect us and our children from evil forces and from everything bad. That is why drawings of angels are so popular, many use them as avatars, send them to their friends as gifts, and decorate school diaries.
On the Internet you can find a huge number of a wide variety of pictures depicting angels. These are carefree innocent little kids, and evil angels in the form of demons, and bright guardian angels, and defender warriors, and many others. For animation fans, there is a wide variety of animated angels. By drawing such wonderful pictures, you can immerse yourself in a wonderful Magic world fairy tales where miracles happen.
The drawing of an angel with wings can be different - it can depict a cute child with wings, a woman of unearthly beauty that looks like an angel, or a man who personifies masculinity and heroism.
There is no such person who would be unpleasant to admire such cute creatures, because somehow, when looking at them, we are saturated with positive emotions, our mood rises, we feel a surge of strength and energy, there is a desire to create. So let's create a real little masterpiece on paper.
So how to draw an angel?
Very simple, let's understand.Basic distinctive features any angels - a rather large head and eyes, the obligatory presence of wings, hair, clothes, and it is also desirable to have a halo above the head. In order to learn how to create drawings of an angel on our own, let's first try to draw a beautiful angel girl. To do this, we only need a pencil and a piece of paper.
We act according to simple steps:
·  Draw first big circle, which acts as a head, and draw a line on the face.
Draw the silhouette of the torso below the resulting circle.
We will give the head the shape of a face, and also try to depict the contours of the future hairstyle.
· On the face we draw round eyes, quite large.
· Next in line are eyebrows, as well as a small mouth.
Let's move on to the body. We draw elements, starting from the top and gradually moving down.
The neck should be in the form of a line of small size.
· The legs of our angel will converge in one place and resemble a spear in shape.
Don't forget to add an angel with wings to the drawing.
· Then we dress our beauty - a few strokes, similar to the framing of a dress.
· Wings are an indispensable element for each angel, the shape of which can be chosen to your taste. Feathers at the end of the wings can be as many as you like - it all depends on your imagination.
· It remains only to finish our girl's hair beautifully and erase the unnecessary auxiliary lines that we drew at the very beginning with an eraser.
 Having drawn angels with a pencil, you can decorate the drawings in any way convenient for you. Feel free to connect your kids to creativity, they will certainly bring maximum pleasure to this activity. AT you can also add hand-drawn angels.
PACKAGE OF IDEAS


Drawing is a pleasant process. It is always interesting to create with pencils and paints. The choice of tools depends on your preferences. We will tell you how to draw a Cupid. This process is very interesting and exciting. The main thing is to follow all the steps in turn. Only in this way will you be satisfied with the result.
Who is Cupid?
Cupid is an ancient Roman god, the personification of love and passion. Previously, the angel was portrayed in the guise of a young handsome guy. Aphrodite chose this young man for herself as a companion and faithful assistant. Later, Cupid was portrayed as a little angel. His attributes were a bow with magic arrows of love. At first glance, this character looks quite simple, but in order to portray him on paper, you will have to make an effort. In this article we will tell you how to draw a cupid in stages.
Drawing technique
Even if you do not have an education as an artist, do not be upset. It must be remembered that any drawing consists of geometric shapes, and thanks to this knowledge, it will be much easier to cope with the technique. The image starts with an oval or circle. If you can draw these then success is guaranteed.
So, the roundness will serve as sketches on paper, for this it is better to choose a pencil of medium hardness. When drawing figures, do not press hard on the tool. Before you start drawing, practice on a draft. Over time, you will understand how to draw a cupid correctly.
In order for the hero to take on a colored look, it is better to use paints or they are easy to use. Before moving on to coloring, remove the extra sketch lines.
Cupid drawing steps
In fact, there is nothing difficult in drawing an angel of love, you will have the opportunity to verify this. Consider several options step by step drawing cupid.
Freehand draw as much as possible even circle and lines, thanks to which it will be easier for you to depict the nose and eyes. It should be as even as possible, because, as we know, angels are chubby characters. A cupid drawn in pencil always looks attractive.
In order to facilitate the drawing of the body, you need to draw an oval under the circle, it should be slightly uneven and go over the head area. lower part geometric figure needs to be rounded off more.

The next step is sketching for the hands. The limb consists of three parts (shoulder, forearm and hand). You need to draw three ovals for each. See the picture below for more details.

You also need to sketch out the legs. It is worth noting that the parts of the buttocks are depicted as ovals, larger than the caviar parts.
Now the more fun part of the drawing begins. We draw parts of the face. The eyes should be large, the nose with a button, a gentle smile and curls. Cheeks and chin should be depicted with auxiliary lines. More details - in the picture.

We outline the contours of the body, drawing bends in the elbows, knees, buttocks. Draw fingers on the arms and legs. and onions, you can see in the picture.
At this stage, you need to remove all unnecessary lines in the drawing and decorate the cupid.
You should not use bright colors for coloring an angel. The hero must be gentle and light. Use pastel colors.

The direction and poses of the angel can be changed according to your desire. The most important thing is to correctly sketch out the ovals for the location of the arms and legs. Now you know how to draw a cupid.
DIY cute cupid
AT Greek mythology the god of love was called Cupid, and the Romans called their own Cupid.
Consider the following version of drawing a character. Unlike the previous example, this one is easier to follow.
Draw a circle with lines for the eyes, nose and mouth. We draw the lines of the head. The next step is drawing the body and hands of the angel. Then draw the bow.

We draw the wings and other parts of the angel.

We finish our Cupid with a bow and arrow. This is what our hero looks like when finished. You can decorate it if you wish. Now you have learned another option for creating a cute boy with a bow and you know how to draw a Cupid.

Other options for depicting angels
Many girls wonder about being Hai. Cupid is also among these heroines. portray a girl with pink hair not difficult.

And in the pictures below, you can see examples of step-by-step drawing cupids for Valentine's Day. It can be used for holiday cards to your loved one.

This version of the cupid image is more complex, it will take a lot of patience, care and training to draw it. Over time, you will be able to eyes closed depict boys with wings behind their backs. Use a variety of techniques and tools for your creativity.
On the eve of the most important holiday - Christmas, the actual topic is how to draw an angel.
Having learned to depict mythical creatures, you can get as close as possible to the amazing and mysterious world.
How to draw an angel. Step by step lesson: #1
In this article, we will consider 2 drawing lessons of gentle and at the same time sublime angels.
1. By tradition, in the center of the sheet, the general outlines of the figure should be made
2. At the top of the triangle in the form of an oval, outline the head
3. Getting to the top of the figure: showing the shoulders and chest
4. Then we draw a skirt, because the angel will be in a female form. How to draw a mermaid
5. Having gathered to draw a mysterious entity, we solve the question: “How to draw an angel more believably?” Everyone has their own ideas and the drawing will be purely individual. The next step is to draw the hands of an angel.
6. Having finished with the main articulation points of the arms, do not forget about the legs
7. The time has come for the most interesting thing - we draw wings for the angel. They are huge, full-length
8. If we see an angel, then he appears according to the flesh. We draw his hands and a thin camp
9. Let's get to the face of the angel. Let it be a pretty young girl with long hair
10. We draw in more detail the details of a kind face, big eyes, soft half smile, strands of hair
11. Using bold lines, we mark the folds on the clothes, giving volume to the skirt
12. Painstakingly and carefully draw feathers on the wings of an angel. They are small at the top, long and thin at the bottom.
13. Draw a halo over the head of an angel
14. Using hatching, we achieve the effect of volume and life
15. To complete the image, it remains to use an eraser to show highlights on the hair, clothes and wings of an angel
Having gained patience and dealt with the problem of how to draw an angel, each artist, as it were, touches the world of magic and the unknown.
How to draw an angel. Step by step lesson: #2
According to the Christian religion, angels have an outward resemblance to humans. This will help you learn step by step lesson How to draw an angel.
1. With the help of horizontal and vertical lines, we denote the outline of the picture

2. With an oval we outline the place of the head, the contour of the figure

3. In mirror image, draw two large angel wings

4. Draw hands with dots and lines

5. Getting to the details of the costume in the upper part

6. Carefully draw the face: eyes, nose, mouth, as well as hair

7. Finish drawing the robe

8. Main Feature wings are an angel: all feathers should be drawn very carefully

9. Draw over the head of an angel a symbol of his holiness - a halo

10. Let's start decorating clothes with patterns and ornaments. Let's draw a flower in our hands

11. Thinking about how to draw an angel in color, we start with hair

12. Delicate shades of blue and light brown paint over clothes

13. Color a long scarf in pale pink

14. Paint over the wings of an angel brown

15. With the help of highlights on clothes, wings and hair, we give the picture volume and airiness
Attention to detail and patience will help you quickly understand all the features of this lesson.
Angels can often be seen on postcards and other holiday paraphernalia. They are depicted in a long robe with wings on their backs. Above the head is a shining halo. Let's learn how to draw such an angel step by step to please relatives and friends with illustrations.
First, the angel must be represented as a figure of a girl. Determine its size on the sheet and already begin to draw the outline of the head and torso.
How beautiful to draw an angel

if the proposed one seems difficult.
Necessary materials for drawing an angel:
- black liner 0.7 mm;
- a simple pencil and eraser;
- set of colored pencils.
Stages of drawing an angel:
- Let's designate the location of the head, hands and dress in the form of simple schematic lines.

- Then we can add the outline of the hair, neck and robe. Leave room for hands.

- Angel wings will be attached to the back. We draw their outline. In addition, we will add a small halo to the drawing, which will be located at the top of the head.

- In the places of the sleeves of the robe, we finish drawing small handles, where the left one will hold a wand with a star. We decorate the angel dress with small details. Under the hem of the robe, the toes of the shoes will be visible.

- We draw in detail the girl's face. Her features should be gentle and sweet. Let's add small details to the drawing and correct the outline.

- We paint over the robe and wings with a gentle blue pencil.

- With a yellow pencil, we completely paint over the hair, belt, shoes and magic wand. Then, in orange and burgundy, we give a contour and volume to such details of the picture.

- We paint over the cute face of an angel, neck and arms with a burgundy color of a pencil, and only then we add shades of yellow, pink and burgundy.

- With a dark blue pencil with a slight shade of purple, we create an additional in-depth color for the dress and wings.

- We take a black thin liner and paint over all the lines in the drawing.

So we get a drawing of an angel with large wings and a golden halo as an illustration. Also, the girl holds a magic wand with a star in her left hand, which will help to fulfill all wishes during the festive hour.
How to draw an angel very easy
If you want to draw an angel, it may seem that this is a rather difficult undertaking. Yes, of course, if we take for example the monumental engravings of Gustave Doré, then only real masters can do this. But we don't have to. Even novice artists and artists can create a simple image of an angel with a pencil. And it will be especially interesting to do it with children.

Let's consider in this article how to do it in stages and how such an angel should turn out.
We will need:
- paper;
- simple pencil;
- eraser;
- if desired, decorate the drawing - colored pencils. In our case, it was yellow, red and blue.
And now let's look at the work in stages:
Stage one. General outline.
First you need to draw the contours of the future angel. They will be his long clothes, head and hairstyle.  Then we draw the face, hands. We carefully draw all the details.
Everything about how to draw an angel, of course, was known to medieval painters. After all, it was during this period that these beautiful and such mysterious creatures increasingly began to appear on their canvases. In the magnificent paintings of the masters of those times, you can see a variety of angels, for example, playing the musical instruments. It is worth noting that angels were not only painted, they were depicted in the form of statues, as well as in the form of luxurious and very bright stained-glass windows, which to this day adorn many Catholic churches.
Before you draw an angel in stages, be sure to prepare all the tools and materials that will inevitably be required during work: 
1). gel pen, which writes in deep black;
2). sheet of paper;
3). Colored pencils in a set;
four). Eraser;
5). Pencil.
If all of the above is already at hand, you can proceed to study the question of how to draw an angel with a pencil in stages. To cope with this task was easier, it is worth drawing step by step:
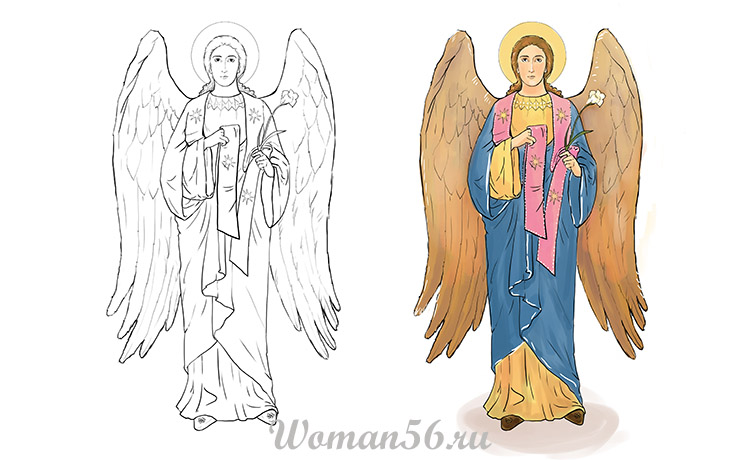
1. Lightly pressing the pencil, outline the outlines of the angel's head, neck and body;

2. Draw the profile and neck;

3. Draw an eye and an eyebrow on the face of an angel, and on his head - Wavy hair;

4. Outline the outlines of the upper body. Draw curved lines to the body, indicating the upper part of the wings;

5. Draw the lower part of the angel's robe, which resembles a fluffy skirt. Use curved lines to indicate the location of the hands;

6. Draw the wings of an angel. Then draw the sleeves and hands in which he holds the stem of the flower;

7. Draw the bottom of the angel's robe. Draw the fabric that curls around his waist, forming nice folds. Draw legs that peek out a little from under the robe;

8. Draw a lily, which is held in the hands of an angel;

9. Having learned how to draw an angel with a pencil, you should not stop there. You need to color the drawing so that it looks bright and beautiful. To do this, you must first circle it with a pen, and then erase all unnecessary lines with an eraser;

10. Shade the face and arms of the angel with a flesh-colored pencil, and paint his cheeks and mouth with a pink pencil. Outline the eyebrow in brown;

11. Paint over the angel's hair with a light brown color, and draw individual hairs with red-brown;

12. With pencils of green, lilac and yellow tones, paint the upper part of the angel's robe;

13. The belt and the fabric that develops around it, paint over with red and burgundy pencils;

14. Shade the lower part of the robe in places with a blue pencil;

15. Color the angel's shoes with brown and yellow pencils;

16. Paint over the wings with a gray pencil;

17. Color the lily that the angel holds in her hands with pencils of the appropriate shades - blue, purple, yellow and green.

Angel drawing, ready! Having understood how to draw an angel, you can try to color his image with paints or felt-tip pens. In addition, knowing how to draw an angel, you can create a wonderful greeting card, for example, Merry Christmas! 