Today I want to tell you what the Facebook pixel is, why it was created and how it helps us find customers. You all know that this social network is constantly improving. More precisely, there are some updates regularly, new features are added.
As in any social network, in order to effectively develop your business, you need to set up advertising campaigns. The most suitable social network for promoting a business, I think, is Facebook. She's so business-minded, it's amazing. You just need to understand the simple nuances of working in this network.
Where should we start learning the Facebook pixel?
We are starting to set up an inexpensive advertising campaign, best of all for our short videos with specific information on the topic that we are promoting. We collect from those network users who watched the video for 10 or more seconds. Then, already for this audience, we set up an advertising campaign using a conversion pixel.
You can set up "Standard Events" in its code, such as: adding to the cart or wish list, placing an order, making a purchase, etc. Or you can create custom conversions using URLs. Then we launch an advertising company with conversion tracking. We can say that the pixel learning process has been successfully started. 
Sure, Standard Events is a more accurate optimization, but custom conversions are easier to set up. We select the goal for the advertising campaign, such as "Increase the number of conversions to your site." At the same time, we set the conversion pixel on each page of the site, including the thank you page.
You can also use this way.
If you find it difficult to determine who your target audience is, try to target your first advertising campaign to the widest possible audience. Specify more interests, set up additional features and let the pixel work for a week on a minimal budget.
Give him the opportunity to analyze those people who perform conversion actions on your site, evaluate them and remember them. Facebook is such a smart machine that clearly reads all the information about each user. And subsequently it will select for us people with similar characteristics.
When we have worked so hard with the pixel and we see that our Leads are costing us at a price that is acceptable to us, we can already edit the ads as we need. Thus, our pixel has grown wiser and now knows who we need.
Here is such an interesting feature in this social network. In fact, Facebook doesn't sell anything! It's just a great tool to make it easier for us to sell and promote our business.
P.S. I really want to believe that I managed to convince you to use the full power of Facebook!
P.P.S. And good luck in all your endeavors!
is the ability to show ads to a predetermined audience. This can be either fixed contact information (e-mail addresses, phone numbers, account IDs) or dynamic audience of your website visitors. This article will focus on the latter option.
For retargeting to work, you need to install special advertising system code in which you are going to advertise. This code allows the ad system to match your website visitors with its database. Depending on the advertising system, its name may change, but the essence remains the same. In the Facebook advertising system, it is called facebook pixel.
Recently Facebook updated retargeting pixel. Previously, you needed a separate code for creating audiences from websites and a separate code for tracking conversions and optimizing ads.
Now this is one code that performs the functions of both collecting the audience and the ability to work with campaigns that are optimized for conversions and track these same conversions.
Create a pixel
First of all, this code needs to be created. To create a new pixel, go to the Tools menu, point Pixels.
Menu "Tools", item "Pixels"
This is what the window looks like on the first visit:

Click "Create Pixel"

Put a tick, come up with a name, click "Create a pixel"

![]()
We get the code for installation on the site.
Received code put on all pages of the site. Just like other counter codes, it is best placed inside head tags. To check the correct installation and further work, I recommend installing the Facebook Pixel Helper add-on (https://developers.facebook.com/docs/ads-for-websites/pixel-troubleshooting) for Google Chrome (in general, it is best suited for working with Facebook ads Google Chrome or another browser based on Chromium).
Without modifications, the code is already ready to collect audiences from website visitors, or to create Custom Conversions.
Pixel setting
Previously, you had to create a separate conversion code to track conversions. Now these functions are new pixel. To track conversions, it needs to be supplemented.
There are 9 basic types of conversions in total:
- CompleteRegistration- completion of the registration process (for example, visiting the thank you page).
- Purchase— a purchase, there are two required parameters for this event: value — the conversion price and currency, the currency in which the price is calculated (the setting is required for dynamic remarketing).
- lead Lead (the first step of any funnel).
- AddPaymentInfo- adding payment information.
- InitiateCheckout- the beginning of the ordering process.
- AddToWishlist- add to wish list.
- AddToCart— add to cart (setting required for dynamic remarketing).
- Search- site search.
- ViewContent— viewing page content (required for dynamic remarketing).
In the newly created pixel, only one event is sent - PageView, indicating the page is loading:

To track conversions on the right pages need to add after this event new event - conversion.
Adding a line
fbq('track', 'CompleteRegistration');
after code
fbq('track', "PageView");
Final code:

Now the resulting code will send a "CompleteRegistration" event to the Facebook servers, and we can:
- use this event for tracking conversions
- use this event for advertising optimization
- use this event to create audiences
In order to track user actions on the site (clicking on buttons, following links, adding to the cart, etc.), it is enough to add the execution of the code of only a specific event. It is important that the event is sent after the main pixel is loaded.
For example, when adding a product to the cart, you need to run

Along with the event, you can send additional data: product name, cost, quantity. Subsequently, on the basis of this data, you can also form audiences, or by creating Individually configured conversions, you can optimize the AC for conversions with certain properties.
content_ids must be specified
If there are not enough standard 9 events, you can create any of your events with the parameters you need
The code for the custom event looks like this:

MyOwnEvent- any name for the event
param1-any name for the first parameter, value1- its meaning
similarly for param2 and value2
For example:

This is what an event might look like, indicating that the user has spent more than a minute on the page.
Custom events cannot be used to optimize ads, but using custom events you can create a custom conversion and optimize for it.
As a result, you can create any kind of micro-conversions to optimize ads.
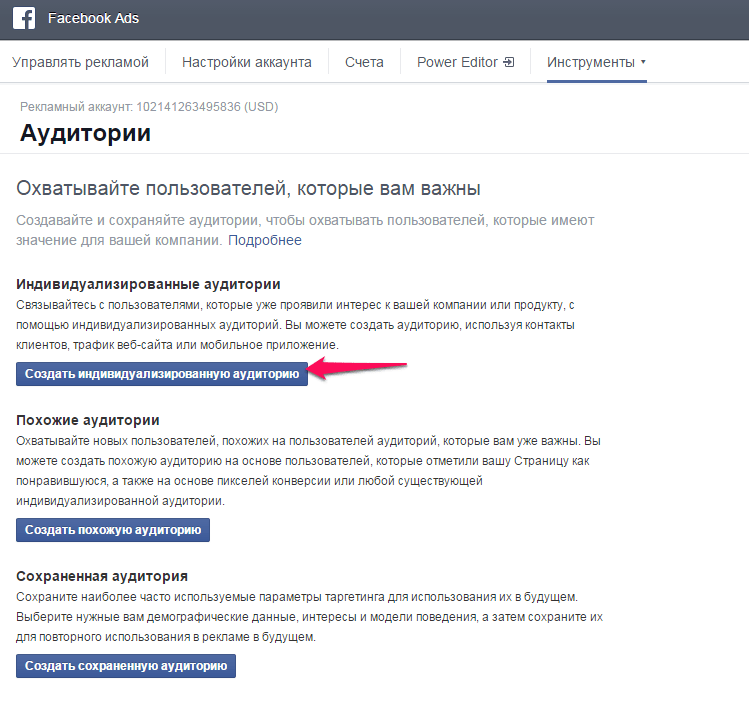
Creating Audiences
Now in the Audiences section, you can create audiences based on which visitors to your site visited.
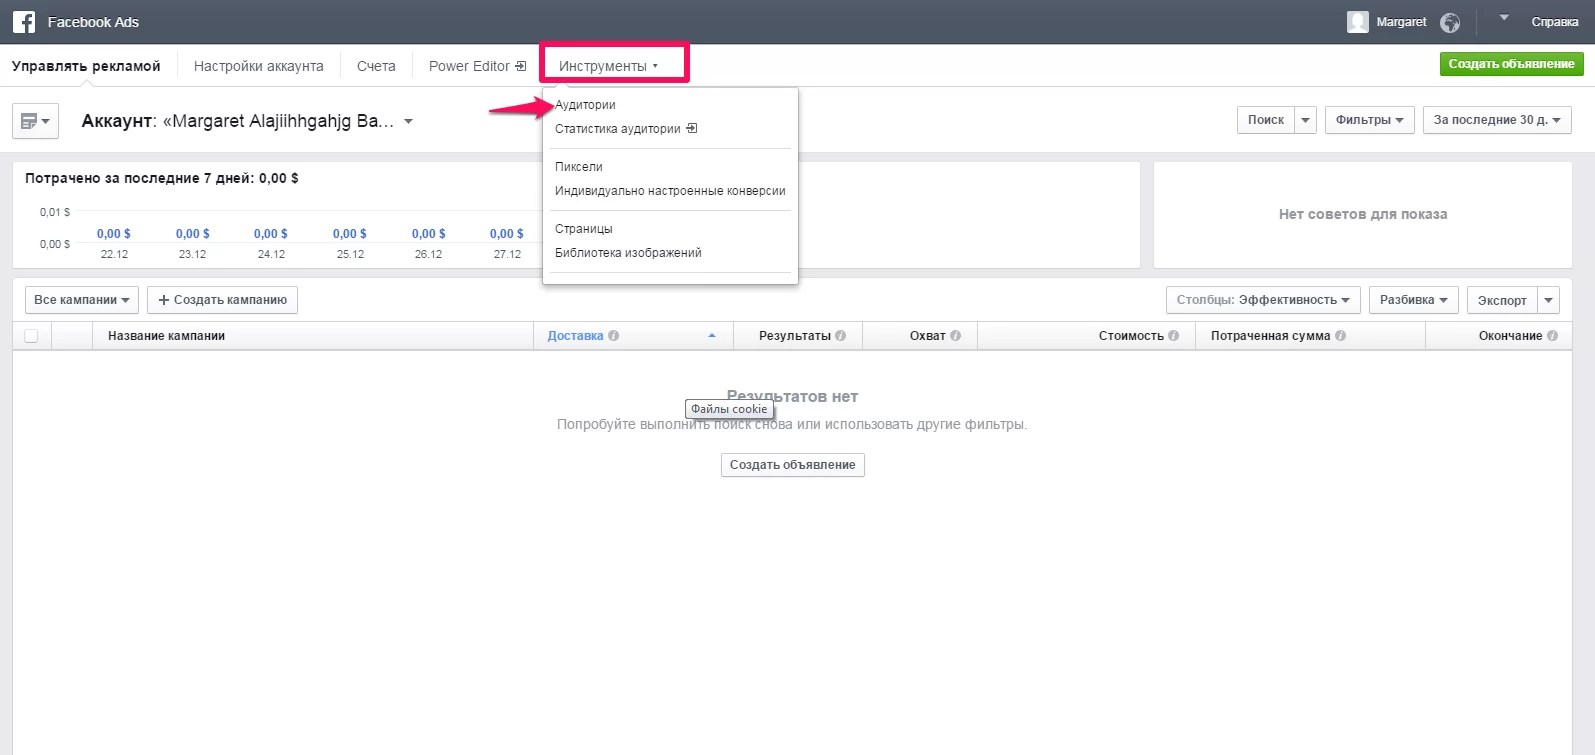
To do this, select Create custom audience.
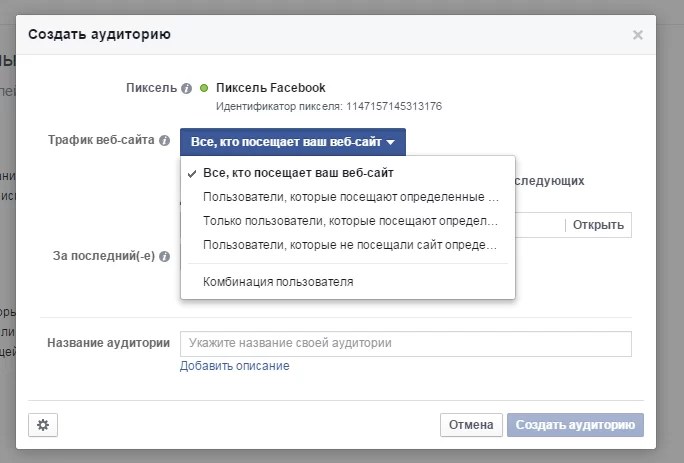
In the pop-up window, select Website Traffic.

Here we have 5 options:
- Everyone who visits your website.
- Users who visit certain web pages.
- Only users who visit certain web pages.
- Users who have not visited the site for a certain period of time.
- user combination.
For all options, the standard settings are the name, the audience storage time (or the time of not visiting the site) and an indication of whether to add information already available in the history to a new audience, or to fill the audience only from the moment of creation. Also, for all options, the maximum audience storage period is 180 days.
Now the features of each of the settings
For the whole audience who visits your website, it is possible to select the site domain if you have set the counter to several domains.
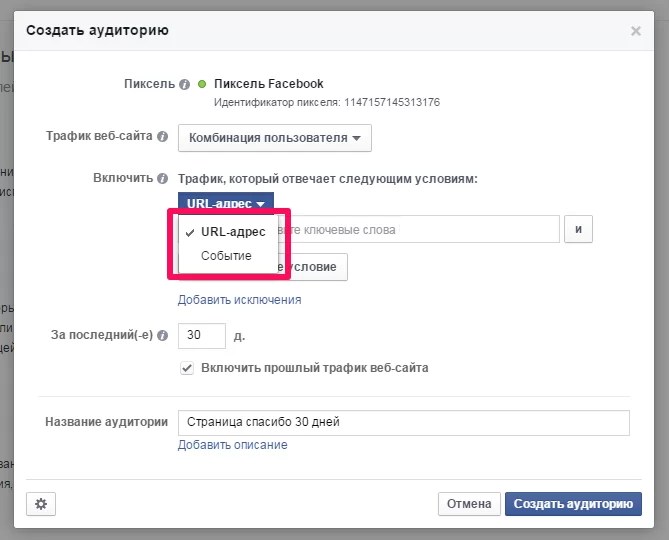
Next audience (users visiting specific web pages), allows you to specify the audience from which pages you want to collect, for this you need to insert either the full URL of the pages from which the audience will be collected from (the URL item is equal to), or part of the page address for the “URL contains” item.

This setting will work for all Thank You pages on the domain.
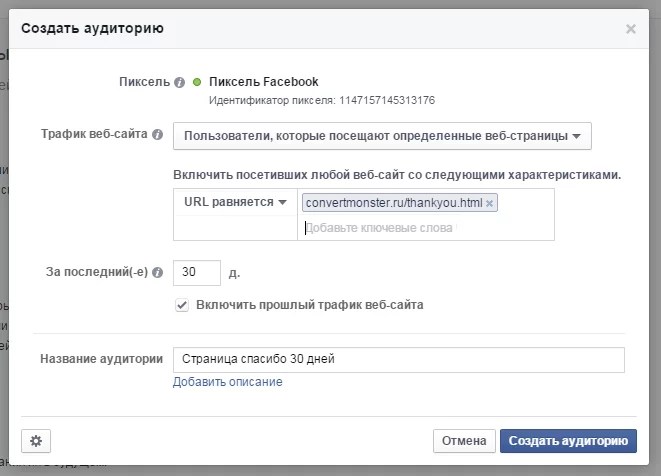
This setting will only give a specific thank you page (Application from the main page). As you can see in the examples, if you have several pages with the same name, it is better to specify a specific url with the page you need.
The third option for the audience, in addition to the previous features, it allows you to exclude some users from the audience received, using all the same rules. For example, you can create a pre-made audience that excludes visitors to the Thank You page, then when creating an ad, it will be enough to specify one audience, instead of separately specifying the targeting and exclusion audiences.
And the last, fourth point from the standard options - p users who haven't visited the site for a certain amount of time— collects an audience of people who visited your site before, but did not return at the time specified in the settings (up to 180 days).
user combination. If for some reason you didn’t have enough of the previous options (and their combinations in the targeting settings - inclusion and exclusion), this option comes into play.
In short, the possibilities for including and excluding audiences in this paragraph are practically unlimited - you can use an unlimited number of conditions (I did not get to this limitation). In my opinion the most important: in this option it is possible collect an audience by events configured to track user actions on your site and their parameters, which allows you to implement any audience based on behavioral factors.
As a data source, you can use not only the rules for the URL address, but also Events from the configured pixel.
For example, if you pass time spent on the page, you can highlight the audience of people who were on the page for more than a minute, but did not convert.
At first, this Facebook tool - Facebook Pixel - may seem overly complicated, but in fact it requires a minimum of knowledge to implement at the "Copy from here, paste here" level. But with proper use, it allows you to get a large amount of information about the users of your site in the context of this social network, as well as create the most relevant ads to work with the audience of your site.
Any entrepreneur dreams of returning every ruble invested in advertising in multiples. For this, advertising must work. Including advertising in social networks, the effectiveness of which can be achieved through its personification. Our expert, smm-specialist Svetlana Raevskaya, will talk about interesting advertising tools - Facebook and VKontakte pixels. Pixels are the special elements of your website's conversion tracking. They are used to fine-tune the advertising of a resource or individual products on social networks. They allow you to personalize the ad to those users who have already visited your site at least once or even made purchases or other targeted actions.
Facebook Pixel
There are currently two types of pixels on Facebook:
- individualized audience pixel;
- conversion tracking pixel.
But they will stop working in the second half of 2016. Therefore, we will talk about a new pixel for Facebook (about everyone). The Facebook pixel is part of the JavaScript code for your website..
The main functions of the Facebook pixel
- Tracking and analysis of conversions.
- Optimizing ads to increase conversions.
- Creation of individual retargeting bases.
By creating and installing just one Facebook pixel on your site, you can get detailed statistics on visitors.
Benefits of the new pixel for Facebook
- Key page view.
- Search. Track user search queries on your site.
- Adding to cart.
- Adding to wishlist.
- Start of the purchase.
- Adding payment information.
- Making a purchase.
- Lead (for example, filling out a form, visiting a page with a price list).
- Completion of registration.
Customizing the Facebook Pixel
The Facebook pixel code consists of two parts: the base code and the standard event code. The base code is placed on each page of the site. But the standard events need to be configured. After selecting the event you need, enter its value into the pixel code. Set the pixel only on those pages of the site where the event should take place. Do not be afraid that you yourself will have to manipulate the pixel code. Smart Facebook took care of users. Detailed instructions for working with a pixel can be found. That is why I will not talk in detail about how to create, install on the site and monitor the work of the pixel. My task is to show you, dear site owners, what great opportunities it provides. Even if you use Google and Yandex analytics services, do not neglect the ability to analyze your website visitors using the Facebook pixel. Most importantly, the pixel gives you the opportunity to maximize the effectiveness of advertising on the social network thanks to individual settings. It is worth wasting a few hours of time to master the work with a pixel. After all, its use will help save your advertising budget.
Pixel VKontakte
It is much easier for an unprepared person to work with the VKontakte pixel. However, he has much less opportunities. I believe that no one can explain the principle of operation and use of anything better than the authors. So here is the instruction about creating and installing a pixel from VKontakte itself. And let's see how it differs from the Facebook pixel.
Possibilities of the VKontakte pixel
Against the background of the functions of the Facebook pixel, the use of the VKontakte pixel may seem unnecessary and unjustified. This is not true. Pixel VKontakte or retargeting code, gives us . Which?
- You can make direct sales to all visitors to your site.
- You can tell about your discounts and promotions either to all users who have visited your site, or only to those who are interested in goods/services for which you have discounts/promotions.
- You can return visitors who put an item in their cart but didn't buy it. To do this, remind them about it on the social network and show a photo of this particular product.
- Knowing exactly what users have purchased on your site, you can offer them related or additional products / services in your advertising.
- If you have a community on the VKontakte social network, you can attract the site's audience to it and prepare users there for purchase.
And these are only those possibilities that lie on the surface and are obvious. In each case, an advertising specialist will certainly be able to come up with many more interesting options. I think it would be logical to use all the opportunities provided to us by social networks. Install both pixels on your site. Collect the most individualized retargeting bases. Set up ads wisely. Save your budget. All good ideas!
Add a comment Cancel reply
Svetlana, hello. You got it completely right. I don't even have anything to add! Perhaps there are more questions? Ask. I will be happy to help you!
Reply
Svetlana, thanks for the interesting article!
Tell me, did I understand correctly: pixels do not replace the metric, but complement it? And pixels do not replace each other either: if we want to advertise on VK, we use the retargeting code, we put a pixel for Facebook advertising, if we want both here and there, then both?
Reply
I was looking for information on pixels on VKontakte and Facebook. In this article, everything is intelligibly told and the information is given in full. I will install pixels on my site.
Tell me, if there is no thank you page on the landing page, how to track the conversion (applications from the site)? In the pixel on the landing page, I specify the events to be tracked, and the code (script) of the event itself is installed on the checkout button?
Reply
Good afternoon, Alex
Tell me, if there is no thank you page on the landing page, how to track the conversion (applications from the site)? - in any case, the thank you page (or any page after the action is completed) should be, because the FB event pixel is set and triggered on the confirmation page.If you set the code on the checkout button, you will only receive users who clicked on this button
Reply
Important things about the Facebook Pixel:
Not as difficult as it might seem at first glance
If you are not familiar with the Facebook Pixel and do not code every day, then you will probably find this topic intimidating. But, it's okay, it can really look quite complicated at first. But, firstly, it's worth it - the cost of a conversion can be reduced significantly! Secondly, a novice programmer can also implement the Facebook pixel, which is not so expensive, and for many CMS there are ready-made plugins, so you can do it yourself.
Basic concepts
- What is the Facebook Pixel? It's just a piece of code that will allow Facebook to track what visitors do on your site.
- Which pages should I add the Facebook Pixel code to? The new Facebook Pixel code needs to be added to all pages of your site. This is one of the differences between the old conversion pixel and the new code.
- I already have a Facebook Conversion Pixel on my site. Do I need to use a new code? Yes need. The old code will be retired at the end of 2016. Therefore, you should replace it with a new one as soon as possible.
- I already have a Facebook Remarketing Pixel on my site. Do I need to use the new Facebook Pixel? Yes need. It will also be removed, as well as the conversion pixel.
- What can I do with the Facebook Pixel? You can use Pixel for 3 main purposes: [ Optimize conversions for your Facebook campaigns (using Events) ] [ Create custom audiences, but more importantly lookalike audiences or in English lookalike ] [ Create dynamic ad campaigns for your online store ]
- Can I use more than one Pixel on my site? You should only have one Pixel code per site, but you can keep the old version of the conversion pixel if you need it.
- What are Events? Events are parts of the Facebook Pixel code. They fire when something significant happens on your site (for example, when someone visits a key page)
- What are Dynamic Events? These are events that are triggered when an action has taken place on your site, such as when a user clicks on an important link or button. The key difference between a regular event and a dynamic event is that a dynamic event is not triggered by a simple page load, but by a desired action on it.
- What are the Event Options? Parameters are additional pieces of code that send important information about the event. Here are a few common options that Facebook typically uses: content_name- Content title content_type- Content type content_category- Content category content_ids- Content ID value - Value (to be used in campaign reports to track cost per conversion) currency- Currency
- What are the standard Events? Facebook has 9 standard Events:
- What are Individual Events? You are not limited to 9 Standard Events. You can set Individual Events and pull up any type of data you need as parameters. Custom Events can only be used to build Custom Audiences. You cannot use them for campaign optimization.
- Can I use parameters when creating custom audiences? yes you can. This is the purpose of the parameters. You can sort your audiences using them. For example, you can create a custom audience of customers who have purchased products worth more than $50. To do this you need to go to Custom Audiences > Website Traffic > Custom Combination, select the Purchase Event, then select the price option and add => 50 as a rule.
- Can I optimize ads using Event parameters? No you can not. You can only optimize ads for Standard Event, but in this case you won't be able to choose parameters.
- What about Dynamic Ads and Pixel settings? As you may know, Facebook Dynamic Ads allows you to automatically advertise products from your website on any device. This is a permanent retargeting campaign for online stores. In order for Dynamic Ads to work, you need to configure 3 Events on key pages or actions on your site: [ Product View Event– for each product on your site. ][ Add to cart event – for the shopping cart page or for clicks on the Add to Cart button ] [ Event “Purchase”- for the "Thank you" page on your site, the page that the client goes to after the transaction is completed. ] Required parameters for Events with Dynamic Ads: [ content_type– this must be “product” or “product_group” content_ids – the id of the product associated with the Event. It must be the same one you use for the Product Catalog. ]
- What's the difference between Event Pixel and Custom Conversions? These are two different things. You can just add some basic code to your site rather than setting different custom conversions directly on Facebook, or you can go more advanced and add Events to your code. You can also set custom conversions based on Events if you like. When you use Events in your Pixel code, you don't need to use Custom Conversions.
- Which is better: Event Pixel or Custom Conversions? The Event Pixel will give you more room for optimization and will allow you to use dynamic parameters (which will be automatically pulled from your site). Events can be fired dynamically (Dynamic Events) when someone performs a desired action on your site (clicks on links or buttons). This helps a lot because you can optimize your ads for these actions that are not available in individual conversions.
- Is it important to indicate the value of each Event? Yes, it is important. Facebook strongly encourages you to enter a value and currency for each Event because it helps them (and you) optimize your ad campaign. It also allows you to calculate cost per action and ROAS.
- How to determine the value of an Event? You must calculate how much value for each Event in your business. For example, if a product costs $100 and you know that your conversion rate is about 10%, then the value should be $10. This value can be changed in the future when you accumulate more statistics.
- How to determine the value of an Event for an online store? On an ecommerce site, you usually have 4 special Events. Each one fires when a visitor completes a specific step in the shopping process (downloads a product page, adds to cart, initiates an order, and completes a purchase). Because of this, each Event will have a different value for you and for your business. “View content”, for example, is triggered on the product page. It is obvious that not every visitor to this page will make a purchase, so it doesn't make sense to use the price of the item as a value at this stage. You'll want to use a percentage of the price as well as the percentage of people who made a purchase after viewing the item. You can easily get this data using Google Analytics. Here's how you can use data from Google Analytics Ecommerce to determine the cost of Events: [ “View materials” (triggered on the product page): Google Analytics > Conversions > Product Performance > Purchase Rate ] [ “Add to Cart” (triggered by clicking on the “Add to Cart” button)Go to Google Analytics > Conversions > User Experience and view the session with the Add to Cart column. You will see the percentage of users who completed the transaction. ][ “Checkout Start” (on the payment page): Google Analytics > Conversions > User Experience > Checkout Behavior and view the transaction data session. This is the percentage of people who went to the payment page and completed the transaction. ][ “Making a Purchase” (on the Thank You Page) A: You can use the transaction cost. This Event only fires when the transaction is completed, so you know the exact value in this case. ]
- What is Advanced Matching in Facebook Pixel
Pixel Events and Options
You can also add your own parameters and track them according to your needs.
| View content | When a key page was visited, such as a product page, such as going to a product detail page |
| Search | When a search was made, for example, a query for one of the products |
| Add to cart | When a product has been added to the cart, such as clicking on the "add to cart" button |
| Add to Wishlist | When a product has been added to a wishlist, such as clicking on the "add to wishlist" button |
| Start of ordering | When a person goes to the checkout page to fill out the order form (clicking on the "Checkout" / "Buy" button) |
| Adding payment information | When payment information has been added to the order form, for example, clicking on a button with saving payment method data |
| Making a purchase | When a purchase is made or the order is completed, for example, a transition to the “Thank you” / order confirmation page is made |
| Lead | When a contact form has been filled out, e.g. a link to a pricing page has been completed, a form has been submitted, a trial has been registered |
| Completion of registration | When the registration form is completed, for example, subscribed to a newsletter, registration for the service |
You can use Standard Events to: [ Optimizing your ads for conversions: Facebook will let you select an event if your campaign objective is "Increase conversions on your site". Ads will be optimized to get the best results for your desired event. This is very useful for ecommerce sites (optimizing the “Purchase Event”), affiliate sites (usually using the “Lead Event”) or collecting emails of potential customers ] [ Creating Custom Audiences: You can set up very powerful Custom Audiences: Go to Custom Audience > Website Traffic > Custom Combination ] Code example Events with different parameters: fbq('track', 'Purchase', ( content_type: 'product', content_ids: '', content_name: 'Shoes Woman 37', category_name: 'Shoes Woman', num_items: '1', value: '28.00', currency : 'USD', town: 'Khrakov', country: 'UA', payment: 'Cash on Delivery', coupon_used: 'yes', coupon_name: 'promo', )); This is an example of a Purchase Made Event with various useful parameters. This is a Dynamic ad because it pulls up content_type and content_ids and has value and currency to track conversions. In addition, it tracks useful parameters that you can use for Custom Audiences, such as: address, type of payment or coupon usage, product name and product category name, or number of products purchased
Event Pixel or Custom Conversions
Value through Event Pixel
After installing Pixel
Useful material
Conclusion
The new Facebook Pixel is a very powerful tool that will really help improve the performance of your ads. The results will pleasantly surprise you. If you are busy developing your business and you have no time to deal with the technical implementation of this process, you can always contact us for help.
You still don't use Facebook Pixel? Do not do it this way.
This is an indispensable tool that allows you to spend advertising budgets with maximum efficiency.
What is the Facebook Pixel for?
1. Conversion tracking
With the help of Facebook Pixel, you can monitor the interaction of potential customers with your site. It doesn't matter what device he came to you from.
Let's explain with a specific example. Often a situation arises when a user clicks on an ad for the first time from a smartphone. But he didn't make the purchase. Later, the user visited the site from the desktop and converted. Without additional tracking, it is difficult to identify "cross-device" customers.
2. Remarketing
The person visited the site, but did not buy. If he clicked on the creative, then he was interested in the offer. It makes sense to lead the user through the sales funnel and beyond. By creating remarketing campaigns, you “squeeze” hot users.
3. Create lookalike audiences
Facebook uses internal statistics to select the optimal audience. Pixel captures which users have converted and passes the data to the algorithms of the advertising account. Those, in turn, show ads to people with a similar social demographic and similar interests.
4. Optimization of advertising campaigns
Facebook has implemented conversion optimization features. Pixel collects the metrics needed to improve the effectiveness of advertising campaigns. Based on this data, the algorithms flexibly adjust targeting in order to increase conversions.
How to create a Facebook Pixel
Go to your ad account. Select "Pixels" from the menu

Click the "Create Pixel" button

Enter pixel name and generate code

You will be offered a choice of 1 of three options:
- use integration with third-party platforms or Tag Manager;
- install manually;
- send the code to the developer by e-mail.

Most often, the 2nd option is used, because. FB is integrated into a small number of platforms, and not everyone can afford to have a full-time developer.
How to install Facebook Pixel on a website page
Before embedding the Facebook Pixel code into a website, you need to understand its structure. Consider the schema:

- The site header is a piece of code for the resource you want to embed Pixel on.
3. Event code - a set of metrics that you want to track.
Copy and paste the base pixel code into your site's header code, i.e. place it after the tag
, but before the tag.

Please note that you need to insert it on each page or in the general site template.
How to Set Up Facebook Pixel Tracking
So, you have successfully integrated Facebook Pixel into your portal. Now turn on the events you want to track

Facebook Pixel allows you to monitor 9 metrics:
- Buying is a closed deal.
- Lead generation - user identification on the site, request for a demo version or a sampler.
- Completed Registration - Completed registration form.
- Adding payment information - entering a card number or other details.
- Add to cart - click on the conversion action button.
- Adding to the list "deferred" - the inclusion of goods in the list of purchases "for the future".
- The beginning of placing an order is the introduction of some information in the fields of the order.
- Search - use the search function.
- Viewing content - visiting the pages of the site.
Let's say you want to track purchases. Activate the option and a view window will appear in front of you

You can optionally specify the parameters needed to calculate your return on ad spend. Copy the code and transfer it to the site.