To install a high-quality metal roof, it is necessary to carefully study the technology of work, be able to handle metalwork tools and prepare all the necessary materials. The following describes in detail the instructions for the entire technological process.. Do-it-yourself metal roofing is mounted (although a few helpers are still needed: for transporting and delivering metal sheets to the place of attachment).
Main characteristics of the material
A metal tile roof is a structure made of steel sheets with a thickness of 0.35 to 0.7 mm (the thicker the sheet, the harder and more stable the roof), galvanized on both sides and coated on the outside with a polymer composition (plastisol or polyester). Sheets of metal tiles usually have a width of 1 m and a length of 1 to 7-8 meters.
Roofing
Benefits of metal roofing:
- low weight (no more than 6 kg per square meter) due to the maximum possible thinning of the steel sheet: from 0.4 mm to 0.7 mm;
- resistance to temperature changes;
- ease of replacement of deformed sheets of material;
- resistance to corrosion;
- long service life (up to 50 years) and reliability;
- relatively low cost of the material;
- a huge selection of coating colors (at least 25 different colors and shades).
When choosing a suitable metal tile, it is recommended to pay attention to a material with a thickness of 0.5-0.6 mm, because a sheet with a lower weight is more likely to deform in the area of the knots, so you have to make a replacement. The thickness of the sheets of metal tiles is a very important characteristic, because with an increase in strength, the strength indicators of the entire roofing pie also increase. However, the thicker the roofing (maximum 1 mm), the more weight the roof has to bear, so the rafters will have to be strengthened.
Basic installation rules
The installation of metal roofing must be carried out in accordance with established rules, the main of which are listed below.
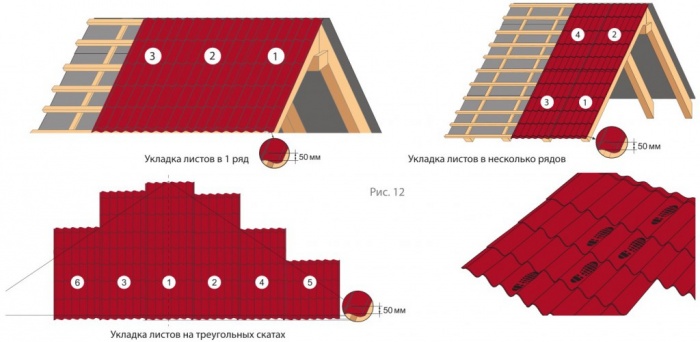
The minimum angle of inclination of a conventional metal roof is 14 degrees. If a gable roof structure is assumed, then the laying of sheets begins from the lower left corner of the slope, with each next sheet being placed on the previous one, taking into account the overlap in one wave. If the angle of inclination is less than 14 degrees (which is not entirely correct), then the overlap must be done in two waves.
 Roof structure device
 In the case of a hipped roof, you need to start the arrangement from the most elevated section of the structure, and then go down in opposite directions.
The lower edges of the latest metal tile sheets should protrude above the level of the eaves by at least 3-5 centimeters. In addition, the steel sheets must be hemmed with boards at the bottom and along the edges.
Installation of a roof made of metal tiles is carried out using self-tapping screws with rubberized gaskets, screwed into the waves of sheets along the bottom edge in increments of 7-9 pieces / m2.
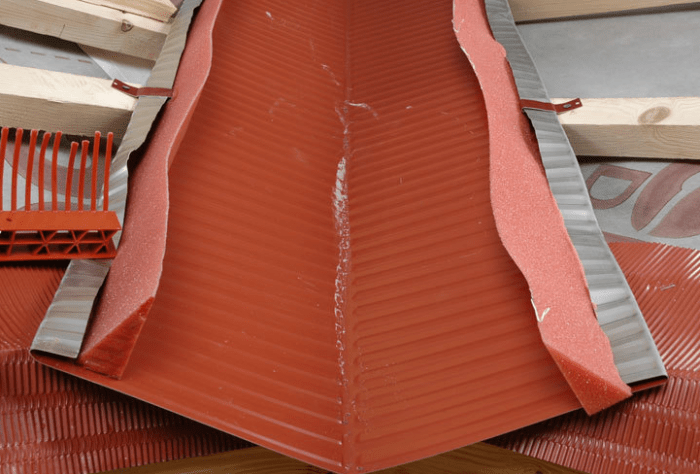
The ridge must be covered with compacted additional elements. At the upper ends of the profiles, it is correct to use semi-cylindrical parts, because due to their shape they are more securely and firmly held on the ridge.
In order to make a roof valley, you will need: firstly, an intermediate structure, and secondly, a grooved element attached to the skin using this structure.
 Roof inner corner device
 When arranging additional elements of the roof, gaps are always formed, which must be sealed without fail. Properly do this with silicone sealant, as well as sealing tapes.
From the inside, in the roof space, the metal coating remains very cold, in addition, developers often note the accumulation of condensate. Therefore, in order not to spend money later on replacing damaged material, it is important to correctly assemble the metal-tiled roof cake, including layers of material in advance that provide high-quality vapor barrier and ventilation.
Required Tools
In order to cover the roof with a metal tile with your own hands, prepare the following tools:
 Fixing the sheet with self-tapping screws
- Drill-screwdriver (must have a nozzle for a self-tapping screw with a hex head);
- A tool for cutting metal sheets (for example, a low-speed circular saw with hard alloy teeth, an electric jigsaw, a hacksaw, or a special drill attachment designed for cutting metal);
- Measuring rail and tape measure;
- Tracing cord;
- Hammer (in addition to the standard one, you will also need a rubber one, which is used if necessary to correct the structure section without damaging the protective coating of the metal tile sheet);
- Gun with silicone sealant;
- Marker.
In no case should you use a grinder with an abrasive wheel to cut metal sheets, because it will irrevocably burn the cut site and the entire nearby coating.
No protective film or paint that smooths out the defects of the metal tile will save from corrosion that appears in the places cut by the grinder. In this case, the replacement of the coating can not be avoided.
Features and composition of the roofing cake under a warm roof
The key point in the construction of a metal roof is a properly equipped insulating pie.. Any element of the composition of this cake plays a very important role, so that, ignoring its installation, one cannot count on the most comfortable operating conditions for the future roof. Therefore, we will analyze each stage step by step. Please note that the layers of the roofing cake have a clear laying sequence, which absolutely cannot be changed.
 Layer order
 So, the composition of the cake for a warm roof includes:
- Longitudinal shoulder straps and rafters(this is the roof frame, roof structure);
- vapor barrier, releasing steam from the house, but not letting it through from the street. The vapor barrier film is attached to the inside of the crate;
- Thermal insulation material(for example, mineral wool), laid between the lags of the roof structure (it is imperative to leave a place for ventilation between the layers of the cake, because at high humidity the material loses its heat-insulating properties);
- Control grille- a layer of cake, the function of which is to fasten the roofing sheathing. It is attached parallel to the rafters, pressing a layer of waterproofing material;
- crate- (bars with a section of 50x50, attached along the slope in increments of 30-35 cm);
- waterproofing membrane- is needed in order to prevent the penetration of condensate deposited inside the roof. The waterproofing is laid in such a way that between it and the insulation, as well as between it and the coating, there is a free space of 4-5 cm.
- metal tile- Spreads directly on the crate.
 Ventilation of the under-roof space
 Features of a roofing cake under a cold roof
The layout of a roofing pie for a cold roof is much simpler than for a warm one. In fact, the pie includes only the crate, sheets of metal and waterproofing..
 Roof construction without insulation
 First of all, the film must be fixed with a construction stapler or small nails. After that, a counter-lattice is laid on top of it, and the self-tapping screws that fasten it simultaneously press the waterproofing film.
As in a pie for a warm roof, the waterproofing is attached with a certain indent from both the crate and the covering material (approximately 2-3 cm). The indent is made so that the condensate that accumulates under the roof flows freely into the gutter. If the indent between the waterproofing is not made, but attached with a large fit, then moisture will quickly provoke corrosion of the roof. On top of the waterproofing and the counter-lattice, a crate is laid, similar to that used for a warm roof. Installation of a vapor barrier in this case is not required.
The technology of roofing from metal tiles without insulation in residential buildings is rarely used due to the lack of sound insulation, as in a warm roof.
Roof ridge installation
Before laying the ridge strip, it is necessary to ensure reliable ventilation of the space under the roof.. If for this it is decided to make spot ventilation ducts, then they must be sealed at the edges in order to avoid deformation.
 Mounting the skate
 If the skate is flat, then its planks are mounted with an overlap, and if it has a semicircular shape, then fixation is carried out along the lines of the metal-plastic profile.
Ridge roof nodes with triangular and trapezoidal slopes are arranged by adjusting the ridge strip to the spinal slope, unbending or bending if necessary.
Valley knots
In order to properly equip the roof units from a metal tile, an intermediate structure and a grooved element are needed that are attached to this structure. In addition, the valley needs to be strengthened by reinforcing the crate with additional floor boards fixed between the main bars.
 Valley installation
 Installation of valley planks is carried out with an overlap of 0.2-0.4 m, moving from the eaves to the ridge. On the bottom bar at the level of the eaves, you need to make a side. Directly under the ridge and under the last plank of the valley, a seal must be made.
The metal tile bordering the valley will be correctly cut at a distance of 7-10 cm from the axis on one side and the other.
The valley is attached to self-tapping screws, and if the sheets are cut, then they and the valley need to be fixed at the points of contact between the metal-tiled ceiling and the plane in which the valley planks are fixed:
- on the bar, departing from the axis of about 30 cm;
- on the profile, at the very bottom of the wave, 1.5 centimeters below the stamping.
Sometimes the places where the roofing sheets are cut are additionally decorated with special overlays that are laid from the bottom up with an overlap of at least 10 cm.. In addition to their decorative function, these linings also reduce the risk of blowing snow masses under the oblique cuts of the metal tile floor. In addition, thanks to the overlays, it is easier for water to roll into the valley.
Pipe Bypass Technology
The composition of the roof structure includes not only smooth slopes, but also other elements: chimneys, ventilation pipes and channels. Because of this, the procedure for closing the roof becomes more complicated, so here you need to follow a different instruction.:
- first, waterproofing is laid on the sides of the object to be installed;
- after that, a groove must be installed on the surface of the slope, which will drain water. It should stand at a distance no further than 0.8 m from the high wall of the pipe;
- further, according to the instructions, an additional crate is placed a little higher than the passage;
- steel sheets of the roof are cut off on both sides of the pipe.
 Bypass brick chimney
 The design will be reliable only if the following installation rules are observed:
- during fixing the apron with self-tapping screws, it will be correct to use a sealant;
- the nearest top of the wave of the steel sheet should be closed with an apron;
- first, the inner, and only then the outer, upper apron is attached, which should cover the metal profile by 10 cm.
If the apron is installed directly in the incision, then water and melted snow will inevitably flow into it, which does not even leave you hope for a warm, functional roof.
The construction of a roof covered with metal tiles is strong and durable, and provided that you follow all the rules for laying both the sheets of metal tiles themselves and the entire roofing pie, your roof will also have excellent performance.
High-quality roofing works provide not only comfortable indoor conditions, but also protect building structures from environmental influences, guarantee reliable operation of all structures throughout the entire life of the building.
In recent years, the leading place in the construction of cottages and low-rise buildings is occupied by roofs made of metal.
Their use is due to the advantages of such a roof:
- reliability of the coating due to the strength and durability of the metal tile;
- high artistic expressiveness and the possibility of implementing complex design solutions;
- light weight;
- profitability;
- fire safety.
The disadvantages include low noise and thermal insulation. Reliability of a roof from a metal tile provides high-quality performance of all complex of works at the basis device.
Preparatory work
- Design work is being carried out in full with reference to the construction site.
- Building materials are imported in the required quantity and quality.
- The old roof is dismantled, if necessary.
- The geometric dimensions of the building are checked and adjustments are made, if necessary.
Roof device
Material
rafters
- extreme, installed on the Mauerlat and fixed with nails;
- using a plumb line, they are placed vertically and secured with props;
- a cord is stretched between them so that there are no less than two threads on each slope;
- each subsequent truss structure is checked for position in the plan, for verticality and for the coincidence of planes (along the cord);
- the following rafters are fixed to the previously installed ones with the help of spacers, which can serve as elements of the future crate;
- the final fastening to each other is carried out with a crate, and to the Mauerlat - with the help of metal corners.
Eaves overhang
Designed to drain water during rain and snow in winter from the wall of the building. The overhang of the cornice overhang (the distance from the wall to the extreme point) can be from 0.4 m to 1.5 m. For its device, a filly (a board 40 mm thick) is nailed to the rafter leg so that it is its continuation.
You can use an elongated rafter leg for this purpose, but this complicates the design and leads to unjustified waste of timber.
Frontal board
 It provides rigidity to the structure of the overhang. A frontal board is nailed to the ends of the filly. Along the perimeter of the building, a bar is nailed to the outer wall so that its bottom is flush with the bottom of the frontal board, and they are connected by a cross-beam.
The beam-crossbar serves to give strength to the structure and for the filing device, which should provide a good appearance, air circulation and prevent birds from entering the structure of the metal-tiled roof.
vapor barrier
It is arranged to protect the insulation from the humid air of the attic.
It is made of a vapor barrier film, which consists of three or four layers.
- A three-layer vapor-proof roofing film, for example, Vapor Barrier, is distinguished by the fact that its middle layer is reinforced and this increases its strength.
- Four-layer (Anti-condensation) has the advantage that the bottom layer is made of non-woven textiles and is able to retain moisture, which gradually evaporates.
The choice of method of protection against moisture depends on the operating conditions and is done at the design stage.
A vapor barrier film is fixed on the lower (inner) plane of the rafters. Its laying starts from the bottom and is carried out parallel to the ridge so that the film has a deflection between the rafters of 2 cm. Such a deflection prevents possible damage to the film when the air temperature changes. Each subsequent layer overlaps the previous one from 10 to 20 cm. An overlap of 15 cm is indicated on the front side of the film, which greatly simplifies its installation. Mounting fastening of the film is carried out with a stapler or stainless steel nails with a wide head. Design fixation - elements of interior decoration of the attic space.
insulation

Lay the insulation on the vapor barrier between the rafters, using plates or strips that are 3-4 cm wider than the distance between the supporting structures. This allows you to qualitatively fill the entire space intended for insulation. The thickness is determined by thermotechnical calculation, but it should be 3-5 cm less than the height of the rafters, which will ensure good ventilation of the metal roof.

Recently, liquid foam has been increasingly used. Its advantages: simple technology and good filling of the entire space.
But we must also take into account the fact that the breathability of this material is low and it is made on the basis of polymers. Its laying boils down to the fact that liquid foam is applied in a layer of the desired thickness.
Waterproofing
Designed to protect the insulation from:
- condensate that forms on the lower plane of the metal tile at high humidity and low outdoor temperature;
- rain or melt water, which can enter through the defects formed during;
- dust and dirt.
The waterproofing device is carried out with such films:
- ordinary, reinforced, consisting of two or three layers;
- superdiffusion membranes with good vapor permeability, which makes it possible to refuse two levels of ventilation and waterproofing without a gap device;
- anti-condensation, capable of retaining a large amount of moisture, which evaporates when the parameters of the external environment or ventilation conditions change.
The technology of the waterproofing device is the same as that of the vapor barrier and differs only in the following:
- the film is laid on the upper plane of the rafters with a mandatory deflection device of at least 2 cm;
- the gap from the waterproofing to the insulation layer is 3-5 cm;
- superdiffusion membranes are laid without a gap;
- ventilation slots are provided in the overhang filing and in the ridge zone.
Control grille
 It is arranged to create a ventilation gap in the under-tile space and fix the waterproofing film.
 The counter-lattice is made of a coniferous timber with a section of 40 × 40, which is nailed to the rafter leg along the entire length of the slope.
crate
Serves as the basis for. A crate is made from a 100 × 32 softwood board if it does not exceed 90 cm. With a larger step, the thickness of the board should be at least 40 mm.
The lathing is nailed to the counter lathing parallel to the ridge of the building.
The installation of the crate begins with the first board, which is 15 mm thicker than the rest. and nailed to the bottom of the roof slope. Each next board is fastened with a step equal to the length of the tile.
In places where the roof configuration is complex (valley, dormer windows, ventilation pipes), the crate is continuous.
Strict adherence to the technology for performing the listed works will ensure the reliable functioning of the roof, and hence comfortable conditions in all areas of the building.
And in addition, a short video about the installation procedure.
One of the important stages in the construction of a house is the installation of a roof and roofing (roofing). One of the most popular roofing materials is metal roofing. And it is not surprising, because among its advantages one can single out low weight, ease of installation, large color gamut, strength.
Of course, there are also disadvantages - this is low rigidity, which makes it problematic to move along the roof, and a significant waste of material when laying on slopes with complex geometry, poor sound insulation, and heating. All of them can be eliminated, for example, the susceptibility of metal to corrosion can be reduced if the installation of metal tiles is correctly performed.
Metal roofing device
The manufacturer has already taken care of the protection of the metal tile by creating a multi-layer structure of the roofing (see picture).
As you can see, the presence of several layers of protective coating allows us to assert that the tile is made of high-quality material. Therefore, in order for the roof under such a coating to serve for a long time, it is necessary to adhere to the technology of installing metal tiles.
Basics of choice - metal tile parameters:
- The thickness of the metal tile. The metal tile is made of sheet steel. The thickness of the metal tile sheet is 0.5-0.7 mm, this is noted in SNiP II-26-76 "Roofs".
Advice. The thickness of the metal within one sheet may vary. Allowable change +/- 5%.
Please note that low-quality metal bends with strong pressure.
- The thickness of the zinc layer of the metal tile. This parameter cannot be visually tracked. Therefore, read the passport for the coil of metal from which the sheets are rolled. According to the standard, the thickness of the protective coating should be 275 gr./sq.m. If this requirement is not met, it may lead to the result shown in the photo.
- The thickness of the metal tile coating depends on the type (kind) of the coating.
- Leaf geometry. Here it is important to pay attention to the fact that the sheets are not only cut evenly, but also do not have bends along the covering side.
The tight fit of the edges is shown in the photo.
With poor geometry, the result will be noticeable visually. At best, the junction will be ugly. At worst, water will flow under the sheet. And do not even hope to tighten such an edge with self-tapping screws.
- Metal tile color. Plays a big role in the case of gradual development. That is, when you need to select a shade. In principle, there are two color coding systems, and knowing your color, you can choose the appropriate one.
Types of metal tile coatings
- PE (polyester) is applied with a thickness of 20-25 microns. Its disadvantage is fast, but uniform burnout. And also that the snow does not linger on the smooth surface of the sheet.
- PEMA (matte polyester). Its layer is 35 µm. It is more resistant to fading and mechanical damage. The rough surface prevents the snow from sliding down quickly. In principle, matte finishes virtually eliminate the need for snow guards.
- PU (pural) and PUMA (Pural matt - matte pural). Coating thickness 50 µm. Such a coating can be used in regions with an aggressive environment.
- PVC (Plastizol). In a metal tile with such a coating, the most protected core of the metal, since the layer is from 100 to 200 microns.
Nuance. The tone will be different. The rate of color fading depends on the coating of the metal.
Calculation of metal tiles on the roof
Let's illustrate an example of calculating a metal tile for a gable roof with a slope size of 8 by 5.
The calculation of the number of sheets of metal tiles required to cover the slope of a rectangular shape is calculated as follows - the length of the slope along the ridge divided by the width of the sheet.
Nuance. When calculating, rely on the working width. That is, taking into account overlaps. Sheet dimensions for Monterey metal tiles are shown in the photo.
For example, the length of the slope is 8 m.p. Then you need 7.27 sheets to work. Round up to the nearest integer - 8 sheets. For two slopes - 15 sheets. Since one sheet is divided in half and used on the second slope.
Nuance. In this case, you will need to start work from half a sheet.
For the convenience of calculating more complex slope configurations, you can use the constructor (calculator).
You can make drawings of roof slopes and draw a scheme for laying metal tiles, i.e. sheet arrangement.
Nuance. The more complex the ramp configuration, the more material will be wasted.
The length of one sheet of metal tiles is determined by the height of the slope plus the cornice overhang (about 5 cm). It should be noted that the longer the sheet, the less material will go to overlap. But, it is difficult to work with a long sheet, and transporting large metal sheets is costly. Therefore, a sheet longer than 6 rpm is advised to be broken into parts. To do this correctly, you need to adjust the resulting length by the amount of overlap. The overlap must be at least 0.15 m for slopes with an inclination angle of more than 25 ° and 0.2 m for smaller angles. For our example. 5 m.p. divide in half - we need 1 sheet 2.5 m long, and the second 2.65.
At the same time, the manufacturing technology of metal tiles is such that there are unfeasible dimensions. Each manufacturer has their own and depends on the equipment used.
Then for the entire roof you need to buy 15 sheets of 2.5 m each and 15 sheets of 2.65 m each.
Calculation of the number of additional elements for metal tiles.
The components include - a ridge bar, end and eaves straps, a snow retainer, internal and external valleys.
It is easy to calculate the additional elements - the total length of the surface to be closed is divided by 1.9 m.p. - (2 r.m. standard bar length, minus an overlap of 0.1 m). For the lower valley divided by 1.7. The overlap is 0.3 m.
For our gable roof, 5 ridge strips are needed (the length of the slope along the ridge is 8 mp); 9 cornice strips ((8 + 8) / 1.9); 11 end. Due to the construction of the roof, we do not need a valley.
Special planks. These are made-to-order, according to your size additional elements.
Self-tapping screws. Their consumption is 7-8 pcs. per sq.m. metal tiles and 3 pcs. by 1 r.m. additional element. Self-tapping screws should be with a drill, this will simplify installation, and preferably painted in the color of the sheet. This will give the finish a more finished look.
We need 768 pcs. on sheets and 3x(5+9+11) = 834 pcs. They are usually sold in packs of 250. Naturally, it is better to take with a margin.
Sealing tape for metal tiles. It is recommended to install it under the ridge bar.
Film - equal to the total area of \u200b\u200bthe slopes minus the overlap tolerances. For example, a roll of film typically measures 1.5 by 50 rpm. = 75 sq.m. The working area of the film is about 65 sq.m.
Insulation under the metal tile is also equal to the total area of \u200b\u200bthe slopes.
From the tool it is useful: a screwdriver, a hammer, a mallet, a tape measure, a marker, a level, a jigsaw or a hacksaw.
Advice. Cutting a sheet of metal with a grinder is strictly prohibited. From heating, the coating is destroyed at the cut point, and the sheet will begin to rust. Also, sparks can damage the paint all over the sheet.
How to store metal tiles
If you purchased the material before you built the truss system, you need to know how to properly store metal tiles (especially in winter). Sheets must be laid on a flat area, preferably on a pallet. In addition, it is important to protect the metal from moisture, ultraviolet radiation and provide ventilation. If the sheets will be stored for more than a month, they must be laid as shown in the photo.
Additional slats are also stored in a supine position.
1. The device of the truss system under the metal tile
Installation of a metal tile begins at a stage of the device of an obreshetka. It is important to initially fix the boards of the crate at the right distance. Namely, the distance between the first and second board is 300 mm, then 350 mm, 350 mm is the distance from one bend of the sheet to the next. In professional language, the distance is called a tile.
Advice. At the exit of the chimney, in the valley, near the windows, you need to make a continuous crate.
2. Checking the dimensions of the ramp
The main thing is that the roof slopes are even and flat.
3. Fixing the eaves strip for metal tiles
The cornice board directs the water flowing down from the roof into the drainage system.
Nuance. On the cornice board, you need to install long brackets for the gutters of the drainage system. Short ones can be mounted after completion of roofing work.
4. Laying the film of the hydrobarrier under the metal tile
In order to prevent the attic from getting wet in case of sudden rain, and also to further protect the insulation from getting wet, a hydrobarrier film is used.
The waterproofing film under the metal tile is laid on the truss system in accordance with the description, which contains the installation instructions. To avoid leakage, it is necessary to ensure that the film overlaps at least 10 cm. For sloping slopes, at least 25 cm. For hip roofs up to 50 cm (in the roof ridges). The film is fastened with a construction stapler.
Advice. The film is spread parallel to the end if the roof slope is more than 25 °. And parallel to the skate, if less. In this case, it is necessary to withstand a sag of 1-2 cm along the edge of the rafter leg.
In places where the chimney exits, antennas, etc. you need to bring the film 4-5 cm to these elements.
5. Mounting the counter-lattice under the metal tile
The counter-lattice is needed to provide a ventilation gap between the film and the metal tile sheet. Otherwise, at the junction of the film to the metal, it will quickly lose its properties.
For mounting, a rail with a cross section of 30 mm and a length of 135 cm is used.
Nuance. When using a superdiffusion membrane with a high transmittance, a counter grate is not needed.
6. Installation of the lower valley
A metal tile valley is installed if the roof configuration requires it.
Nuance. It is better to install the lower valley not on self-tapping screws, but on a kleimer. So it will maintain integrity, which will reduce the likelihood of leakage. Kleimer can be made independently from scrap metal.
7. Installation of the first sheet of metal tiles
To avoid deformation, the sheet is lifted to the roof using skids (see photo).
Nuance. It is better not to mount sheets in strong winds. Loose sheets may bend.
Installation is carried out from right to left, so that each subsequent sheet covers the groove for water drainage on the previous one.
The bottom row of sheets must be mounted so that the sheet hangs over the edge of the rafter system by 50 mm. (that is why the distance between the first and second board of the crate should be 300 mm, not 350). This is necessary to ensure ventilation and ease of water flow.
Methods for mounting metal tiles are shown in the diagram
The technology of laying metal tiles provides for the alignment of the first sheet along the end of the slope and the cornice. If everything is correct, the sheet is attached from above with a single self-tapping screw. The second sheet is installed with the same requirements and fastened with the first sheet. After all the rows are aligned along the cornice overhang, the sheets are firmly attached to the crate.
Adviсe:
- During the work on the roof you need to move. Therefore, it is better to put on shoes with soft soles and step only into the bottom of the wave.
- If during the installation process you need to cut the sheet, it is better to paint over the place of the cut with special paint.
- After mounting the sheet, you need to remove the protective film from it (if any). Under the influence of ultraviolet light, it will crumble, and will have an ugly appearance. In addition, it will be much more difficult to remove it.
8. Fastening of metal tiles
Fasteners of metal tiles are carried out with special self-tapping screws. The presence of a sealing gum allows you to tighten the self-tapping screw as much as possible, while not deforming the sheet itself.
The scheme of fastening metal tiles with self-tapping screws - through one wave.
Nuance. Along the length of the end, a self-tapping screw is attached to each tile.
Many advise mounting the self-tapping screw down the wave. It is not right. Because water flows along the gutter of the tile, which means that the slightest violation during installation is fraught with the appearance of rust.
The photo below shows that the self-tapping screw needs to be slightly mixed to the right.
It is also important to properly tighten the screw. Mounting rules are shown in the figure.
9. Installation of additional elements
9.1 Installation of the metal roofing valley. Depending on the design of the roof, an upper valley is installed. When fastening it, they try to tighten the screws so that they do not fall on the lower screws. If clamps were used, this requirement is omitted.
9.2 Installation of a wind strip on a metal tile. Regardless of the configuration of the roof, an end (wind) bar must be installed. The overlap of the planks is 10-15 cm. They are fastened with long self-tapping screws. Based on 1 self-tapping screw per 1 r.m. planks. The wind bar is laid on top of the tile sheet and fixed with self-tapping screws on both sides.
9.3 Mounting of the ridge batten of a metal tile depends on its configuration. When installing a round ridge bar, it is required to close the ends with special plugs.
The broken bar fits more tightly to the sheets, so a plug is not needed.
It is possible to protect the ridge for metal tiles from snow and moisture by laying a special ridge sealing tape (ridge seal).
9.4 Next, we mount aprons (adjacency strips) for metal tiles near the pipes or the slope adjoining strip to the wall. To do this, the wall needs to be pierced by 1-1.5 cm. Insert a bar into the resulting strip, and treat the installation site with sealant. It should be noted that the sealant will break down. Therefore, the junction needs to be inspected and sealed in a new way from time to time.
Nuance. It is forbidden to insert the junction bar into the masonry joint; this may violate the integrity of the wall. And then the manufacture of a reliable structure in the junction node will turn into sabotage.
9.5 Installation of snow guards on metal tiles. Lastly, we install snow retainer strips on a sheet of metal. They are simply necessary if the metal tile is covered with polyester.
Snow guards for a roof made of metal tiles may look like the one shown in the photo.
Often snow retainers are reinforced with an additional bar.
Its cost is low, and the strength of the snow holder increases significantly.
The choice of plank depends on the preferences of the owner, as well as on the intensity of snowfall and the angle of inclination of the roof slope.
How to install snow guards on metal roofing?
The snow retainer bar is located parallel to the cornice in one row or two rows, in a checkerboard pattern.
The final roofing cake is shown in the photo
10. Roof insulation, installation of a vapor barrier film and interior decoration
Installation of metal tiles - video instruction
Mistakes in the installation of metal tiles
In conclusion, I would like to briefly recall the most common mistakes in installing metal tiles:
- an unaligned slope will cause the sheet to be bumpy;
- incorrectly cut sheets can quickly rust. Therefore, do not use a grinder in your work;
- incorrectly screwed self-tapping screws lead to deformation of the sheet;
- you need to use only high-quality self-tapping screws with a special rubber seal;
- saving on high-quality seals leads to the fact that snow is blown into the roofing pie or moisture gets into it;
- it is better to inspect the sheet several times for scratches and paint it over with special paint in time, rather than admire rusty streaks later;
- use special (made to order) additional elements if the standard ones do not completely cover the openings. Their manufacture will cost you less than the subsequent replacement of the whole assembly or roofing materials;
- do not buy long sheets of metal tiles. The metal has a high coefficient of linear expansion. This means that the sheet will play and, over time, the screws in it will loosen. Therefore, cut the sheet into several parts;
- on the other hand, the more joints, the greater the likelihood of leakage. Therefore, stick to the golden mean;
- keep the correct overlaps.
Conclusion
As you can see, the installation of metal tiles can be done independently. Adhering to certain rules, laying metal tiles on the roof will be successful and in a short time.
The metal tile is a facing material made of thin-sheet galvanized steel. It is produced in the form of profiled metal sheets with a characteristic appearance, imitating the structure of natural tiles.
Profiling is carried out by giving the sheets a wavy or trapezoidal shape, which significantly increases the performance of the material. One of the market leaders at the moment is metal tile and.
Before proceeding with the device of the roof under the metal tile, consider the roofs.
To material advantages can be attributed:
- Light weight.
- High wear resistance.
- Fire resistance.
- Relative ease of installation.
- Good potential for the implementation of design solutions.
There are also minor flaws, which are eliminated with proper planning and execution of work:
- Low sound insulation: in case of precipitation and strong wind, the metal tile creates an increased noise level. The disadvantage is leveled by the use of good sound insulation, the function of which, as a rule, is performed by a heat-insulating layer.
- Condensation may form in the interior of the roof, in order to avoid this, care must be taken to arrange and.
Metal tile roofing: technology and design choice
Roofing cake is construction of materials that fill the roof space in layers.
The device of a metal roof depends on the type of roof, which can be warm or cold. cold roof- this is a roof without laying insulating layers, it is appropriate in cases where the house has an attic, and insulation can be laid in its ceiling. Warm roof necessary when the living space is located directly under the roof.
cold roof construction
A cold roof under a metal tile has only two main layers: metal roofing and to prevent condensation. 
The coating and waterproofing are separated from each other by a crate and a counter-crate. Ventilation is carried out in the roof ridge (the place where the slopes meet), this is necessary for air to enter the interior and to ensure the evaporation of accumulated water.
The waterproofing layer is made of PVC membranes or polyethylene films. When laying it unacceptable full tension film, it should be left sagging by 20-25 millimeters - this will improve its conductivity and make it easier for moisture to drain.
Waterproofing is attached to the rafters with a construction stapler and fixed under the crate with self-tapping screws.
Thus, the cold roof structure will consist of next layers(in order of distance from the ceiling):
- Waterproofing.
- Control grid.
- Crate.
- Metal tile.

Cold roof device
The warm roof pie contains more layers.
Mansard roof device
The main structure here is a heater, it fills most of the space between the rafters and performs soundproofing functions. Its thickness depends on the climatic features of the region and on the characteristics of the building, most often it is 15 cm or more. Fire resistance is one of the most important characteristics of a heater.
Thermal insulation is placed in the spaces of the gratings formed by the rafters.
The most common insulation materials include:
- extruded polystyrene foam;
- Styrofoam;
- glass wool;
- basalt;
- expanded clay.
Another necessary element of the “pie” of a warm roof is a vapor barrier layer. He protects the heater from condensation penetrating from the side of the room.
 The vapor barrier is attached to the rafters with a stapler. She must be located below the insulating layer.
Vapor barrier films are produced on the basis of polyethylene, polypropylene, isospan.
Waterproofing is a necessary construction not only in a cold roof, but also in a warm one. The principles of its selection and installation are the same for both varieties.
final roof structure from a metal tile will have the following ordered layers:
- The lower crate (isolates the vapor barrier from the thermal insulation).
- Control grid.
- Crate.
- Metal tile.
The middle position of the insulation between the outer and inner protective layers provides it with maximum safety and durability.

Roofing from a metal tile: technology for creating an insulated roof
Leave between all layers small gaps for natural ventilation.
Dense filling of the interrafter space is the key to the reliability and durability of the roof. Insufficient layer thickness of the pie will lead to the formation of vast empty spaces, accumulating moisture and reducing the operational properties of the coating.
The other extreme should also be avoided - too thick layers, since in this case ventilation will be blocked.
The device of a roof from a metal tile on a wooden crate
The main purpose of the crate is roof frame support formed by rafters. Waterproofing and metal tiles are attached to it, it creates a natural  ventilation interior space of the roof.
There are two types of crates - solid and sparse. In a solid construction, all boards are adjacent to each other, which provides increased frame strength, but significantly increases material costs.
In a sparse crate, the boards are at a certain distance from each other.
- Average optimal value the tilt angle is 22 degrees, the minimum is 14 degrees. A lower value does not provide sufficient structural strength and does not make it possible to use the attic space.
- big angle tilt increases the amount of attic space, but it has a drawback - increases the windage of the structure, that is, its exposure to wind.
- The optimal value of the indicator can be calculated independently. To do this, you need to find one half of the gable width, divide this number by the desired roof height and calculate the sine of the division result.
truss system constructed from metal or wooden beams. This is main roof frame, the operational potential of the entire structure will depend on the reliability of its device. To create a roof from a metal tile, as a rule, wooden beams are used.

Installation of roof beams
It is a system of supports that are fastened to each other in various ways, depending on the roof structure, the number of slopes and their angles. A crate is attached to this system., which is an additional, secondary framework.
Fasteners of metal tiles to the structure
Sheets of metal profile are attached to the crate. For this, they are used roofing screws, which are screwed into the cavity of the tile wave with the help of an electric drill. 
As a rule, fasteners begin. During the execution of work, you should move along the profile with great care, since the material is easily pressed through.
After completing the fastening of the tiles, you can proceed with the installation additional elements.
These are the main stages of the installation of metal roofs.
Working with this material is relatively simple, the main difficulties are related to ensuring good ventilation and protecting the roof from moisture and wind.
Useful video
The device of a metal tile on a practical example:
The use of metal profiles or metal tiles as a roofing material today can be safely called the most optimal and balanced choice, especially in comparison with ceramics or soft coatings. The device on the roof of a roof made of metal is quite capable of being done by one's own hands, but, like most roofing works, it will require accuracy and careful preparation for work. A metal tile is many times lighter than a slate or an ordinary tile; with the proper quality of galvanizing and polymer coating, the service life of a metal can easily exceed 30 years. The main thing is that thanks to the profiled surface structure, the roof easily withstands loads from snow, wind and storm water flows.
Roofing from a metal tile
The principle of use and the coating device is not much different from other roofing materials, but has its own characteristics. The design of a roof made of metal tiles is clear from the drawing. The roofing device consists of the main components:
- Supporting frame of rafters, battens and, if necessary, counter battens;
- Eaves elements, ridge strips and roof valleys, a group of auxiliary protective overlays, known as additional elements for roofing from metal tiles;
- Waterproofing and thermal insulation systems;
- Sheets of metal tiles laid in a strictly defined order.
Important ! Unlike a metal profile, a roof made of metal tiles requires a high quality frame device. The difference between the diagonals of an imaginary quadrangular plane of the rafters should not exceed two millimeters.
Construction of a roof made of metal tiles, preparation for work
Preparatory work for the device begins with carefully leveling the plane formed by the upper edges of the rafters. Most brands of metal tiles require a very precise frame construction. Otherwise, when laying, you yourself will not notice that even if the roofing technology is followed to the nearest millimeter, each subsequent sheet in a row will, as it were, deviate from the vertical. As a result, the closing corner sheet will simply be impossible to dock in a vertical and horizontal row, video
In some cases, alignment is easier to do with a counter-batten.
It is better to transport the purchased metal tile material on a truck, with a body of a suitable size. Its length must be at least the length of the sheet. In no case should sheets be allowed to hang down. Firstly, due to thin metal, a sheet of metal tiles can be easily deformed, which can lead to a loss of appearance and the impossibility of further use in roofing. Secondly, in this way it is very easy to damage the polyester coating of the metal.
Advice ! If the metal tile will be stored for a sufficiently long period before the roofing begins, lay the sheets with wooden slats, with a section of 15x100 mm.
Before starting work, it is necessary to draw up an estimate, and evaluate which main elements of the metal roofing, and in what quantity, will be required for installation and installation. We take fasteners and a sealant with a margin of 10%.
When calculating the needs for sheets of metal, remember that the roofing is carried out with the overlap of one wave with an adjacent sheet. In some cases, the vertical edges of the sheets have special locks, as in the photo, so the calculation of the number of strips must be performed based on the specific brand of metal tile from which the roof is planned.

All lumber, board for battens and battens for counter battens must be treated with an antiseptic, preferably on an alkyd basis. Especially carefully you should choose the option of the product in the case of a cold roof made of metal tiles. In the warm version, a layer of thermal insulation is placed under the waterproofing, and thus the space for infection of the wooden frame elements is reduced.
The technology of a cold roof made of metal tiles provides for the laying of thermal insulation on the beams of the ceiling, the attic remains uninsulated and most often drafty, which increases the risk of infection. The installation of a cold roof roof is simpler, since it does not require additional work of laying mats directly on the rafters.
Metal roofing technology
The device of the roof is reduced to laying sheets of metal and fixing it on the supporting frame. The process of laying roofing material is carried out in several main stages:
- We fasten a waterproofing sheet on the rafters and hammer it with a counter-lattice and boards of the crate, we install fasteners under the gutters;
- In the presence of an internal fracture of intersecting roof slopes, before laying the main layer of metal tiles, a valley drainage device;
- We lay sheets of metal tiles according to the scheme and instructions;
- We carry out the installation of ridge, cornice and frontal protective strips, we sew up the plane of the celestial and the lower part of the roof overhangs;
- We install ventilation elements, install corner plates in the area of adjacency to the chimney and air vents, assemble snow retainer systems;
- We carry out the device of thermal insulation and vapor barrier, sew up the surface of the structure.
Advice ! Given the huge amount of work with self-tapping screws when installing a roof, it will be most convenient to wrap fasteners using a screwdriver with a nozzle for adjustable head screwing force.
We carry out the installation of lathing, waterproofing and valley elements
The roofing device involves laying metal tiles on the crate, the wider the board, the easier it is to fix the metal. We begin the installation by stuffing the strip on the overhangs of the tension strip rafters. From it we begin to roll out waterproofing sheets, if there is a valley in the roof structure, then we lay the material from a wooden plank at the place where the slopes are joined. First, it is necessary to lay one rolled-out sheet of waterproofing along the gutter of the valley, as in the diagram.

The membrane sheet must be laid with an overlap and be sure to be glued with a connecting adhesive tape SP-1. This will prevent the insulating layer from absorbing condensed moisture. The waterproofing device must not have sagging. We fix the laid sheets of waterproofing film with nails of the planks of the counter-lattice. Tikkurila-treated pine bars 50x60 mm are best suited for installing a counter-lattice. On top of the counter-planks we will install horizontal boards of the crate.

The device of the lathing directly depends on the wave period of the metal tile. The installation step of the board must match the horizontal rows of depressions on the sheets of roofing material. Sheets of metal tiles will need to be fastened without a gap to the wood of the crate using self-tapping screws with a head on a silicone gasket. Such a device will provide a tight and tight fit to the board.
Before proceeding to the laying of metal sheets, it is necessary to complete the installation of the roof valley. The corner connection is reinforced by two batten boards knocked down at an angle, on which an internal metal gutter is laid, rain and melt water will flow down it. The device is assembled from separate sections and the battens are sewn onto the boards with an overlap of 15-18 cm and the joints are filled with sealant. After the installation of both roof slopes with metal tiles, the top bar of the valley is installed on top of the metal sheets.

We install sheets of metal tiles, we perform the device of the ends and the ridge
Before installing the roofing material on the cornice of the overhang, a beam with a section of 100x100 mm or a pair of boards of 100x50 mm is stuffed. The lower edge of the first waterproofing sheet is pulled onto the laid material and launched down. We attach hooks on the beam for hanging the gutters of the drainage system and hang the cornice strip that closes the beam and prevents water from flowing under the roof slope. We will stick an adhesive tape on the upper edge of the eaves strip and, having stretched out the lower edge of the waterproofing material, we will install it on the tape.


When constructing a roof, sheets of metal tiles are most often laid according to a specific scheme provided for by the project. If you perform laying and device from left to right, each edge of the next sheet must be brought under the cut of the previous one. With the laying out of the first three sheets, they proceed to the device of the upper row, then to the laying of the next four or five pieces. Often, in order to avoid distortion in the position of individual sections of the metal tile, a thin nylon cord is pulled along the crate, along which the device is made and the edges are leveled.

Advice ! If it becomes necessary to step on a fixed metal sheet during the installation of the roof, this can only be done in soft shoes, and carefully choose the fulcrum, most often it is the wave cavity.

Fastening with self-tapping screws is carried out in a checkerboard pattern, the lower edge is attached in each wave of the roofing material. Next, end strips are installed, which are “sewn” with self-tapping screws after 50-60 cm, the overlays are connected with an overlap of 50-60 mm.
For the device of the ridge knot, it will be necessary to hem the junction of the roof slopes above the girder with the help of two boards, a decorative overlay will rest on them, often rounded with plugs. A plug is screwed onto the end of the lining with self-tapping screws and mounted on a wooden beam. Under the longitudinal edges of the ridge lining, a seal with a wavy surface is necessarily installed, and fasteners are made with self-tapping screws through one wave.

Arrangement of the adjoining and ventilation zone
The space around the chimney requires increased attention during installation, since the roof structure requires a sufficiently large gap between the pipe wall and the metal sheet, through which moisture can leak. The gap is closed with corner plates. The lining is installed first - an apron at the bottom of the chimney, a thin metal with flanges, also called a tie, is brought under the bottom of the lining. A sheet of metal with sides is designed to drain water, so it stretches down to the very cornice of the roof. Similar overlays, but of a simpler form, close the side and top walls.

The assembly of ventilation systems can be done on a roof made of metal tiles with your own hands, even without special experience in working with conclusions. To do this, mark the exit point of the ventilation pipe and cut a hole in the roof with scissors for metal. A rubber seal is put on the hole and a flange landing device is attached, on which the outlet for ventilation of rooms, under-roof space or sewer channels is subsequently installed.
Do-it-yourself metal tile roof insulation
At the final stage of building the roof, the roof is insulated from the inside of the coating. To do this, heat-insulating mats made of basalt or mineral fiber are cut to the size of the space between the rafters and carefully, without deformation, are laid between the rafters. At the next stage, you will need to close the thermal insulation with a vapor barrier membrane. Most often, the insulation sheet is straightened and sewn to the rafters using a stapler and the joints are glued using SP-1. The entire thermal insulation device is covered with sheets of waterproof 8 mm OSB. The joints between the sheets are also glued with a connecting tape and coated with an alkyd protective varnish to enhance the water resistance of the plate.
Conclusion
When arranging the roof, most installation work requires increased care in order to reduce the risk of damage to the outer surface of the metal tile. All joints must be sealed with sealant, and the edges of the cut sheet must be treated with an aerosol protective paint, otherwise intense corrosion and rusting will begin in a couple of months.