All children love sweets and toys, so one of the most popular gifts for kids is kinder surprise. Of course, you can just buy a chocolate egg (or several) and present them in a bag, or you can do otherwise by making an original gift from kinders.
Making a cake
It is very easy to make a “cake” with Kinder chocolates and chocolate eggs with your own hands. For this original birthday present you will need:
- several rectangular chocolates "kinder chocolate", their number is determined desired dimensions cake;
- several chocolate eggs;
- satin ribbon;
- thick cardboard;
- whatman;
- glue, PVA is best;
- thin rubber band;
- ruler, pencil, scissors.


In addition, you will need decor to decorate the cake, which will be discussed below.
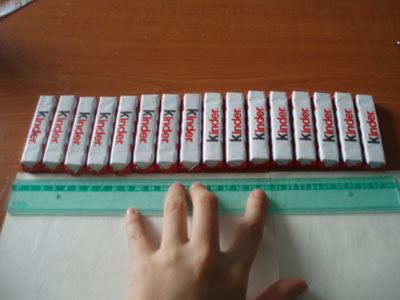
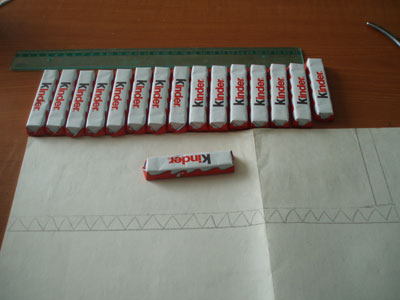
First of all, you need to decide on the diameter of the cake, for this you need to lay out rectangular chocolates in a row and measure the length of the resulting “ribbon”.
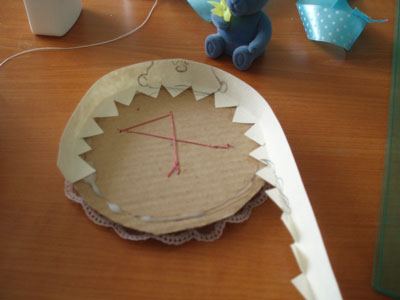
Now, using a ruler and a pencil, draw a rectangle on the Whatman paper, its length and width are equal, respectively, to the length and width of the "ribbon" of chocolates. On the long side we make an allowance 1.5 cm wide, and on one of the short ones - 1 cm.
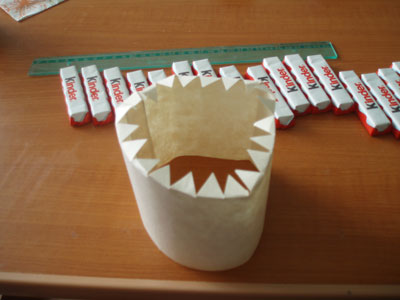
On the long side along the width of the allowance, we draw cloves of arbitrary width. We cut out the workpiece, glue it along the short side, and bend the teeth to the center of the resulting ring. Cut out a circle from cardboard, the diameter of which is 1 cm larger than the diameter of the Whatman ring. Glue the circle so that its center and the center of the ring coincide. This will be the bottom of our cake.
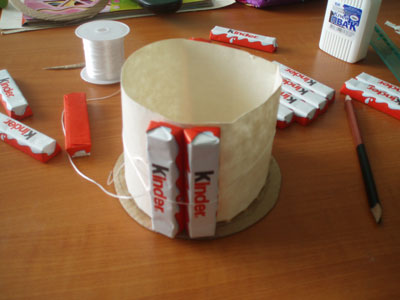
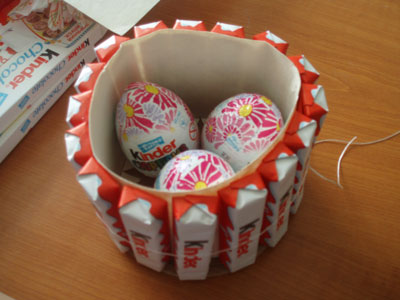
We put a thin elastic band on the Whatman ring, and begin to insert chocolates under it, placing them tightly to each other. In this case, the lower part of the chocolate will rest on the protrusion of the cardboard bottom. We got a round box in which you can put chocolate eggs and any other sweets.
Now we need to make a cover. To do this, cut out another circle of cardboard of the same diameter as the bottom. Then we cut a strip 4 cm wide from thick paper, measure 1.5 cm from above, and cut out the cloves. Glue the strip to the lid blank.
It remains to decorate our cover, for this you can use colored paper, foil, fabrics, lace, as well as rhinestones, beads, bows and flowers. We install a toy in the center of the lid, it can be fixed on double-sided tape or sewn to the lid with a couple of stitches. If we make a cake for a boy, then we install a machine or a robot on top. A gift for a girl can be decorated with a small soft toy or doll.
If desired, you can make a large cake, in several tiers. The manufacturing technology is the same, you just need to make tiers of cake of different diameters. Below is the circle big size, circles of smaller diameter are set above.
If such a large cake is given, but inside its tiers, it will be possible to place not only sweets, but also any other things of the appropriate size that are planned to be presented.
Gifts for adults
You can make a gift from kinders not only for children, but also for your girlfriend, especially if she is sweet. For example, a girl can be presented with exactly the same cake as described above, only in the paws of a soft toy decorating the lid, give a box with jewelry.
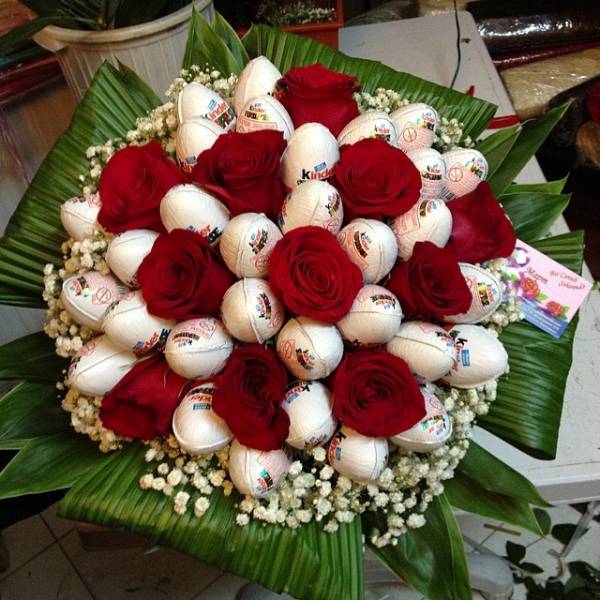
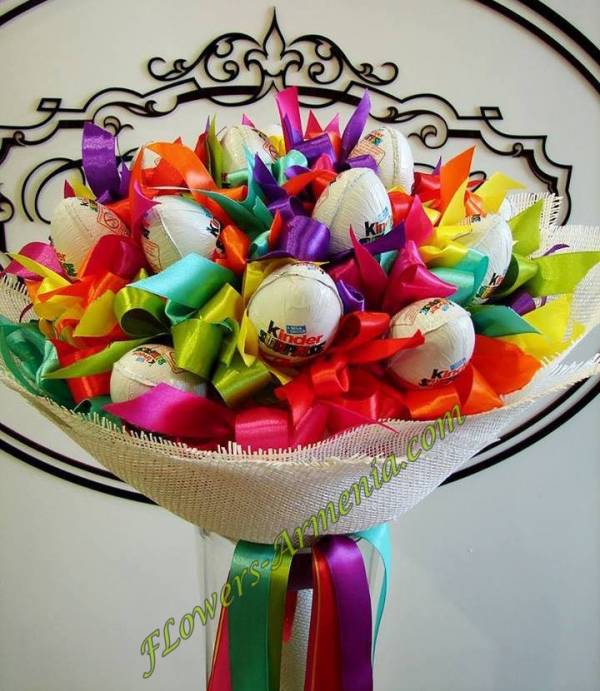
You can make a gift from Kinder Surprise in the form of a bouquet of flowers. This is a wonderful souvenir for a woman of any age.

The easiest way to make tulips from kinders. To make a flower, you can use two-layer plain napkins. To make a flower, you need:
- cut the napkin into four parts so that you get squares;
- place a chocolate egg in the center of the square with the sharp end down;
- wrap the ends of the napkin at the opposite end of the egg;
- trimming the ends of the napkin, twist them and secure with tape on a wooden skewer;
- using green floral tape, wrap the skewer so that it resembles a tulip stem;
- cut out leaflets from green colored paper and fix on a skewer with tape.

Having made several of these flowers, you can put them in a vase or pack them in transparent paper, like a real bouquet.
If you want to surprise your girlfriend, then you can make a more complex gift from chocolate eggs. Before you start making flowers, you need to do the following operations:
- carefully remove the wrapper from the chocolate egg (it will need to be reused);
- with a sharp knife, cut the egg strictly in half (along the "seam");
- remove the container with the toy;
- the toy can be used at your own discretion, for example, given to nephews. And in the empty container put a note with declarations of love or small photo his girlfriend with the comments "the most beautiful." You can also place the ring in a container with a marriage proposal;
- now the hardest part begins, you need to collect the egg so that it does not look damaged. To do this, put the container with the note in one half, then run a hot knife along the edges of the halves of the chocolate egg, and immediately connect the halves. The melted chocolate forms a new "seam" and the egg will appear whole;
- now you need to wrap the finished egg with a wrapper, and then use it to make a bouquet, as described above.

So, you can make very original gifts from chocolates and chocolate eggs. One has only to show imagination and make a little effort, so that instead of the standard "candy" gift, you get a real little masterpiece.
Children's birthday is always a joyful event in any family. The kid receives a lot of gifts: toys, clothes, various useful little things. If you want to surprise a child and give him a very original gift, then in our article you will learn how to do this.
It will be about how to make your own kinder chocolate cake with a surprise. Making it at home is very simple, although it looks, at first glance, a complicated process.
Depending on what kind of gift you want to give as a gift, the quantity will also depend necessary materials. In our master class, we will show you how to make a small cake, and how to present jewelry in an original way to your baby.
So we need the following:
Kinder chocolate (the amount will depend on the estimated size of the cake)
-3 kinder surprises
- Thick cardboard
- thick paper
-PVA glue
- Scissors, ruler, pencil
- thin rubber band
For decoration: lace, satin ribbon, bow, rhinestones, threads, needle
-Children's jewelry box
First, lay out all the chocolates in one line to understand what diameter the cake will be. We apply them to thick paper, on each side you need to add a centimeter. This will be needed for bonding. On the long side, randomly draw cloves, carefully cut out.

We bend the teeth, and glue the paper base. We measure the diameter of the resulting part. From thick cardboard, cut out a circle that will be 1 cm wider than the desired diameter.

We glue the piece with teeth to the resulting cardboard blank, give it time to dry.

We tie a thin rubber band on the cake. Then we begin to install kinder chocolates under the rubber band.

Then we proceed to the manufacture of the cover. We cut out a circle from thick cardboard, a little larger in diameter than the first blank. Next, we cut out the same piece with teeth from thick paper, as we did earlier, only small in width, and glue it to the cardboard cover.
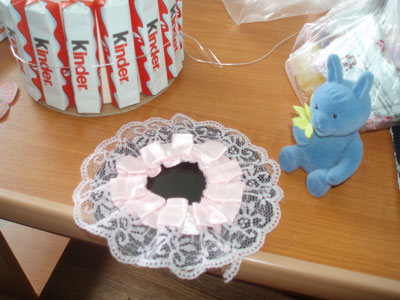
Top cover can be decorated with lace, beads, rhinestones, fabric. They can be glued or sewn on. It all depends on your imagination. We decorated the lid with pink lace, and placed a bunny-shaped box in the center, inside of which our main gift is earrings. The bunny was sewn to the lid with a few stitches.


Inside the resulting box we put 3 kinder surprises, sweets, or whatever your imagination tells you.
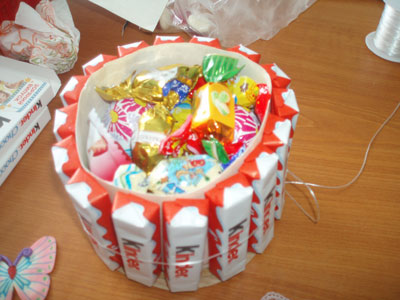
Then we close the box with a sweet surprise. We tie a beautiful satin ribbon over the rubber band and make a beautiful bow. The bow can also be decorated to your liking. We sewed a butterfly on it.
One ingenious foreigner invented at one time to hide toys in chocolate eggs. They say he received a lot of money for his invention. It would be interesting to listen to the opinion of the owners of the company, if they look at those wonderful structures that mothers are now building from Kinder for their children. Ships and hearts, hedgehogs and planes, faces, suns and many other crafts. Don’t know how to mess around with the dough, but you really want to prepare a gift with your own hands? Let's try together!
General principles for making gift cakes from kinders
There are many options for decorating a Kinder cake. Some products seem complicated, but this is only at first glance. In fact, making a cake from kinders with your own hands is simple, the main thing is to choose the right material and build the very basis of such a product. For the formation of cakes, special blanks are used, which are made of cardboard or foam, fastening the material with hot glue, adhesive tape or PVA.
Corrugated paper is used to decorate the base. It stretches easily, which allows you to easily shape any shape of the workpiece. In addition, such paper has one more quality, if its edge is stretched a little in different sides, a nice frill is formed.
Chocolates are fixed on the base with double-sided adhesive tape, and the outer protective layer of adhesive tape is removed immediately before fixing the sweets on the frame. For decoration, they take thin chocolates (sticks), cakes in a package, sweets in wrappers and eggs with the Kinder logo. Often the composition is supplemented, for example, with a jar of Nutella chocolate paste or other sweets to taste.
Kinder cakes are decorated with satin ribbons, beads, lace and all kinds of accessories, which can be purchased at the nearest needlework store. The top of cakes intended for girls is decorated with artificial flowers or soft toys.
Do-it-yourself Kinder New Year's cake as a gift for a child
What you need for work:
16 small chocolates (sticks);
One egg;
Chocolate figurine of Santa Claus or Snow Maiden;
Styrofoam;
White corrugated paper;
Wide double-sided tape;
Red satin ribbon 0.5 cm wide;
PVA emulsion (thick glue);
Sequins (white).
Two small Christmas balls;
Fine brush for drawing;
Small red beads;
Fir cone;
Glue gun;
Organza ribbon;
Red "rain" (tinsel);
Small decorative snowflakes.
Working process:
1. First of all, you need to make the base of the cake. To do this, cut a circle with a diameter of 9 cm from the foam. It is desirable that the height of the workpiece corresponds to the length of the chocolate bar with which the base will be glued, but you can make it 1 cm lower. It is better to take the foam 3 cm thick and cut out two identical circles from it, which glue together using a glue gun.
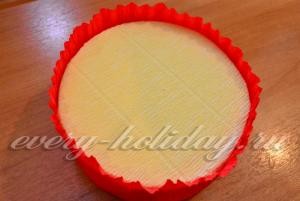
2. On corrugated paper, draw two circles with a compass. One, with a diameter of 9 cm, and the second is slightly larger: 10.5 cm, and carefully cut them out with scissors.
3. Use a glue gun to fix the larger circle on the bottom of the foam blank, and the smaller one on top.
4. Then, from the same corrugated paper, cut a strip 28 cm long and at least 8 cm wide and fasten it around the foam base with hot glue. The edge protruding from above, slightly stretch with your fingers to get a beautiful frill.
5. Now you need to attach adhesive tape to the finished blank in a circle. To keep the chocolates well, it is better to take a wide tape of adhesive tape and fix it in the center of the base. Thin tape is better to fix the bottom and top of the foam cylinder.
6. Gradually removing the top protective strip of adhesive tape, attach the chocolates. Glue the "sticks" directly to each other, leaving no gaps between them and be sure to make sure that the inscriptions on the wrappers look only in one direction.
7. In the middle of one of the chocolates, apply a small drop of hot glue and immediately press the edge of the white organza to it. Pulling lightly, wrap it around all the chocolates and secure the edge well with a gun, in the same place as the beginning. On top of the white, fasten the red, satin ribbon in the same way.
8. String Christmas balls on a satin ribbon and fix by tying a tight knot. Then make a beautiful bow, cut off the excess edges and fix it with a gun at the junction of the ribbons. On top of the red bow, you can glue a white one, made of organza.
9. On ribbons with a slight indent from each other, glue snowflakes, and beads in their center.
10. Mix sequins with PVA emulsion or glue based on it and gently apply cones to the petals with a thin brush, let dry. The remaining mixture can also be used to color the balloons.
11. Along the edge of the top circle of the cylinder, in front of the paper frill, attach the tinsel. In the center, fix the egg and Santa Claus with hot glue, and in front of them - a cone decorated with sparkles.
How to assemble a cake from kinders with your own hands for lovers in the shape of a heart
What you need for work:
3 cm penoplex;
Corrugated paper, pale pink and burgundy;
Dense red satin ribbon 3 cm wide;
Thin white lace (1.5 cm wide);
Thick, 3 mm, cardboard;
Small white beads;
Glue gun;
Medium-sized artificial roses, small white flowers;
Wide double-sided tape;
Thin "Kinder" chocolates;
Packaging of Raffaello cakes.
Working process:
1. From any sheet of paper, cut out a heart of the size you want to make a cake. Place the prepared stencil on the foam sheet and circle it, then carefully cut along the contour.
2. Along the entire perimeter, step back from the edge inward one and a half centimeters, outline the outline and cut out the middle along it, it is not needed. In the same way, prepare the second blank and glue them, overlapping each other.
3. Cut a long strip of burgundy paper, at least 16 cm wide, and glue it on the inside of the resulting blank. Then, gently pulling up the paper, wrap the whole heart in it.
4. Using a previously prepared thick cardboard stencil, make a bottom and paste over both sides of it with paper of the same color as the heart (for example, burgundy). Attach the bottom with a glue gun to the workpiece.
5. Cut a strip, 5 cm wide, from soft pink crepe paper and stick it on the outside of the heart so that it protrudes one and a half centimeters from above. Slightly stretching the paper with your fingers, decorate the edge.
6. Using a strip of double-sided tape, fix the chocolate around the circle. Their number is determined individually and depends on the size of the cake.
7. For reliability and decoration, wrap the chocolates with a red ribbon, fixing it in some places with a glue gun. Attach lace to it in the same way.
8. Prepare a lid from thick cardboard, literally 1.5-2 mm smaller than the bottom. Paste over its sides with pale pink paper, and the end with a red satin ribbon. When you wind the ribbon on the top side of the lid, place delicate white lace under it.
9. From rosebuds and small flowers, collect a small neat bouquet and glue it in the center of the lid. Fasten small beads asymmetrically around the bouquet with a glue gun.
10. Open the Raffaello box, pour the cakes into the cake box and cover with a lid. In such a cake among sweets, you can hide a small surprise.
How to make a do-it-yourself kinder cake for a girl's birthday
What is required for work:
Corrugated paper scarlet or pink;
Regular and double-sided tape;
Thick 3 mm cardboard;
Gun, glue stick;
Satin ribbon for decoration;
Compact jar of Nutella;
. "Kinder" - an egg;
Small soft toy;
. "Kinder" - chocolates (sticks).
Working process:
1. For the bases of such a cardboard cake, prepare two circles with a diameter of exactly 18 cm and a strip of the same cardboard 60 cm long and 6.5 cm wide. Fasten its edges with one-sided tape and in the same way fix the prepared circles on the resulting rim from above and below.
2. To decorate the core of the cake, cut out two identical circles from corrugated paper, the same diameter as the cardboard ones, as well as a strip at least 8 cm wide. Its length should be equal to the circumference of the base.
3. Using a gun, securely attach the paper circles to the top and bottom of the base. Then glue the strip so that it protrudes above the top, and decorate it with waves. To do this, lightly stretch the free edge of the paper with your fingers.
4. Glue the chocolate base to the sides of the base with double-sided tape, and fix the egg and a jar of paste with the same tape on top of the cake. soft toy fix next to the egg and pasta with hot glue. You can pre-sew it to the base with threads.
5. Cover the cake with a satin ribbon. This will serve not only as a decor, the ribbon will not allow the chocolates to peel off.
DIY kinder gift cake for a boy in the form of a boat
What you need for work:
Thin satin ribbons in white and red;
Small stars (red, white);
Red and white crepe paper;
Styrofoam sheet 3 cm thick;
Small plastic ring;
Hot glue and glue gun.
Working process:
1. From smooth cardboard or thick paper, make a template along the contour of the sole of the iron and transfer it to a sheet of foam, circle it. Then, carefully cutting with a knife, prepare two identical blanks and glue them with hot glue.
2. Prepare a felling template. Draw a rectangle, round off its narrow sides and cut it out. Transfer the drawing using the resulting template to the foam. Cut along the contour, then cut along the middle and glue, laying the halves on top of each other and, thereby, doubling the height.
3. Make a round tube in the same way. It should not be high, a foam sheet will suffice.
4. Using the template, cut out two pieces of red crepe paper, like a deck, and attach them with glue to the bottom and top of the foam blank. Cover the sides of the boat with strips of paper of different colors, also fixing them with glue. In this case, put the red on top of the white so that it protrudes half a centimeter.
5. Decorate the cabin and pipe of the ship with white corrugation. Fasten them to the base, stepping back a centimeter from the stern (rear) of the boat.
6. Glue a strip of wide 2-sided adhesive tape on the sides of the case and press the chocolates to it, gradually removing the top protective film from the adhesive tape.
7. Sew or hot glue white stars onto the red ribbon, and red stars onto the white one. Do not part, leave between them one and a half centimeters.
8. Decorate the top of the cabin with a red ribbon, and carefully tie the fixed chocolates with a white one.
9. Wrap the plastic ring with colored ribbons so that the colors alternate and secure it by laying it on the stern, imitating a lifebuoy.
Do-it-yourself two-tiered kinder cake
What you need for work:
Two rounded cardboard or foam bases, of different heights and diameters;
Crepe paper in two colors;
A few sticks of glue and a heat gun;
Satin ribbon, matching the paper;
White organza ribbon;
Cake Kinder dellis;
. "Kinder" - chocolates (sticks);
Chocolate eggs with a surprise;
Scotch double-sided;
. "Kinder" - sweets in wrappers.
Working process:
1. To build a two-tier cake, you must first prepare two round bases of different diameters and heights. It is possible to make such blanks from foam plastic or glue them from thick (3 mm) cardboard. The height of one should be calculated for the length of the cake, and the second for chocolates. Choose the diameter yourself, the main thing is that the packages with sweets, fixed on the sides, fit snugly together.
2. Decorate the tiers of the cake made of cardboard or foam with crepe paper. Stick lighter colors on the bases, and darker ones on the sides. When decorating the sides, calculate the width of the paper strip so that its top edge is a centimeter higher than the base. To form a wavy (frilled) edge, stretch the paper a little with your fingers.
3. Set the decorated smaller tier in the center of the larger one and attach it with hot glue.
4. After that, when the base of the two-tiered cake is ready, with adhesive tape, attach cakes to the sides of the lower tier, and chocolates to the upper tier. Make sure that all the inscriptions "look" in the same direction.
5. Fixing the edges of the organza with hot glue, tie it first with a row of cakes, and then with a row of chocolate. Attach a satin ribbon to it with glue and fix its edges in the place where the organza was attached.
6. Tie beautiful bows from pieces of ribbon or organza and glue them to the ribbon that was tied around the tiers. Start where you attached the ribbons to hide the seam.
7. Fill the free space on the lower tier with wrapped sweets, and lay Kinder eggs on the upper tier. Be sure to glue them with glue or double-sided tape.
How to make a do-it-yourself kinder cake in the form of a typewriter
What is necessary:
Corrugated packaging cardboard;
Double-sided tape;
Red braid;
Ordinary construction tape;
Thin chocolates "Kinder";
Hot glue stick and gun;
Four chocolate medals;
Thick white paper;
PVA glue;
Two decorative "eyes" (accessories).
Working process:
1. Draw a side view of the car on corrugated board. But, before drawing, lay the chocolates, this will help you not to make a mistake with the size of the workpiece.
2. When the part is ready, prepare the second one according to its template and draw windows on both.
3. After that, cut a long strip from the same cardboard, exactly 5.5 cm wide and secure it with construction tape between the side parts.
4. Put the blank on the cardboard, circle it with a pencil and cut it out along the contour - this will be the bottom of the car. Attach it to the machine.
5. Paste the resulting cake blank with thick white paper.
6. Attach a long strip of double-sided tape to each chocolate bar from below, then glue them to the frame you made. Peel off the top layer of adhesive tape immediately before fixing the chocolate bar. Do not cover the windows with chocolate.
7. With red braid, fixing it with hot glue, decorate the windows and the machine itself along the contour. Attach the eye-shaped fittings to the front windows, and secure the chocolate medals (wheels) with double-sided tape.
8. You can install such a cake on a stand made of cardboard and covered with foil. The machine is attached, like chocolate, with adhesive tape.
Do-it-yourself Kinder Cake - Making Tricks and Useful Tips
Do not use hot glue to attach chocolates. The delicate packaging wrapper will be removed when the chocolate bar is separated from the cake base.
To prevent the chocolate from melting in a warm room, it is recommended to keep it in the refrigerator until fixing.
Making a cake from kinders with your own hands, you can decorate the product to your taste, complementing the decor with candles, numbers, bows or other sweets. Bunk cakes look original if you sprinkle multi-colored peanuts in glaze on the free space between the tiers or put Raffaello sweets.
Children's birthdays are always a special and very important holiday for all family members. On such days, kids always receive a lot of different gifts: clothes, toys, various useful little things and, of course, sweets. By the way, look at gift ideas for a child.
Would you like to please and surprise your child at the same time? Make an unusual kinder cake for him with your own hands, step by step photo each stage will clearly show what and where to insert, stick or decorate.
Almost anyone can make such a souvenir cake from kinder chocolates on their own at least once, holding paper, scissors and glue in their hands.
You can be sure that your gift will be the most unusual, original and memorable.

Materials and tools:
Styrofoam or penofol - for the base;
- corrugated paper (I use red and cream color);
- Double-sided tape;
- Kinder chocolate bars (it took me 24 pieces);
- glue gun and rods to it;
- peanuts in glaze (for decoration);
- candle (for decoration)
- satin or rep ribbon (for decoration).
How to make a do-it-yourself kinder chocolate cake:
First you need to make the basis for our future souvenir cake from 2 Kinder. To do this, take a piece of foam or penofol, 5 cm thick. If your foam is 3 cm thick, then make it from two pieces, gluing together. Cut out a circle of the desired size. I cut out a circle about 13.5 cm.

To make a cake, I use two colors of corrugated paper - red and cream. From a light-colored corrugation, we cut out two circles equal to the diameter of the workpiece.
Now glue the bottom and top of the workpiece.
Cut out a strip from the red corrugation, equal in width to the width of the workpiece plus 2-3 cm, and along a length equal to the length of the workpiece (along the entire circumference)
The edge of the paper can be made into a wave by slightly stretching it in different directions with your fingers.
We glue the paper to the workpiece.
Now we take double-sided tape, tear off the first layer of paper and stick it to the workpiece with adhesive tape.
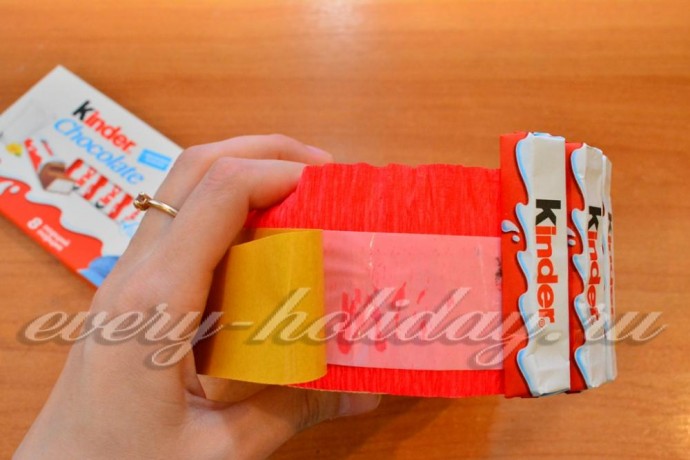
We peel off the second layer of paper and begin to gradually apply chocolate bars to the adhesive tape.
And so on until the whole cake is pasted over with chocolate.