Many women want to make a picture from satin ribbons, especially those who know how to appreciate art, and those who have the ability to notice beauty. Using all available satin ribbons, you can embroider incredible and bewitching pictures. This decor uplifts the mood and gives great joy. In order to feel the process of creating a masterpiece, you need to do it yourself.
simple patterns
To create a picture with flowers from satin ribbons, you need:
- canvas for arranging the composition;
- several needles;
- lilac thread;
- satin ribbon of green, yellow, purple and lilac;
- comfortable hoops;
- graphite.
The drawing of the selected flower must be transferred to the canvas blank. The first time it is better to use a simpler drawing. For example:
For masters who have behind little experience, the image shows the seams that are used in embroidering a picture with patterns of flowers with threads of satin ribbons. When the drawing is transferred to the canvas, it must be fixed in the hoop.
Feelings when embroidering with ribbons should resemble the feelings that prevail when writing a text, that is, lightness and ease.

The tape needs to be fixed. The three petals at the top are embroidered with a straight stitch. It is necessary to pull the needle with the base material to the front side. The length of the petal is controlled according to the pattern, and in the process of contact, the needle goes to the wrong side.

After completing the embroidery of the upper petals, the embroidery of the petals from the sides and below continues. Their execution is similar to the upper petals.


When the flower petals are ready, it is necessary to embroider the core of the plant. So, it is necessary to use a "loop" seam. A seam is made with a needle brought out to the side, you should stay on the wrong side and make a seam again. The loop is tightened, and the needle returns to the wrong side. The petals located below are decorated with floss thread.
The stem embroidery is done by twisting the stitches. The needle must be on the front area, turning, forming a tape. Don't forget to secure the seam with a knot.

Leaves are sewn with ribbon stitch. The tape is straightened and pierced with a needle. After that, the level of tension of satin ribbons is adjusted. Actions continue until the completion of the composition.


We embroider roses

Necessary materials:
- high density fabric base;
- floss threads;
- white beads;
- needles with wide and narrow eyes;
- pink satin ribbons (5 cm wide and 4 m long) and green (2.5 cm wide and 5 m long).
The first action is the execution of roses of different sizes. For this, a pink ribbon is used, the edge of which is folded and fixed with a needle. The unoccupied edge of the ribbon is bent back, then the ribbon is twisted into a roll, this will be the core of the rose.
When creating the rose itself with your own hands, you need to bend the ribbon to the base each time, the flower is twisted, you need to fix it with threads and carefully sew it on, as shown in the photo.


Tape is introduced dark green. The twisted tape is tacked from the inside with blind stitches.


The same tape will go to create the leaves. The leaves are cut out of ribbons and singed with a lighter, attached to the embroidery with hot silicone glue.
Rose is ready!

For an unusual feeling of overflow and heterogeneity of the composition, it is necessary to tint the flower with liquid acrylic paint. The same acrylic paint is applied to the veins on the sheets and the background.

fiery red rooster
Required inventory:
- satin ribbons of different colors;
- sackcloth;
- floss thread;
- comfortable hoops;
- needles and scissors;
- tracing paper and pencil.
You need to find a job center. To determine the center of the burlap, it is folded in half and in half again. Along the fold lines, the fabrics are highlighted with a “back to the needle” seam. When the canvas is prepared for work, it is necessary to redraw the image of the bird on tracing paper. After that, the pet on tracing paper is transferred to burlap.

Having a finished sketch on the canvas, it can be inserted into the hoop, stretching the fabric. The work with ribbons begins with the embroidery of the largest details; in this exposition, this is the breast and neck of the bird. Start more accessible with four stitches on the neck of the rooster with a gold-colored satin ribbon. The length of the thread of each line is about 15 mm. After four more of the same lines are made on the breast. But their length is shorter and equal to 10 mm.

According to the scheme outlined above, the entire body of the pet is filled in turn. The stitch inclination for the bottom part should be changed. To add volume to the embroidery, some stitches are duplicated. More often a double layer is used on the neck and chest, in our case it is a yellow satin ribbon. When embroidering the second layer, the stitches lie in the required direction. Straight ribbon stitches are used to fill in the lower torso of a pet. For work, satin ribbons of blue and deep blue are used. The cockerel wing is embroidered with ribbons of the following colors: blue, yellow, deep blue. The bird's head and beak will be golden yellow.
In order to achieve a natural beak, straight ribbon stitches are passed along it. The cockerel's head is also embroidered using curved stitches. In this case, the shortest stitch is applied first, and then subsequent lines are sewn. In conclusion, it turns out that each subsequent stitch slightly overlaps the previous one. The beard and scallop are “drawn” with a scarlet ribbon with a straight stitch. French knots are embroidered in place of the peephole.
Curved stitches are used for the cockerel's tail. Various shades are used to create it. of blue color. A twisted stem stitch is used to create the long claws and paws of poultry. Short claws stand out with straight twisted stitches. When embroidering flower stems, a “back to the needle” seam is used.

Straight stitches are also used when embroidering petals, and for the core - French knots. To embroider grass, ordinary stitches of different lengths are enough.
The embroidery is ready, you can fix it, insert the embroidery into a frame and hang it on the wall or present it to someone as a gift!

It is also possible to embroider a formidable warrior rooster, as in the photo.

Video on the topic of the article
This part of the article presents videos that show master classes in embroidery with satin ribbons.
Embroidery is one of the most popular types of needlework. Craftswomen create the most amazing and beautiful things. In this case, different stitches are used - satin stitch or cross stitch. Also come out just wonderful pictures from tapes. Handmade things amaze with tenderness and natural beauty. Creating them is quite simple, and the whole process does not take as much time as when working with floss threads.
History of embroidery
In ancient times, embroidery of pictures from strips of fabric did not look like it does today. Craftswomen used ropes woven from plant fibers. Later, when weaving began to develop, ribbons appeared in modern form. The art itself, according to researchers, arose thanks to the French king Louis XV. But to this day, everyone is fascinated and intrigued by pictures from tapes. With your own hands you can create a real miracle.
Beginning of work

To work, you will need a special needle with a long eye (depending on the density of the matter, it can be thin or thick) and ribbons of different colors. They can be satin or silk. As a basis, it is better to choose a denser, but elastic fabric: linen, jeans, silk, velvet. According to experienced craftswomen, matter with a mesh structure is best suited. For example, ready-made It must be well stretched on the hoop (their diameter can be eight by ten centimeters) or on a special frame. There are fixtures with a stand, they are convenient to install on the floor or on the table.
A thin strip of fabric is threaded through a needle with an elongated eye. The tape should pass into it freely, without twisting. First, it must be cut obliquely. Then, for secure fastening, you should pierce it through with a needle at a distance of two to three centimeters from the beginning, and then stretch the fabric closer to the eye of the needle. Now pull the short end down. Get a knot.
Colored strips made of silk are suitable for embroidering a picture with ribbons and for decorating clothes. They are very comfortable because they do not wrinkle. Easily washable satin or moire, besides, they do not shed. They can be embroidered on almost any fabric. Organza braid is also used. The image is voluminous and tender. Lace and voile ribbons will complement the picture. You will definitely need thread for embroidery. They make out or fix colored fabric strips from the inside of the work.
Stitch types
Most often, to embroider a picture with ribbons, a straight stitch is used. It's running in the following way. The fabric is pierced with a needle from the inside, the tape is pulled to the front side, and then it is again passed through the canvas. Thus, for example, leaves of flowers or their stems are obtained. The stitch length can be varied depending on the intended pattern.
Another curious stitch is called Japanese. Its peculiarity lies in the fact that the tape must also pass through itself. There are others, for example, a loop with an attachment. It is used to create cups of flowers. Needlewomen use a straight stitch with a curl and other elements.
Pattern selection

A fascinating activity - embroidering pictures with ribbons - you should start by choosing a pattern. Often craftswomen use floral motifs, landscapes, images of cute pets. If you are not confident enough in your own abilities, for example, specialized needlework magazines will come to your aid. The drawing needs to be transferred to thick cardboard or paper, pierce the places of future stitches with a pin or needle. Then the contours of the image are transferred to the fabric. The selected drawing is best applied with crayon, pencil. It is necessary to make the contours soft so that they are not visible after the end of the work.
How to embroider flowers

Most the best option embroidering a picture with ribbons for beginner craftswomen - follow the finished pattern. It shows the sequence of stitches and the color of the necessary strips of fabric. Of the special techniques that the craftswomen use, we can mention, for example, the gossamer rose.
The flower is embroidered as follows. Perform five stitches arranged radially. Then, moving from the center in a circle, thread the tape over and under them. Sometimes separate elements are made for an integral composition, and then they are connected together on the canvas.
You can embroider a picture with ribbons with roses made in a different way. To do this, fold a strip of satin at a right angle. The ends are wrapped up in turn, weaving them into a cord. Its length should be from five to seven centimeters. Then you must simultaneously hold both ends of the tape with your fingers and gently pull on one of them. As a result, the cord will gather into a rosette. To prevent the flower from crumbling, it must be fixed at the base with two stitches. They must pass through its middle. The edges of the tapes must be treated with glue or singed with matches. Thus, the fabric will not unravel.
Stitches must be done carefully. The tape, each time stretching through the canvas, must be straightened. Then the embroidery will look very beautiful. Flowers are done first. If they are all the same color, the transition from one to another is done from the wrong side. But if the distance between the embroidered objects exceeds four centimeters, then it is better to cut the tape and start over each time. Then the leaves are made. Simply magnificent pictures of flowers are obtained, you can also make bees, moths and much more from ribbons.
To secure the seam, the tape must either be sewn to the fabric or brought to the wrong side of the canvas. In the latter case, make a neat loop and pass the needle under the finished embroidery stitches. After completion of the work, when pink satin buds bloom on the canvas, you can decorate it with beads, rhinestones and beads. These elements will be a very appropriate addition. Also, the pattern is decorated with knots and stitches.
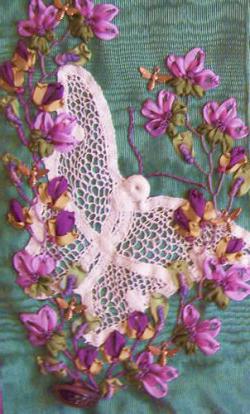
It is not difficult for a craftswoman to embroider a picture with ribbons. The work is exciting, exciting and takes a little time. Needlewomen create the most delicate, similar to real flowers, light butterflies, birds. Such a picture will not only decorate the interior of the apartment, but also serve as a great gift for relatives and friends.
For embroidery with ribbons, you will need cotton or linen fabric. Before use, it is better to wash and iron it in order to avoid shrinkage in the future. Need, of course, satin ribbons of different widths. It is very good if you can find ribbons of the same color, but one-sided and two-sided. Do not forget to pick up a floss to match the ribbons, an embroidery needle (with a large eye and a blunt tip), a thin sewing needle, a hoop and scissors.
To properly cut the linen fabric, mark the dimensions of the desired piece. Pull out one thread at a time along the contours. It is best to cut with a blade or short scissors, carefully cutting the threads along the strips.
Select a drawing. In principle, any subjects can be embroidered with ribbons, from still lifes with flowers and fruits to medieval landscapes and genre pictures. To decorate a bag or, say, a small wall panel, all kinds of bouquets are more suitable. An old castle, a forest with a figure of some beautiful animal, etc. will look good on a tapestry. If you can't draw, find a suitable picture, scan it, and then process it in Adobe Photoshop - convert the image to black and white and remove all unnecessary details, leaving only the outlines and borders of color spots. Enlarge the image to the desired size and print.
For embroidery with ribbons, it is important that the pattern is without too small details. The form is transmitted due to the texture of the tapes, their thickness and location, and not due to additional stitches.
You can transfer the pattern to the fabric in the same ways as for satin stitch embroidery. You can translate the pattern through carbon paper or by spraying. In the second method, pierce holes at a distance of 5 mm from each other along all contours, then pin the pattern onto the fabric and fill the contours with grated chalk or pencil lead. Of course, chalk and pencil should be of a contrasting color. You can also attach the patterned paper to the fabric, sew all the outlines with a basting stitch, and then remove the sheet.
Think about the order in which you will embroider the details. For this type of embroidery, this is very important, since the images are voluminous. First you need to embroider objects in the background, then - in the middle. What is closest to the viewer is embroidered last.
It is best to embroider asters, daisies and dahlias in a circle. Leave the middle blank. It is better to take a narrow double-sided tape. Thread it into a needle with a wide eye. Insert the needle from the wrong side from the middle of the flower. Stretch so that a 1 cm edge remains on the wrong side. Gently lay the tape along the front side for the length of the petal and bring it to the wrong side. Also make the second stitch from the middle, close to the first, but with a slight discrepancy. The rest of the petals are embroidered in a circle. After the last stitch, the end of the tape should be on the wrong side. Cut it off to leave 1 cm, and carefully sew to the wrong side with floss threads to match the tape. It is best to do this with a buttonhole stitch, stacking the stitches closely. The middle can be filled with threads, a knot pattern.
As for roses, it is better to make them separately, and then sew them onto the picture. They are made simply. Cut a piece of wide tape, fold it in half, matching the edges. Sew along the edges with a “needle forward” seam with small stitches and pull slightly. Twist the bud, sew it at the base and spread the petals. Tuck the free end inside the ribbon and fold over. Sew a rose to the panel with floss or ordinary sewing threads, but be sure to use the same color as the rose.
Kanzashi - vintage japanese view needlework, which appeared 400 years ago. Japanese women, who always knew a lot about style and charm, attached jewelry made of ribbons and beads to their hair. According to their belief, such gizmos also drove away evil spirits. The article “Kanzashi technique for beginners with diagrams” will definitely come in handy for needlewomen and will help them learn how to make original crafts.
Today, the kanzashi technique is actively used not only in the creation of jewelry, but also in interior items. Panels and paintings with ribbon flowers are perfect for any interior. Also, these crafts will be a great gift for family and friends.


Painting with flowers
To create a product you need:
- orange satin ribbon (3 meters);
- yellow satin ribbon (3 m);
- burgundy satin ribbon (3 m);
- green satin ribbon of dark and light shades (3 m);
- tweezers;
- sharp scissors;
- dark beads;
- wire;
- a piece of dark fabric;
- A4 photo frame;
- burlap for the background;
- soldering iron.
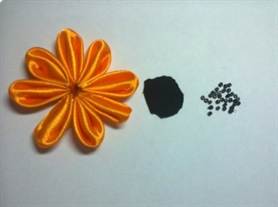
Start by cutting all the satin ribbons into 5 by 5 centimeter squares.

Take the burlap and pull it over the frame. Then proceed to create with your own hands the flowers that will decorate the picture. Take one square piece and fold it so that a triangle comes out, as shown in the photo. Then fold it two more times.


Then bend one of the corners.

It should come out like this:

Bend the next corner in the same way. Burn the ends and cut off the sides.

Draw ribbons for all subsequent petals using orange, yellow and burgundy ribbons.
From ribbons of green tint, you can create simple pointed petals and large petals for the foot of the picture.

The final stage is the process of assembling the prepared parts and placing them on the canvas. From yellow petals create two flowers, and from orange - three. For the core of the flowers, take a wire and string beads on it. Cut out a small circle from the felt, where the string of beads will be fastened. Connect all the blanks to each other with glue.

The picture is ready!
flower panel
Crafts using the kanzashi technique will always please the eye, like this wonderful flower panel.

Necessary materials:
- ribbons of different colors;
- cardboard;
- large format frame;
- sharp scissors;
- lighter;
- tweezers.

Work begins with the manufacture of flowers. First, prepare squares from ribbons.

Fold in half three times, trim the tip with scissors. Then grab it with tweezers and secure with a lighter.

Repeat steps on 10-12 petals.

Collect them on a needle, sticking the needle into the middle of the edge of the product.

Tighten the thread and tie a knot. Decorate the middle with half a bead.

Make a second flower larger than the first and glue them together.

The second kind of petal looks different.


The kanzashi technique is available even for beginners, it allows you to short term and with great pleasure to create voluminous bouquets of roses on a panel from ribbons, to make beautiful New Year cards or an autumn panel from ribbons, everything that has enough desire and inspiration.
Kanzashi paintings. All women want to make their home cozy. Helps in creating a comfortable state for the home different pictures or panel. In our article, we will provide you with a master class on making a kanzashi painting. Read how you can make such paintings with your own hands.
Kanzashi Style (Tsumami)
Thanks to our master class, you can create such a picture quite quickly, especially if you already have skills in this technique and new ideas. Surely you have already noticed such pictures in the photographs. You can use the panel created by your own kanzashi-style handles both to decorate your home and as a present to your relatives and friends. It will fit into almost any interior and will delight all the people living in your apartment. So, now we move on to our master class. Materials that will be required for work.

Kanzashi painting master class
The first step of the master class on creating crafts: a frame, flowers.

Gallery: kanzashi paintings (25 photos)


The second step of the master class: leaves
In order to create leaves for your flowers, we will cut out a leaf from a five-centimeter-wide green ribbon, previously depicting it on the material with a pencil or chalk. And then we just scorch it with the fire of a candle along the edges in order to accurately fix the outlines of the sheet. In the meantime, our sheet is cooling, bend its edge with your hand. You can create leaves in a different way. To do this, we take our green material and cut out a trapezoid from it with sides of 4 and 1 centimeter. Then we bend it in half, pressing two corners to each other. At the same time, the front side of the fabric should remain inside. Let's melt the corners, then sharply pressing the scorched edge with our fingers.
Then slowly turn the created leaflet. The leaf will come out in the form of a round arrow. Photos of leaves can also be found quickly, so you can see how they generally look.
The third step of the master class: making a kanzashi painting
When you definitely have flowers and leaves ready, all that remains is to lay everything out on the material in such a way that you get a gorgeous picture. Do it based on your thoughts about bouquets and flower arrangements. This is how you wish to arrange the flowers, so lay them out, give in to your imagination in this work.
- Then posting a picture, depict with a simple pencil or small stems to our flowers.
- And then, let's sew their green threads. Moreover, it is worth taking several threads so that the stalk is very noticeable.
- Now let's move on to gluing leaves and flowers to our canvas. First, of course, we glue the leaves, and only then the flowers themselves. Remember that the glue should be applied only to the middle of the leaves so that it does not spread and does not give the picture a bad appearance.
- Well, when you do it all, then you have to do finishing touch in your work. And it consists in gluing the base along the perimeter onto the back particle of the frame and placing the finished picture in this frame. So our unusual picture is ready.
- It can be hung to the most prominent place in the apartment. Let it please you, your loved ones, as well as the guests of your room.
- I hope the master class you liked it, and you can easily make a kanzashi picture with your own hands, to the delight of yourself and your loved ones. best idea to decorate the interior in the house, there will be a creation of a picture using the kanzashi technique from satin ribbon and fabric, because it will take very little material and effort. A handmade craft will always differ in some way from purchased items.