If you want to learn calligraphy but don't know where to start, then this article is for you. In it, you'll learn what supplies you'll need, how to hold a pen correctly, some tricks, and how to practice. Believe me, you will quickly become a professional!
Everyone can learn calligraphy. Even if you think your handwriting is disgusting, there is someone who wants you to sign wedding invitations with a fountain pen. People especially like modern calligraphy because it blatantly ignores traditional rules and emphasizes individuality.
First of all, you need to learn artificial calligraphy.
“Fake Calligraphy” is a great cursive with which you can learn how to use a fountain pen. Though to be honest, it's technically not "fake". It's still calligraphy, it just doesn't need a fountain pen. Whether you're an experienced calligrapher or just starting out, fake calligraphy is a very important technique to learn how to write on any surface.
This type of calligraphy takes more time than fountain pen calligraphy. However, if you need to write a simple phrase, then you will find this technique fun and you will love the great result that you can achieve with it.
So, first write your phrase in plain cursive. Don't worry if you don't write like the example below - just write as well as you can. This technique works with almost all connected letters.

Then you need to draw lines to indicate the thickening. They appear when your hand moves down to create part of the letter. For example, in the letter “a”, the first curve on the left is a bulge, then you move the pen to the right and down again to indicate the right leg of the letter “a”, and there another bulge appears.

When you have marked all the thickening, just fill in the empty spaces.


Fake calligraphy is a fun and easy way to understand calligraphy. By the way, often people cannot distinguish fake calligraphy from the real one.
Now that you've practiced fake calligraphy, you can move on and purchase a straight pen holder.

For beginners, it is better to use a plastic or cork holder, it will be more cost-effective.
Then you will need feathers.

These are the three feathers that are best for beginners:
- pen Brause Steno
- Feather Brause Rose
- Nib Brause Extra Fine 66
Once you've purchased your pen, you'll want to insert it into the holder.

You will need to carefully make a wedge, as shown in the photo above, which will be located between the outer metal circle and the petals inside. It seems to you that the pen should be located in the middle, but it is not.

Always hold the middle of the pen and avoid the serrations because they are sharp and can hurt you...just as you can bend them if you accidentally squeeze them too hard.
Then select paper.

You can use sketch paper or any paper that is suitable for calligraphy due to its ink absorbency. If the paper absorbs too much, then you will end up with an inky cobweb around the letters.
You will also need ink

For beginners, Speedball India ink or Sumi ink is best. Many people try using Higgins, but they give that awful gossamer effect mentioned above.
The last thing you need to do is prepare water for rinsing the pen.. You should clean it every couple of minutes.

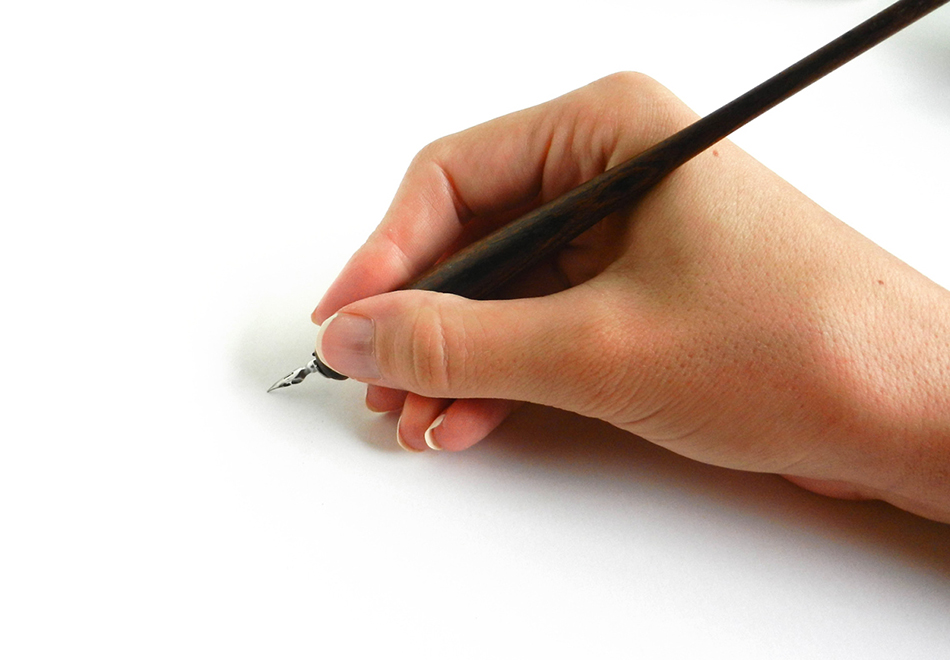
Now you are ready to learn how to hold a pen! To create modern calligraphy, you can hold the pen just like a regular pen. Only the fountain pen needs to be held tight. Hold it with your thumb and forefinger, use your middle finger for support and a firmer grip, and use your ring and little fingers for support.

Now you are ready to write! Dip your pen into the ink up to the middle of the well (the well is that hole in the middle of your pen).

The most important difference between a fountain pen and a regular pen is that the pen should slide over the paper, you don’t need to press on it the way you do with a regular pen. Otherwise, the pen will catch on the paper and you will get ink splatters. Watch this short video to show you how to hold a fountain pen and handle ink.
As a beginner, you may find yourself in a situation where the ink refuses to transfer from pen to paper. There is a simple trick to get him to do this: just “kiss” the tip of the feather on the water and try again. The ink should now behave just fine!

If the ink is old and clogs the nib, swirl it in water for a few seconds and then wipe it off with a soft, lint-free cloth.

With this article, we open a series of articles about calligraphy! We will publish soon various techniques and lessons, so stay tuned and become a true professional in the art of calligraphy.

If so, then you have just stumbled upon the perfect article to do just that.
Learning calligraphy is not an easy process, but with the right teaching materials it may take less time than you think.
What is calligraphy?
This term is borrowed from ancient Greek and means the art of beautiful writing.
Instead of just writing pretty letters, calligraphers are supposed to follow a set of rules and traditions, including those that govern the arrangement and placement of letters in text.
How to master calligraphy? More importantly, does it really make sense to do this?
For example, if you are a designer, modern calligraphy is a great skill to add to your resume and fast way attract customers with elegant logos, signs, cards, invitations, etc.
Our article on calligraphy for beginners will help you become familiar with all these things and help you learn calligraphy and give your work a recognizable and individual style.
Here is our compact guide to calligraphy:
Learning calligraphy - where to start
How to learn calligraphy? The first step along the way is to get the right equipment, including the best calligraphy pens. Calligraphy with a pointed pen will require you to learn how to use a fountain pen. Including one that is made of a metal tip - a pen, and attached with a special holder.
All such calligraphy basics guides recommend these pens as they have no ink inside and can't do any damage - instead you dip them into a special container while you write and benefit from their flexibility to experiment with different line options. This way, your pen will never corrode or clog, despite the vast amount of different ink you have to use to complete your project.
How to use calligraphy pens? Here are the tools you will need:
- Feathers
- Pen holders
- Paper suitable for fountain pens
- Ink
Feather
For beginners who are learning how to use a calligraphy pen, we recommend the Nikko G-Nib pen. It is relatively rigid and draws nice lines with the desired level of flexibility.
pen holder
There are two types of pen holders: straight and oblique (oblique). The former is best suited for vertical calligraphy styles, while the slanted holders make it easier to combine several different styles.
A high-quality, affordable alternative is the slanted Speedball Oblique Pen Nib Holder, as well as the Tachikawa Comic Pen Nib Holder for Various Pen Nib - Model 25 (a great choice for upright styles as it holds tighter than other similar holders).
There are designers who use the same holder for all calligraphy pens, but we encourage beginners to try a few different options before choosing one holder.
Paper
The roughness of regular paper will prevent you from using it for calligraphy. Among other problems, you will encounter situations where your pen gets caught on paper and leaves annoying ink blobs.
Also, regular printed paper has more fibers and therefore absorbs ink and allows it to spread within the sheet, which is likely to be an obstacle to the smooth and clean lines that calligraphers strive for.
To make calligraphy more effective and enjoyable, buy paper that is suitable for nibs and fountain pens. For example, the popular brand Rhodia, whose paper is very smooth and resistant to ink. Several types of paper are available: blank sheets, in-line or dotted grids.
Ink
There are several types of ink suitable for fountain pens, but beginners should always choose quality black samples. Our choice is Speedball Super Black India as this ink is very dark, water resistant and also reasonably priced.
As with any creative process, calligraphy is best practiced in a pleasant work environment.
A comfortable and well-organized desk where you can place all your supplies and feel positive and relaxed is the best place to practice your calligraphy skills.
Choosing the best place to work
To get the most out of your calligraphy practice, choose a comfortable and relaxing place where you can place your feet comfortably. Organize your supplies well and keep the place uncluttered to provide enough room for your arms to move.
Writing paper should be placed on a special writing board or at least 5-6 sheets. This way you will have a soft surface that will allow you to write more naturally than on a table, and the surface will not allow your paper to fidget.
Instrument preparation
Make sure you have a non-fluffy towel and a cup of water nearby so you can clean your pen. Paper towels are also fine, but be aware that their fibers can catch on the tip and cause annoying blotches.
Your ink should be placed in a wide-mouthed bottle or jar so that you don't touch the sides of it with your pen. And put the bottle where you can't tip it over easily. Basically, your work tools should be within reach, but still at a safe distance. For example, we put them in a roll of tape or even close them to avoid risk.
As mentioned earlier, you must place the pen inside the holder. The easiest way to do this is to take the pen somewhere near its base and then insert the pen inside the holder using its outer ring.
Make sure you don't hold the nib by the nib as this can bend it and deform it. To get it right, find the guide on YouTube and follow the instructions.
Main strokes calligraphy
The structural elements of calligraphy are thick downward strokes and thin upward strokes. Thin upward strokes are easy to draw as you effortlessly hold the pen and move it up.
Thick strokes, on the other hand, require more pressure as the pen moves down. Of course, you must balance and combine both movements to get best change lines.
Before you begin, dip the pen deep into the ink bottle, making sure the breathing hole on the back of the pen is completely closed. Wipe off any excess ink on the side and you can start writing.
Here are the rules you should follow:
Downstrokes come first. Do not press too hard - this will help you observe the change in line thickness. This way you will also protect your pen.
Experiment with different loops and combine thinner upstrokes and thicker downstrokes. Loops of continuous lines will help you connect them and come up with the perfect combination.
Continue with thick downward strokes and slowly release the pen as you move towards the bottom.
Reorder. Draw downward strokes so that it looks like they are pouring down.
Continue with ovals. Apply strong pressure on the left side and lighter pressure on the right side.
It often happens that a new pen draws two parallel lines instead of one, or " railways”, as they are called by experienced calligraphers. The reason is that you either applied too much pressure to the pen or there is not enough ink left.
Equipment and stroke tips for professionals
For those of you who are confident that you are starting to write professionally, we have prepared some embellishments to add to your beautiful lettering.
Variable letters
An easy way to give your writing an experienced look is to change the slope. You can easily change the width of the strokes and the length of their connections. Start by changing letter spacing and give the baseline a slanted, stepped, or curved look.
Changes like this will help change the feel of your letter, as well as the message it conveys. Is it formal, dynamic or eccentric? Think about it!
You can also change the way the letters are formed, make them a little thinner, rounder, or even connect them differently. Do this a few times and you will surely come up with a completely new design.
Curls and decoration
You are studying calligraphy so you need to make some squiggles. Squiggles can be added to your text like swirls and loops to make it more beautiful and eye-catching. For example, you can cross heavy lines with lighter ones to show that you care about the visual balance of the text.
Another option is to embellish the calligraphy with special designs to match your words, or use banners to highlight important lines. The more complex your design, the smarter it will be to start drawing in pencil and testing it.
Traditional calligraphy
Spencerian and Copperplate are excellent examples of traditional calligraphic handwriting. There aren't many font options based on them right now, but their classic elegance is undeniable. Special projects may require you to become familiar with them, and this is also useful as a practice.
Perfect Feathers
Your ideal pen should be sharp, flexible and responsive. In this way, you can draw thinner lines and enrich them with an effective and elegant finish. For sensitive projects, we recommend three excellent pens in particular:
- Speedball no. 101
- Brause 361 Steno Blue Pumpkin
- Brause 66 Extra Fine Arrow
None of these pens will be easy to use, but the effort is worth it.
Useful Tricks
You've just started monetizing your calligraphy skills, but something still looks completely wrong. You may be having trouble using the pen, in which case you may find the following tips helpful:
If you have problems with strokes:
- Instead of doing it like everyone else, try faux calligraphy and see how the strokes look and feel. Write neatly and fill in the gaps. This way you will simulate perfect lines and see what you actually have to do.
- Practice on the printable sheets until you can make the letters perfectly shaped. It's not hard to find samples of basic strokes and uppercase letters online.
- Start with the lighter ones pencil drawings and trace them slowly with the pen. Once the ink is dry, erase any traces of the pencil.
- Large letters make it easier to see critical errors.
If your letters have a casual slope:
- Use the incline guidelines while exercising. Draw one of your own using a protractor, or even use plain paper. Put the sample page under the sheet - this will facilitate the process.
- Rotate the paper to create the correct slant. You will immediately see which position is best for you.
- To avoid paper rotation, replace the current pen holder with a tilted one.
If your hand is unsteady or tired:
- Use workout strokes to warm up
- Hold your pen loose and shake your hand
- As you write, move your whole arm, not just your wrist.
- Spend more time exercising. Get more exercise even when you're just using your phone. This will help make hand movements smooth and natural.
If the ink just won't stay on the pen
- Some of the new nibs have a very thin oil layer that may not match your ink. To prevent a serious problem, wipe it down with alcohol (or a soft toothbrush and paste) or simply run it through a flame.
- The problem could also be that the pen has dried ink that is interrupting its flow. In this case, take a pen cleaner and clean it.
- Keep in mind that a regularly used pen requires periodic cleaning and maintenance. To properly clean it, take it out of its holder, brush it gently and let it dry before using it again.
If your work may require some updating:
- Change feathers and try some new ones.
- Change ink. You will be able to find many types of ink suitable for calligraphy, but fountain pens can usually handle any liquid that can leave marks when applied to paper. Some designers even prefer to use non-traditional methods and make their drawings with watercolors, coffee or berry juice.
Choose a style
Unlike calligraphers of the past, designers today can choose any style they like, or even master multiple styles professionally to complete a variety of projects. As discussed earlier, knowing several styles of calligraphy is useful for showcasing a writer's personality, conveying an important message, or simply complementing a formal occasion. Here are some popular ideas to inspire you:
Combining Styles
Just because the tone is classic and vintage doesn't mean the font won't look modern. Combining these styles will impress everyone who sees your work, from your friends to the Queen of England!
Elegant calligraphy
Writing can be fun and challenging at the same time, and elegant calligraphy is proof of that. Mixing classic lettering with energetic swirls is the best choice you should use in wedding invitation design and other special occasions.
romantic and artistic
Has it ever happened to you that a particular thin font reminds you of romance?
These lace letterings have beautiful swirls with a steep slope that are suitable for exquisite caps and invitations that will grab the attention of your guests.
eccentric
Whimsical lettering seems light and relaxed, and usually inspires us to think about fairy tales and escapism. It's because of their fluid baseline and dynamic angles that this font style sets our mood like a well-written poem makes us dream of adventure.
fun font
No matter your age, you are always drawn to pretty invitations, a trick that designers often use. The perfect font for invitations like this is a cheerful one done with playful baselines and rounded letters to set a good tone for the times.
Important data about calligraphy
- Calligraphy is not mastered overnight. You should practice as often as possible and often.
- It will take no more than two hours and several attempts to understand whether you can really practice calligraphy.
- If you're not 100% focused, it won't work. And that's the end of the story.
- Calligraphy is not only about how you write, but also about what you write. That's why you should always write "real" words and convey a meaningful message.
- You must study continuously. By doing this you will discover huge world that will captivate you and make you search for more. This entertaining process is simply unparalleled.
- The difference is in quality, so make sure you buy high quality materials and accessories.
- Calligraphers are usually friendly people and amazing conversationalists. As such, they are your best source of information and inspiration, and you should start looking for a mentor immediately.
Top five calligraphy options
Next, we will outline the most important basic principles of calligraphy, divided into five different approaches, line sets and letterforms. This section will also help you learn about the various tools and techniques that can be used for your projects, and we encourage you to try them all.
Twin pencils
Dual pencils are simple and very useful for those who draw calligraphic letters. They can also be used to create large and attractive lettering for posters, banners and similar promotional materials.
You need a pair of well-sharpened pencils and two rubber bands. First, scrape off part of the side of the pencils so that they fit snugly together.
Leave them together in a vertical, downward position and make sure their tips are at the same level when they touch the paper. For this purpose, you can secure them with tape or rubber bands at both ends.
Then take a double pencil and hold it in the normal drawing position. Ideally, it should be directed at an angle of about 45 degrees.
While both pencils are being placed on the paper, press lightly on them and move them forward and to the left. The distance between their points is what forms the so-called "invisible feather".
When you move your hand, you will be drawing a double line, and if you choose to make circles pointing in the same direction, your double pencil will create unique thin and thick ribbons with unparalleled accuracy.
If you don't feel comfortable with pen angles, think carefully about all movements and directions.
This process will require three different skills: working with the angle of the pen; direction of movement of the hand; and proper pressure on the paper.
Markers
These pens are more than comfortable, very bright and, most importantly, much cheaper than all similar tools.
There are downsides, of course, and the ink on these pens tends to fade over time, or maybe they look too heavy and can be easily damaged with the slightest amount of pressure. That's why these pens are a great training tool, but not the best alternative for important projects.
To choose a marker for yourself, take a pen and a sheet of paper. To get started, take two markers: 3-5 mm and 1.5-2 mm. Start with a wider
You don't have to worry about paper either: markers work well on printer paper, parchment (not the best option for beginners), or similar materials.
The pressure should be light and even, as many calligraphers in training make the mistake of pressing too hard. This will not improve the performance of the marker, but will only spoil it. On the other hand, keeping in contact with the paper will bring much better results.
Only touch the paper with one corner of the nib, then try the other to see how your writing will look.
Place the full-width nib on the page, and then slowly rock it: do you feel that one of the corners is not touching the paper, while the other is still on it? It's almost like magic!
This time, fit the full width of the tip onto the page, making sure both corners touch it appropriately. Remember that this is the ideal contact for writing, and if you push harder, any corner of the tip will come off the paper.
Pen angle and pressure are two different points, and the pen should point to the left and forward by about 5 degrees. While doing this, the hand should be moved to draw weak and beautiful ribbons.
For sharper lines, consider buying a better quality marker, but you should only consider this once you feel confident about practicing calligraphy professionally.
The best set at the best price that we recommend is the Sharpie Calligraphic, which contains 12 nibs in different colors and sizes; and Staedtler Duo - a set of 2 high-quality markers. An excellent set that doesn't smudge or bleed is called the Calligraphy Pen Set and comes with four lightfast inks in primary colors.
As previously discussed, there is no point in buying special paper for calligraphy while you're learning, as printer paper is cheaper and works for our purposes.
However, if persistent ink stains annoy you, you may want to consider purchasing Ampad office notebooks or thick paper for drawing, such as used in the UK, but be aware that it will cost a little more.
Calligraphy with refillable and cartridge pens
You will need: pen, separate ink supply (refill bottle or included cartridge).
Refillable fountain pens and fountain pens with cartridges work in the following way A: Each pen has a large reservoir filled with more liquid ink, and this ink will flow through the baffles of the body, controlled by an internal mechanism. This way, the ink will go right into the pen block and be easily applied to the page.
With a similar pen, you will also get several nibs of different sizes and wide selection cartridges for use with the main body of the pen.
The biggest advantage of using refillable and cartridge pens is that they are easy to work on horizontal surfaces due to their advanced mechanical ink flow control mechanism.
Unlike fountain pens, which need to be dipped in ink, these pens won't run out of ink in the middle of a word and are definitely a much safer option for clumsy beginners.
Cartridge inks are thinner so they don't dry out and clog the insides of your pen. It also gives them a lovely subtle look when applied to paper.
The nib itself is also quite stiff, given that its mechanisms must be screwed into the body. This means cartridge ink, combined with a flexible and responsive nib, can truly transform your entire calligraphy experience.
Just like fountain pens, cartridge refill pens leak spectacularly.
This does not change the fact that ink left inside a pen over time can dry out and clog, making it necessary to maintain it properly. You will need to wash the pen thoroughly, but you will never be able to remove all the ink stuck in its reservoir.
Refillable and cartridge pens are considered the most convenient by calligraphers and are also featured on many popular websites. For this reason, beginners are strongly encouraged to use them.
Fountain pens and goose pens
There are many different types of pens, but there are a few basic principles that apply to all fountain pens. For example, all fountain pens consist of the following elements:
- Pen holders- The holder is the area the writer will be squeezing while working, and as such, it should be comfortable and soft to the hand. More often than not, holders have internal metal fittings at both ends of the nib so that you can safely move them around.
- Feathers are the metal ends of the handle that have two separate parts and an elongated "tongue" that holds them together. Their nib is square cut to make full contact with the paper and is usually flexible enough to allow the ink to spread smoothly and evenly over the surface.
- tanks are sometimes found inside the structure of your pen and look like little sloping bowls on the side used to supply ink to the slit. Some of them look like separate metal cups that you have to attach to the pen before you can use them, including those located on the top and bottom of the pen. The main function of the reservoirs is to collect some ink and keep it at the top of the slot so you can write at least a few words before refilling it with ink again.
The reservoirs will not always be inside the pen, which allows you to buy each of the three elements separately, namely to mix and match them together. The options are endless and cannot be combined in one guide, but the experience of popular calligraphers can help you make the right decision.
As a beginner, you may also want to save time and effort, and therefore consider purchasing a pre-assembled calligraphy kit. In most cases, you will be given 4-6 different nibs with holders and reservoirs, and they will cost less than if you bought them separately. Once again we recommend the Speedball Calligraphy Kit, where you will find a holder and even 6 different nibs.
The ink may not be included in your kit, so start looking for the right ink.
The Best Types of Ink for Fountain Pens
The best results are achieved with matte and thick inks such as Chinese, India, or even gouache paints that you have thinned to achieve the desired consistency.
For faint strokes, you may want to consider the watery ink typical of fountain pens.
Instead, you can take a medium-sized brush suitable for watercolors and then refill the reservoir at the top of the pen slot.
Calligraphy on inclined surfaces
With a fountain pen, it will be easier for you to write on sloping surfaces than on a regular desk. Including on easels and a board located on your lap and supported by the edges of the table. Calligraphy takes a lot of time, so make sure you're comfortable.
- First of all, choose a stable writing surface that won't slip.
- Adjust your seating position and make sure you are comfortable and relaxed.
- If possible, fix the surface of the paper on a sloping surface (you can use office clay (Blu Tack) and electrical tape).
If you are using a quill or fountain pen:
- Keep the ink/paint open and place it next to the hand you are not writing.
- Choose a good "parking spot" to safely dip your pen and avoid splashing ink on other surfaces. You can take a small saucer that will hold your tools while you have a break or if you have a phone call.
Please note: Dipping a pen into an open ink bottle will cause ink to get on the holder and end up getting your fingers dirty as you work.
How to refill the pen:
- Take the pen in your hand and hold it in a horizontal position
- Lower the refill pipette or brush so that you can only take a few drops.
- Keep the pen horizontal when drawing ink into the reservoir.
- Replace the saucer and place the pipette/brush on the saucer and leave the pen in a horizontal position. Otherwise, you may have to scrape ink stains from your knees.
- Take a sheet of recycled paper and check how the ink flows on each side of the slanted board. Only then will you be able to perform basic tasks.
Your choice of ink, nibs, and writing surface will determine how often you need to refill your tank. At best, you'll do this after a few words rather than a few letters, but that can also depend on the speed at which you're working.
The same rules apply when you use a quill pen. Unlike steel nibs, quills are more flexible and wear out faster, especially when you use them on cheap, stiff paper.
A non-professional can tear paper with a quill pen and a fountain pen.
If you're not sure you know what you're doing, we encourage you to look for similar calligraphy techniques that require less effort to learn.
Calligraphy with sponges and flat brushes
Here comes the dirtiest (cause you're more likely to get your hands dirty) approach to calligraphy that we prepared in this guide:
The thinner the sides of the brush, the better results you will achieve. Recommended width is 6 to 20mm, preferably with a stiffer texture (like sable and nylon instead of bristles). Flat brushes are long and short, the latter are considered the best option, which retains control of the line by keeping them short and tight.
You can take an ordinary cleaning sponge and cut it into cubes and then turn it into the most amazing calligraphy tool. When using, remember to protect your hands from ink with rubber gloves.
There are several important differences between writing calligraphy with a pen and a flat brush.
The brush, for example, is very flexible and soft, and will respond to more pressure to create thicker lines, which is not what traditional nibs actually do. Another feature of brushes is that they tend to run out of ink fairly quickly and occasionally create a modern texture and a unique, rough look.
The best way to use brushes is on an inclined surface (about 30 degrees). However, horizontal surfaces also work well.
However, you must control the pressure you apply, as any change can affect the clarity of your lines and cause the ink to bleed down the page. But of course you can do it on purpose (looks absolutely amazing!).
Other interesting effect Sponges is that when working with ink, they create mottled (non-uniform) effects, similar to lines drawn with a brush, and create interesting contrasts and fading lines that look very attractive.
Ideally you should use a thick and matte ink like India, very watery poster paint, or diluted gouache paints for your sponges and brushes. Liquid and watery ink will not stay on the sponge for long, and thus your letters will look sloppy and uneven.
The biggest advantage of using sponges and large brushes is that they leave enough space and wet ink on the line of the letter so that you can add additional colors, blend them in an interesting way or just let them drain.
When mixing several colors in one letter, take a small amount - any bright color (white is also fine) and draw the base of the letter's shape. Then place it on a horizontal surface and pour in a few drops of darker and more contrasting colors. Do not move it until it is completely dry, unless you originally intended to mix paints and achieve a unique color.
Mastering faux calligraphy
Faux calligraphy is essentially modern calligraphy created with a standard pen (gel, ballpoint, etc.). For many designers, standard pens help to become fully familiar with calligraphy, and there are two important reasons for this:
The point is that standard pens do not intimidate the beginner and are often more flexible and more accessible than fountain pens. After all, these are the tools you've been using for as long as you can remember, and you already have enough muscle memory to work with and create beautiful calligraphy.
However, faux calligraphy is not just for beginners. Regardless of your skill level, you may find it useful for your important projects.
Building your own set of calligraphy fountain pens
Here's what you'll need:
- Pair of nibs by Nikko G - At the beginning of this post, you had the opportunity to learn more about the quality of these nibs, often referred to as the best option for beginners.
- Straight handle. A good choice- pen from Manuscript pen, as it has a universal pen insert. We also recommend General cork holders for their flexibility and ease of use.
- 32# Laser jet paper - Or just take printer paper. This is an economical solution that still prevents ink bleed.
- Screw cap bottles and Sumi ink (India ink also works well). Both brands of ink are matte and will provide the desired viscosity.
- Water - To clean your pen from time to time, you will need a cup of water.
- Non fibrous towels and fabrics. You can also use paper towels, but you have to be careful not to let the quill get caught in the fibers.
Rather than buying expensive, overpriced calligraphy kits for beginners, we recommend that you build your own and only choose tools that are beginner-friendly, affordable, and actually useful to you.
Feather cleaning
When buying, all feathers come in factory oil, as this oil helps them maintain their presentation and prevents them from spoiling. At the same time, it is almost impossible to have oil and ink on the pen at the same time, so clean the pen thoroughly before you start using it.
After you're done, you'll see the ink flow down the pen smoothly and not leave a blotch on the paper, as it would with oil on it.
Fountain pen assembly
Most beginners choose plastic Speedball pens because of their Nikko G nibs, but there's nothing wrong with using universal pen holders.
These holders have a rim and 5 metal petals, which allows you to use many nibs of different sizes and types.
How to hold a pen
Holding a fountain pen is no different than holding a standard pen. This means that you still have to use thumb and forefinger by squeezing the holder and place your middle finger behind the handle for extra support. As you draw, use your ring finger and little finger to draw faint lines.
Dipping a pen in an inkwell
It doesn't matter which pen you use - the quality of your writing will still depend on how deep you dip it.
In technical terms, this means that you dip the pen just above the vent (center) so as not to put too much ink on the pen and let it drip while you write.
You should also shake the pen vigorously over a cup of water to make sure that any excess ink has fallen off.
You are ready to go!
The main difference between ordinary ballpoint pens and fountain pens is the angle of inclination: modern calligraphers must take care to maintain the angle of the pen in relation to the paper.
You should never hold your pen vertically, but write at a 45 degree angle between pen and paper.
Also, don't hold it too vertical, as the nib can catch on the fibers of the paper and affect how the ink flows.
Calligraphy in Greek means "beautiful handwriting" and is one of the industries visual arts. The selection contains 15 beautiful works of different masters of calligraphy.

At a time when book printing did not yet exist, mainly thanks to calligraphy, the organization of text signs and the graphic design of books was done. Calligraphy can be practiced on various surfaces (papyrus, paper, silk, parchment) and different tools (brush, bird feather and metal).

Time passed, and with it the style of calligraphic art changed. As typography, typing and typing spread, calligraphy became increasingly rare and is now perceived as an aesthetic phenomenon.

First of all, calligraphy developed in the countries of ideographic writing (Japan, China, Korea are among them) and in the countries of Islam. In Asia, brushes and ink are commonly used to write Chinese characters.


AT modern world calligraphy is used from everyday handwritten inscriptions on postcards to high art. Classical calligraphy is very different with non-standard handwriting and type work. Beautiful and unusual letters are always born at the moment of writing.

Calligraphy in the modern world can be found on wedding and invitation cards, handwritten logos, graffiti, graphic design, typefaces, historical documents, and religious art.

The very first versions of calligraphic writing were embossed on stone and squeezed out in clay, and only after a long period of time did pen written characters appear. The very first feathers were reed feathers, and in the 18th century a steel feather appeared.